Monday, February 11, 2008

Make Wonderful Quick and Easy Scrapbook Layouts

Quick and easy! Sometimes that is just what we need or maybe even want, our scrapbook pages to be! Got "scrappers block"? All it takes is a few quick and easy scrapbook layouts and you're back in business! Got a "backlog" of photographs waiting for their place in your albums? Do some quick and easy layouts and get caught up and still have wonderful layouts in your memory album.

Scrapbook layouts do NOT have to be elaborate, extremely ornate, completely filling the page or use a lot of embellishments. Simple is sometimes the best embellishment you can use!
Wild Safari

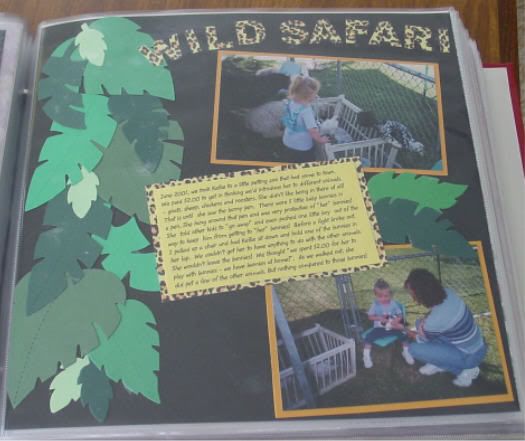
In this layout I took my grand daughter to the little petting zoo at a local street festival. It was her first petting zoo experience. But since I was doing it from my point of view for her album, I just used computer journaling and typed out what I saw her do or act. How she liked the bunnies best and wanted to take one home. How she wasn't scared of any of the animals until they came to her first instead of her going to them. I used yellow cardstock for the journaling and a matching hue to matte the photo and then double matted onto a leopard fur theme print paper. I used the same print paper to punch out the letters for the title. Using different hues of the same color is a great (and easy!) way to create quick and easy layouts, that still capture those wonderful memories.

The only other embellishment or decoration was some die cut leaves. I had been to the local scrapbook store and they allowed a customer to use their die cut machines for paper purchased at their store. So I "stocked up" on leaves, thinking it would be a very common design that I'd want to use often. All I did was assemble leaves in different hues of green in a manner to resemble tree branches hanging down like they would in the jungle. The part of this layout that took the longest was typing the journaling! The rest was done in about 15 minutes! But this is one of my grand daughters favorite "memories" even though she doesn't remember it! She loves animals and just loves knowing that she was petting bunnies when she was a "little baby girl". That in itself creates an extra added memory for this scrapbook layout page!

The Zoo
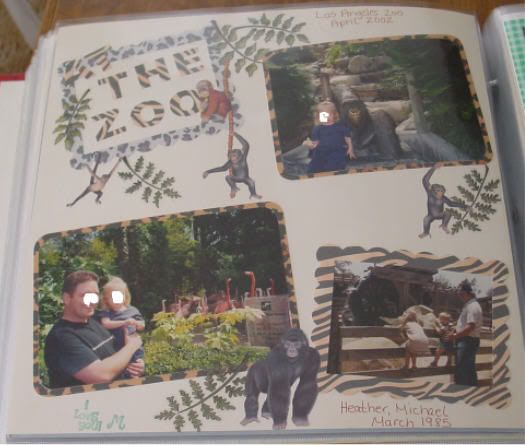
I was not on this trip to the zoo with my granddaughter, but I wanted her to have the memory even though she doesn't remember being there this time. So journaling wasn't something that I could do on this layout. I just titled and dated. I used animal fur theme print paper for the matting of the photos, title card and the punched out letters. I added a few leaf and animal stickers and was done! I spent about 15 minutes on this layout.

One Item on This Layout Generates Additional Memories
Something special I add to this layout was a photo of her mom with her dad at a zoo when mom was a little girl. This creates a wonderful embellishment of a memory for mother and daughter. Daughter sees mom did same things she is doing! Plus, all those photos from the past that I didn't use in a scrapbook layout in another album - uses up the "extras" while adding another memory. Plus, I only had the 2 photographs of my grand daughter's day at the zoo, and needed something for that lower corner. I could have created a sticker scene or some other generally related embellishment, but this photo "from the past", was just the right touch to complete the layout while adding an additional memory to the page!

So, see? Quick and easy doesn't have to be frowned upon! A scrapbook layout can be created in a few minutes, using no more than one or two simple supply items and still hold an enormous amount of memories!

Friday, December 14, 2007

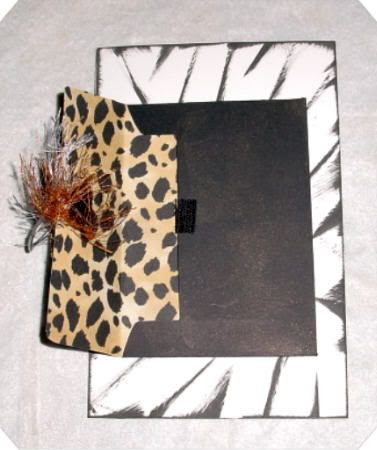
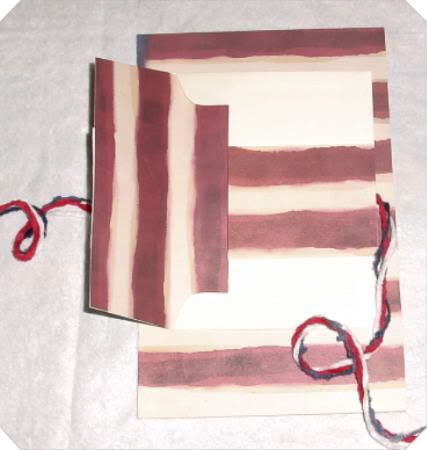
Make Your Own Envelope


1. Find any envelope you want to use for the size. Small, long, square, whatever. Even little package name tags size are fun to work with and have on the page

2. Turn it over to the back. Look to see "how" it is constructed. Usually there is one large flap "glued" over the top of 2 side flaps

3. Starting at the top, gently start "tearing" or peeling the large front flap away from the smaller flaps on the sides. Tear slowly and gently but if it isn't perfectly torn or there are gaps, it won't matter - that is fixable. Just try as slowly and gently as possible to pull the flaps apart to make it easier on yourself!

4. Once apart open it up and now you have your pattern!

5. Open the envelope pattern you just created. flatten it out. Place it on the paper you want to make into an envelope. Sometimes a tiny bit of glue stick in the middle is a good thing to do so that it stays in place. Just make sure you put the glue where the glue residue WON'T show once the envelope is done. Trace around the pattern. Remove the pattern from the paper.

6. Now to make the fold lines: Using the "real" envelope for a guide, take your ruler and line up from side to side, where the folds should be. You will only have 4 fold lines, 2 vertically and 2 horizonaly. Draw a line for each fold. At this point you just make the fold on each line you have drawn.

7. Fold the 2 side flaps in and then fold the lower portion UP, then fold you top flap DOWN. Use your ruler or bone folder to flatten the creases. Now your envelope is created! Apply adhesive ( I use glue sticks) on the side flaps. Fold the bottom flap up and press for the glue to stick. The top flap just folds down.

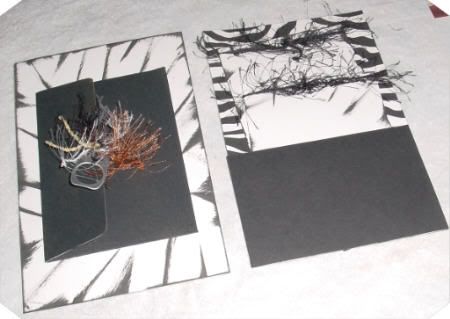
To add extra embellishment: I always cover the inside of the envelope that is visable, like this


Take the envy you just made and lay it on a contrasting piece of paper. Place it open side up so you can see where to end it. Make the contrasting paper go just below the bottom flap's edge, just to make sure there is no gap showing and when you open the envy all you see is the contrasting paper.

Trace the outline of the envy - basically just the top half of the envy is what you will be tracing. Cut this piece out, and do a bit of wigglying and a small trim of the edges that go inside the envy so that it matches the closing flap. Hard to explain, but as you do this, you will see what I am talking about. Then just glue it down!

Make sure you have glue where the fold line are, and make sure you flatten this very well - use your ruler or a bone folder to smooth it out. This makes sure that there is no "bubble" of the paper in that area.

And you are done!!


Thursday, December 06, 2007

Like To Chat? My Lot is the place for yoU!

Do you enjoy chatting? Well, now a days it is called Social Networking and it is stil so much fun to chat with others about literally anything you can think of or like to talk about! Come join My Lot and be a part of the gang!

http://www.mylot.com/?ref=coffeebreak

Nice chatting with you!


myLot User Profile

Saturday, October 27, 2007

Baby Memory Scrapbook

Here is something I thought I'd share. It is a great way to get started scrapbooking, a great baby shower gift, a great way to go back in time and try to get caught up! A baby memory scrapbook - amazing and I can just feel those wonderful memories of your little ones emerging within your heart - start one todaY!

Sunday, October 14, 2007

Unusual SCRAPBOOK Embellishments from Around the House

Look around! Scrapbook embellishments and creations are often seen but not used! Find them! Use them! Embellishments for your scrapbook layouts and pages are a fun way to scrap and add alot of dimension to the layout. But you dont' have to spend alot of money for something unusual. Look in your junk drawer!

Just because it was not purchased in the scrapbook department, doesn't mean it can't end up on your scrapbook layout!! Pull out your imagination and see what one of a kind scrapping creations you can create to make your scrapbook layout and page spreads the most unique and talked about layouts in town - - - or at least in the generations to come! Just seeing what you used as in your scrapbooks and albums will create a new memory of you for those looking at your albums.

Look around the house! The craft room, sewing room, kitchen orthe work bench in the garage are all great places for finding things to use. We've all used the usual, ribbons, trims, buttons, snaps, and other "sewing" related items. Beads and jewlery makings and the like. Even clay!

BUT.......WAIT......DON'T STOP THERE!!!!

Here is a list of items I have recently heard of being used. I have not used all of them all, but some I have and it is pretty cool to create with these things.

But I would also like to hear from you guys about unusual things that you have used as emellishments in your scrapbook layouts. Especially the items that didn't cost anything, that are found around the house and such. Share your ideas as a comment here so we can all get that "Oh, cool! I never thought of that before" feeling that will throw us into scrapping mode immediately!!

Rings from soda cans (we used to call them "pop tops" as back in the old days, the ring used to pull all the way off. Now, they just fold up inside!) Anyway, these little gems make great embellishments. i have used them for a clasp on an envelope. Use them for an embellishment on a tag. As the "loop" part of a tie effect.

The square, plastic bread clips - the ones that keep the bread bag closed - these come in a variety of colors. Just add a sticker, add some glitter. Add a 3-D flower embellishment. Then you just clip it on the edge of something, or if you have a tag, clip it on to the hanging strings. Hang it from a ribbon

Party favors or cake decorations. Depending on the thickness of the item, often these items can be used in a scrapbook layout. At my daughter's baby shower, there were little ring kind of things on the cake, I used those in the layout. My DIL's baby shower there was plastic confetti decorations - little horses, bottles, pacifier, I grabbed a couple handfulls at clean up time, and added those to a shaker box in a layout. Also, they can just be glued on! I used the napkins and party hats - cut out the theme of the party and used them as die cuts.

Aluminum foil - heavy duty kind. Just crinkle it up as you want and rub ink over the crinkles to add dimension and color! Makes a great frame for a masculine scrapbook layout!

Old credit cards - yes OLD ones!! Ones that are no longer valid! Put them on a shopping theme layout. A great embellishment for a "money learning" theme for teenagers. How about an expired AAA card for a "first driving" theme or a "just got my drivers license" theme? These are all layouts that are common in scrapbooks so an expired card is a great embellishment

Washers, thin nuts, small chains, old keys, paper clips, and other "hardware" items are great embellishments! And you didn't have to go to the scrapbook store to get them!

Look around and see what you can find and then share with the rest of us! I am anxious to hear and learn some new ideas!

Thursday, October 11, 2007

Halloween Paper Piecing Patterns and Stickers!

Kid Printables.com is a fantastic place to play around in! Everything is free and there are so many things to do and use...the sky is the limit!

Need some Halloween paper piecing patterns?

Print these out on cardstock and cut them out, add your own detailing and presto! Paper piecing!

Cat, Hat and Bat
Arched Cat
Witch
Ghost trick or treating
Witch's face
Monster faces
Haunted House
Need some stickers?

Print these out on cardstock, run them through a Xyron and presto! Stickers!

If you don't have a Xyron, just use your glue stick!

Or...Print them out on photo paper - this will give them the glossy finish on the front and add a little extra character!

Stickers

Saturday, October 06, 2007

Make Your Recipe Bookfor FREE - Digital Scrapbooking

Back when WordPerfect was the "only" word processing tool out there, I typed up all my family recipes, including personal comments about the recipe or a story the recipe created. I just used colored typing paper cut in half and a regular font and then used Italic font for the story behind the recipe and put that at the bottom. Only other thing I did was make "chapter" dividers out of the cards the kids had given me over the years..which was really nice. I still love looking at those! And then I used the colored papers for the different chapters. That's it...done and has been used for years. Nice that at least all the recipes are in my book, but not very pretty, fun or amazing.

As a scrapbooker, I have been wanting to make a scrapbook recipe book of these same recipes. Why haven't I? LACK OF TIME!!! That major pain in the neck that we all get! Just not enough to go around!

HOWEVER... I have just been saved. I stumbled across this program and am working on my pages! I am new to Digital Scrapbooking, but this is quick, easy and amazing! Part of my problem is the unlimited options scrapbooking offers. I don't know how to "tone it down". Well, Smilebox has shown me how and I am a beliver!

Smilebox

This program is free to use and recipe books are not the only option. Digital scrapbooking is apparently the up and coming thing in this computer age, so maybe I can learn something new! Well, probably not. I LOVE my hand made pages and so do my kids and I love making and creating them so I think I'll just do my recipe book digitally and the scrapbook by hand. I taught my 7 year old grand daughter how to scrap and she has gotten a life-long membership!

So I start my recipe book and this is great too as I can make multiple copies - one for me, one for each of my grand daughters and one for my daughter - who doesn't cook or bake, but I'd like for her to have it anyway!

Give it a try and see what you think! Memories are in more than photos. You kids will love making Mom's best potatoe salad or "those cookies Mom used to bake" in years to come!

Tuesday, September 11, 2007

Need FREE Scrapbook embellishments?

Scrapbook For Box Tops is a site I started to help my grand daughter (now second grade) collect Box Tops 4 Education labels as her school fund raiser. We have had a GREAT response from so many fellow scrappers. We are glad to help you as you help us! I hope that we can keep it going!
You collect and send us BOX TOPS 4 EDUCATION labels from participating products (that you buy anyway!) and we swap for free scrapbook embellishments!

Check it out at Scrapbook For Box Tops and see what it's all about. FREE SCRAPBOOK supplies - can't get much better than that!

And remember with all the holiday baking and cooking and lots of kids lunch products you will be needing, make sure you save that Box Top label and swap them for free scrapbook supplies!