Showing posts with label Embellishments. Show all posts

Saturday, May 01, 2010

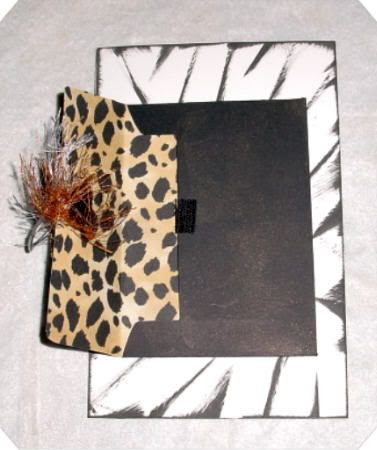
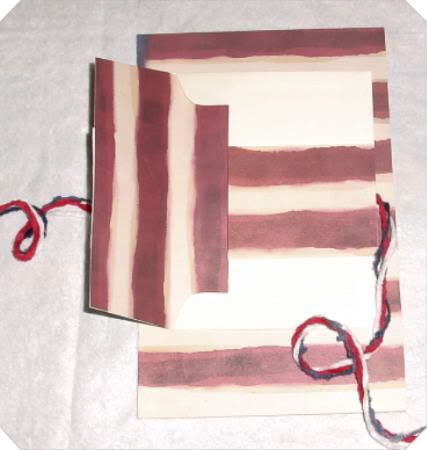
Free Envelope Pattern 2"x3"

I love envelopes! They are the best way to be able to add MANY photos to a single layout! And there is so much you can do with a single envelope! You can make envelopes any size you want. Adhere them on the background page any way you want. Make so many beautiful and amazing closures for the envelopes. And the list goes on.

Sometimes you have a lot of photos you'd like on a layout but can't possibly put them on on mattes and on the background page - Envelopes make it possible to put many photos on a single layout. Just make the size of envy you want and cut your photos that same size and BINGO! Slide the photos in the envelope and you got a fantastic layout with LOTS of photos!

Cut multiple sheets of cardstock the same size as the envelope and use them for journaling. You can say alot in one envelope!

Have some memorabilia or other little items you want on the layout but no way to adhere them to the background page? Slide them into an envelope!

Envelopes make for a fun, interactive feature to a scrapbook layout - it is fun and intriguing to "untie" the closure to see what's inside the envelope!

Use vellum, or cardstock, solid or pattern. Anything works! The possiblities are endless! And envelopes are so easy to make and you can make them to match any theme or style of scrapbook layout.

I found this pattern for a 2x3" envelope in my huge stock of scrapbooking supplies and things and thought I'd share it.
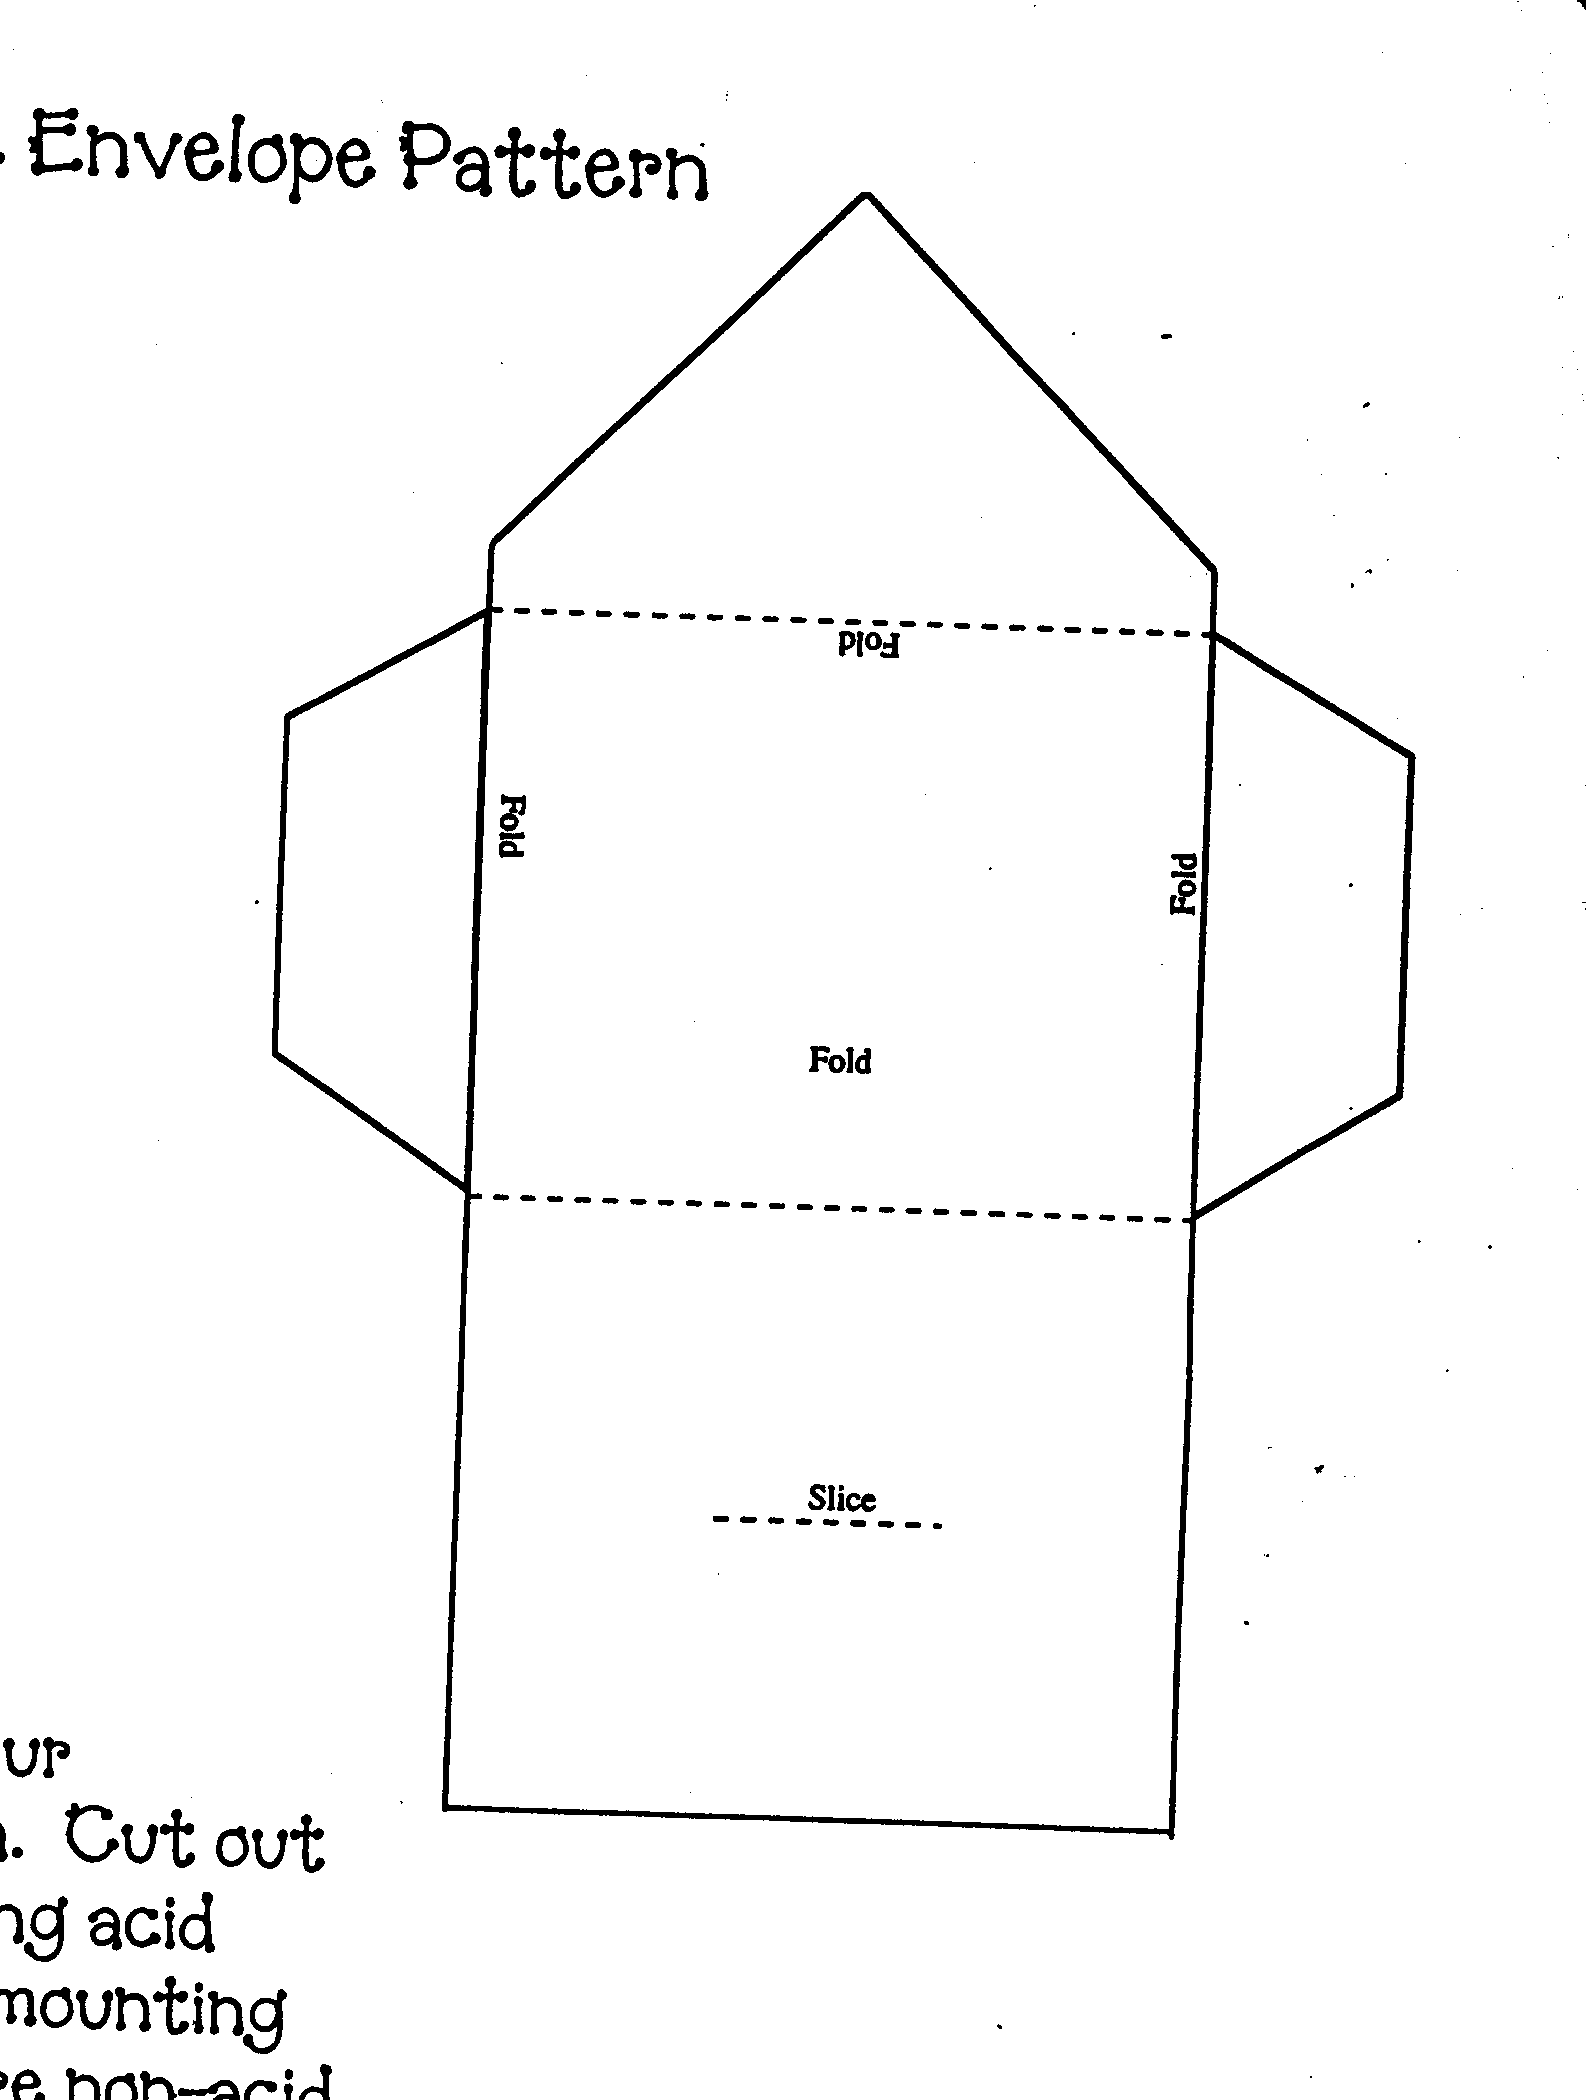


Also, if you look at this article, it has other options for creating and using envelopes. I have created all these myself. I love creating the closure - there is just so much you can do and so many ways to make the flap close to accomodate the layout! How To Make An Envelope

Click on the image above and it will take you to another page where you can save and print it. I tried to make it the size you could just copy onto an 8x10 sheet of paper and get actual 2x3" size of envelope, but couldn't figure out how to do that so you can just print it out as is and then make a copy and use the ENLARGE feature on the machine - or if you know how to enlarge it on your computer photo editing program, you could do it that way. This is not my original pattern. I know who is the the creator of the pattern, but I thank whoever did it!

Monday, May 25, 2009

How To Find Scrapbook Supplies at a Yard Sale

Scrapbooking is a huge and quickly growing cottage industry craft. I have been involved with scrapbooking for 10 years. It is amazing how it has changed. From simple to ornate, from flat to bulky. "Anything goes" in scrapbooking it seems. Acid free is a concern, but even with that issue, the embellishments and supplies currently on market are addressing that so you don't have to! New supplies come out every month, if not every week. I go to craft stores in my area and just browse the scrapbook isles and every time I go, there are new features, new items, new embellishments. Seems it is never ending. And that is great.

Scrapbooking is a fantastic craft, and in my opinion, the best way to preserve memories for generations. As usual though, expense is always an issue. Although I do admit scrapbook supplies have gotten a lot more reasonable in price today than they were 5-10 years ago, sometimes they are still to expensive and if you don't have the income to accomodate, well, the scrapper you are makes you look elsewhere so that you can still preserve your memories for generations to come and satisfy your craft bug!
So where can you find affordable scrapbooking supplies? Well, you can always shop store sales and use coupons. I have found that to be a great way to get the more expensive stuff. Coupons can also work for the less expensive items too, but sometimes they just don't have what you want. So since scrapbooking is a craft, use your crafty mind and think about how else you can conquer expense to save your memories.
Where can you find really good things at a really low price? Yard sales! Yes, that's right, yard sales...or garage sale, estate sales or rummage sales. These ales are a treasure trove for craft supplies! "One man's junk is another man's teasure" - really speaks loudly for the crafter.
What to Look for To Find Scrapbook Supplies
Clothing: One of the most popular items at any yard sale is out-grown clothing. Especially baby clothes. Those little tikes out grow the clothes faster than they wear them out which means the clothing is still in great condition. Look at the buttons. Cute little, whimsical, pastel buttons. Buttons are a great scrapbook
embellishment. Cut them off the clothing item and glue them on with glue or pop-dots - great for the "bulky" look. Also look at the pattern in the fabric and cut that pattern out - if there are little trains or ducks in the fabric pattern, cut them out and run them through a Xyron machine to put adhesive on the back and they secure neatly to the background paper! Makes the perfect fabric die cut! You can do this with any fabric pattern.
Older childrens clothing also has some finds. Jeans have those copper, western looking buttons - great for a masculine, outdoor-zy or western theme layout. Or even cut the pocket off a pair of denim jeans and use the pocket as a pocket on your layout! Look at clothes that have name brands displayed on the front - great if you have a favorite brand you want to remember. Just cut the brand name off the article of clothing and use it as a die cut. Sometimes it is a saying like "I Love Roxy". Although a clothes brand, my grand daughters dog is named Roxy so I can cut that out of the shirt, run it through my Xyron and have a fantastic title for a layout about her and her dog! Look at collars - cute fringes or lacey collars- would make a great "border" to a photo. Appliques are also a fantastic addition to a scrapbook layout.

Other craft supplies: When I started scrapbooking 10 years ago, I had no help from anyone. My spending money was literally next to nothing. I started with photo square adhesives, a circle template and a scrapbook spiral album. But since I have been a crafter all my life, I had others supplies. Ribbons, threads, embroidery floss, fibers, buttons, appliques, yarns, beads, gems stones, rhinestones, jewelery pieces and charms were just some of the items I had. Granted, as I was just starting, I didn't realize I could use all these kinds of things, but now - boy, did I have a treasure trove in my craft closet! Look at any craft supply at a yard sale through the eyes of a scrapbooker - you'll be amazed at what you will find!

Books and magazines: Books are also a standard at most yard sales. I don't approve of destroying books, but at the same time, if the book holds a wonderful memory, I see no problem in preserving it for generations to come. Plus, you don't know that it won't get thrown away if it doesn't sell. Look at the books and see the pictures. Anything remind you of a favorite memory from your life? How about your child's life right now? For 10¢ you buy the book and cut out the item related to the memory. Instant die cut! Cut several images and organize them on the layout page to create a "scene" relating to the memory. Magazines are also great for this but you have to watch for acid in the pages. You can buy an acid-free spray and spray the magazine page. What I did was just insert the magazine page into a page protector and the page protector onto the scrapbook layout page.

Post cards and stationery: Not often as common, but out there just the same. Whether you use the post card as is or cut images from it, you have instant stickers! Cut theimage out, run it through a Xyron machine use acid free glue sticks or photo adhesive squares and you have a sticker!Add pop-dots for a 3-D effect! You can do the journaling on the stationery as it is or cut the designs from the stationery to use as you need.
Board Games: Scrabble has those wonderful small wooden tiles of letters. Each letter can spell out the title or a person's name! Monopoly money is a great embellishment for layouts themed for shopping, travel and other money related scrapbook themes. Even the board could be a great addition - if it is to thick to cut, just scan parts of it to make your back ground paper or to cut parts out for die cuts!
Holiday decorations: Tinsel, christmas cards, wrapping paper, gift tags, paper wall decorations, candy wrappers, window clings, glitter, silk flowers - just take look with a scrapbookers frame of mind and the possibilities will jump out at you!
Other things you might look for: Labels from jars - just soak them off. I'd love to have a label from Knott's Berry Farm jelly jar as Knott's was my families favorite place to spend Sunday afternoons as a kid - way back before it was an amuzement park and cost admission! Nick-naks that can be disassembled to get to the brand name or the image you want. Hand made things like embroidered towels, doillies or lace pieces. Use as is or cut off the part you need. And those School work books- a great "back to school" background paper is a page of math problems from a work book; you just add the photos and journaling!
So next time you see a sign that says "Yard Sale", put your scrapbookers thinking cap on and stop and go shopping!

Monday, May 12, 2008

Free Scrapbook Supplies - Make your summer work for you!

School is nearly out but that doesn't mean Free Scrapbook Supplies will be gone!

Check out Scrapbook For Box Tops for some tips on how to make box tops work for you this summer!

Scrapbook for Box Tops is still "open". Collect box tops all summer long! Send them to us any time you have a bunch collected! June, July, August...we are still here. Get Free Scrapbook supplies all summer long and help Kellie with her school fund raiser as she starts 3rd grade in September!

Hurry! Don't forget!

Friday, December 14, 2007

Make Your Own Envelope


1. Find any envelope you want to use for the size. Small, long, square, whatever. Even little package name tags size are fun to work with and have on the page

2. Turn it over to the back. Look to see "how" it is constructed. Usually there is one large flap "glued" over the top of 2 side flaps

3. Starting at the top, gently start "tearing" or peeling the large front flap away from the smaller flaps on the sides. Tear slowly and gently but if it isn't perfectly torn or there are gaps, it won't matter - that is fixable. Just try as slowly and gently as possible to pull the flaps apart to make it easier on yourself!

4. Once apart open it up and now you have your pattern!

5. Open the envelope pattern you just created. flatten it out. Place it on the paper you want to make into an envelope. Sometimes a tiny bit of glue stick in the middle is a good thing to do so that it stays in place. Just make sure you put the glue where the glue residue WON'T show once the envelope is done. Trace around the pattern. Remove the pattern from the paper.

6. Now to make the fold lines: Using the "real" envelope for a guide, take your ruler and line up from side to side, where the folds should be. You will only have 4 fold lines, 2 vertically and 2 horizonaly. Draw a line for each fold. At this point you just make the fold on each line you have drawn.

7. Fold the 2 side flaps in and then fold the lower portion UP, then fold you top flap DOWN. Use your ruler or bone folder to flatten the creases. Now your envelope is created! Apply adhesive ( I use glue sticks) on the side flaps. Fold the bottom flap up and press for the glue to stick. The top flap just folds down.

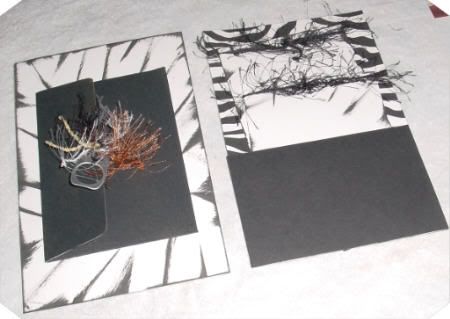
To add extra embellishment: I always cover the inside of the envelope that is visable, like this


Take the envy you just made and lay it on a contrasting piece of paper. Place it open side up so you can see where to end it. Make the contrasting paper go just below the bottom flap's edge, just to make sure there is no gap showing and when you open the envy all you see is the contrasting paper.

Trace the outline of the envy - basically just the top half of the envy is what you will be tracing. Cut this piece out, and do a bit of wigglying and a small trim of the edges that go inside the envy so that it matches the closing flap. Hard to explain, but as you do this, you will see what I am talking about. Then just glue it down!

Make sure you have glue where the fold line are, and make sure you flatten this very well - use your ruler or a bone folder to smooth it out. This makes sure that there is no "bubble" of the paper in that area.

And you are done!!


Thursday, October 11, 2007

Halloween Paper Piecing Patterns and Stickers!

Kid Printables.com is a fantastic place to play around in! Everything is free and there are so many things to do and use...the sky is the limit!

Need some Halloween paper piecing patterns?

Print these out on cardstock and cut them out, add your own detailing and presto! Paper piecing!

Cat, Hat and Bat
Arched Cat
Witch
Ghost trick or treating
Witch's face
Monster faces
Haunted House
Need some stickers?

Print these out on cardstock, run them through a Xyron and presto! Stickers!

If you don't have a Xyron, just use your glue stick!

Or...Print them out on photo paper - this will give them the glossy finish on the front and add a little extra character!

Stickers

Tuesday, September 11, 2007

Need FREE Scrapbook embellishments?

Scrapbook For Box Tops is a site I started to help my grand daughter (now second grade) collect Box Tops 4 Education labels as her school fund raiser. We have had a GREAT response from so many fellow scrappers. We are glad to help you as you help us! I hope that we can keep it going!
You collect and send us BOX TOPS 4 EDUCATION labels from participating products (that you buy anyway!) and we swap for free scrapbook embellishments!

Check it out at Scrapbook For Box Tops and see what it's all about. FREE SCRAPBOOK supplies - can't get much better than that!

And remember with all the holiday baking and cooking and lots of kids lunch products you will be needing, make sure you save that Box Top label and swap them for free scrapbook supplies!

Saturday, June 09, 2007

Get Some FREE Scrapbook Embellishments!

I' d just like to remind everyone about the program I am working with my 7 year old grand daughter on. Scrapbook For Box Tops. The fund raiser at her school is for the kids to collect Box Tops 4 Education labels from participating brand/products.

37 NEW BRANDS JUST JOINED BOX TOPS 4 EDUCATION!

Kimberly Clark has joined the Box Tops 4 Education family! Diapers and other baby related products from Huggies and also Kotex and Depend have joined! Gotta have this stuff anyway, so check for a coupon and then watch for the box tops!

(Also, watch these particular advertisers as they often have free samples of their items that you can request.)

Plus, I now have (on the web site) the option for you to print out coupons on your own printer for products you want to buy. Print them out, take them to the store and save money! THEN..... cut off the Box Tops 4 Education squares (pink/blue and white) and go "shopping" on Scrapbook For Box Tops and choose the items you'd like and email me your "order". Send us the box tops, and I will send you the items you choose and a few extras!

I have ALOT available, not all is shown on the site. Stickers, fibers, die cuts, stickers, brads, eyelets, stickers, punch art, paper piecing and more - all acid free, and speciality made for scrapbooks.

If you don't see a theme or item you are looking for, ask me! I have lots of stuff, just have not been able to keep up the flow of posting. YTD we have collected 628! We are still collecting during the summer so Kellie can take them in when she starts 2nd grade.

Hope you'll all continue to help us out and enjoy your FREE Scrapbook embellishments!

Saturday, April 21, 2007

ABC Scrapbook Album - Not the Ordinary ABC's!

Whether you child is a toddler, pre-schooler, or kindergardener,an SBC album is a great educational tool (as well as alot of fun!) for them to have a book about the ABC's that they will enjoy and WANT to look at often, thereby helping them LEARN THE FUN WAY!!!

I made a scrapbook ABC album for my grand daughter and gave it to her when she was 2. Now, in 2st grade, she STILL picks out that book when she is at my house and totally enjoys looking through it, even tho she knows her ABC's. These layouts are not complicated, however you can make your ABC scrapbook as structured as you like. I used the "I Spy" collage theme.

But this isn't just a regular A is for apple, B is for boy ABC scrapbook album. I used ACTUAL things that she knows for the letters, not just the ordinary things. I also tried to incorporate a few things from her mother's life - D is for Dynamo which was the duck her mommy had when she was little. R is for Rainy Day, the rabbit we had when she was young and has now died. D is for Daddy, M is for Mommy and included a photo of each! These are memories that she will have for years, and can even hand down to HER children! Who knew the alphabet could have so many memories!

Q is for quarter and I glued a quarter on the page. N is of Nanny and I put a photo of me. M is for Mommy and Me and I put a photo of her and her mommy. U is for Uncle Michael and I put a photo of her uncle. Y is for yarn and I took a length of actual yarn and squiggled it up and glued it down! G is for goat and I used a photo of her mommy and uncle when they were little playing with a goat. Every letter a memory! What wonderful ideas can you come up with for your childs ABC album!

Educationally speaking: If you are making the scrapbook for a toddler or pre-schooler, it helps alot if they KNOW the picture they are looking at and can then relate the letter to the picture instead of learning the letter and trying to find something that relates to the letter.

In addition to some of the usual items or "normal" kind of items, I used items that meant something to her and only her. I used white cardstock for each page and those letters that have a color (p is pink, purple) i used that color to embellish - like strips across the page and then wrote "pink" or "purple" under the color. I also wrote the name next to each item in colored gel pens.

C is for California (she lives in California, die cut) cotton Candy (die cut and her and her favorite candy!) C is for Christmas (a photo of her mommy at christmas when she was 2) C is for Cinderella (stickers of Cinderella, although she now tells me that the pink dress is not Cinderella, it was Sleeping Beauty or whoever, I am bad at the names of all the princesses!) C is for coins (sticker of coins in this ATM card world)

D is for Daddy (photo of Daddy) D is for Dolphin (photo of dolphin when we took her to Sea World and she is now mezmerized wtih dolphins!) D is for Dynamo ( photo of her mommys pet)D is for Dragon fly (an unusual bug)

M is for Mommy and Me (photo of her and her mommy) M is for magician (die cut) M is for Mermaid (sticker) M is for money (stickers of dollar bills)

S is for sleeping bag (sticker, what she loves to sleep in when she spends the night at my house) S is for Strawberry Shortcake (sticker and she and her mom love this character) S is for Sylvester (sticker, she liked the cartoon cat) S is for saxaphone (die cut, she liked tooting horns!)
P is for Papa (photo of her Papa) P is for paw (die cut, from the Blue's Clue's days!) P is for Powerpuff Girls (stickers and she liked them back then!) P is for pumpkin (die cut, she loves carving pumpkins) P is for Panda (sticker, she loves animals)

So you get the idea. Create an album uniquely to your child and his/her likes, interests and family. They will enjoy them for years! Make memories in your ABC albums - education and memories - what a great combination!

Saturday, March 10, 2007

Scrapbook 11 Photos- One Page - The Accordion Way!

I was one of those scrappers that took photos upon photos upon photos of my first grand daughter. No matter what she did or where she did it, Nanny was there with that camera! Probably the most photographed kid in the country! Okay, I know I share that with every other grand mother, but the next problem was how to display all those photos! Throw away a photo? Yeah, like that's going to happen! I wanted every second to be remembered.

But again, that age old question of how many photos per scrapbook page? I use 12x12 instead of 8x10 for the main purpose of being able to have more space for memories and photos, but even a 12x12 can only take so many! So I had to figure out a way to put more photos on the 12x12 pages!

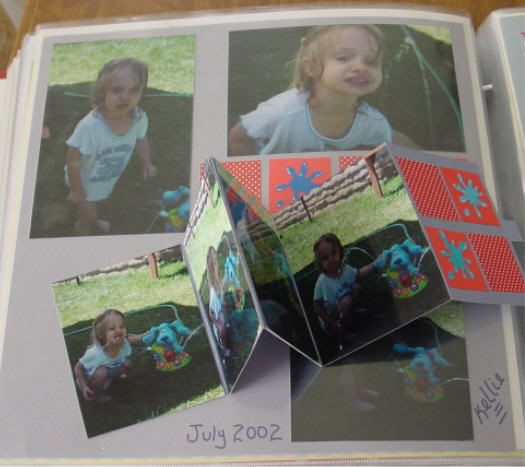
An accordion album can mean alot of things and can be created alot of ways. I was concerned about the thickness this embellishment would cause. But, where there's a will, there' s usually a way! So intead of making an "all by itself", "book in a book" kind of thing, I just did a simple technique with a couple folds and made the perfect accordion fold booklet for my scrapbook layout.

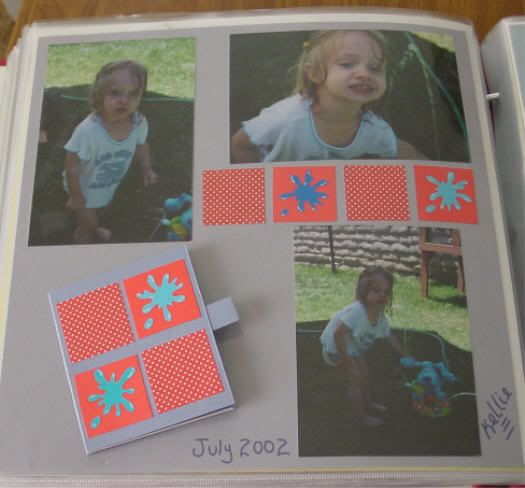
This layout was just of my grand daughter playing outside in the sprinkler. Since this layout was #2 in the sprinkler "photo layout", I didn't do any journaling on this layout as that was already on the first scrapbook layout. However, all you'd have to do if you did want journaling would be to use sections of the accordion book and journal on it instead of putting a photo on it.

In addition, this layout was not particularily to remember the event or what she was doing, but it was more to remember that FACE!! That precious little cherib, darling, princess, cute, adorable, face with its priceless and beautiful smile!!! Totally unrehearsed, just plain, pure sweetness! A picture that is saying about 5,000 words!

The only other embellishment is four, 1 inch square punchies with a water splat sticker .

To Make the Accordion Folder

To make the folder, just choose the size of photos you want to use. I cropped these to the size of just the main picture and very little background. I wanted to see the baby, not the background. This folder is about 4x4 in size. I used 12x12 size cardstock and cut 2, 4 inch by 12 inch lengths. I scored them every 4 inches, and then made the folds. Then I glued the 2 lengths together and folded the total length into 4" pages. One 4" section is glued to the background cardstock. To add the photos, there are 4 photos and one "cover" on the one side of the folder, and then 4 photos on the other side. A little tab pull made from a piece of folded cardstock and adhered as the "pull" of the book. I decorated the cover with matching squares as I used on the page embellishment.

So quick and easy and you have 11 photos on one scrapbook layout page!

To Put In a Page Protector...

To put this scrapbook layout in a page protector, just slide the layout into the page protector with the accordion folder closed. On the right side edge of the accordion folder, take your craft knife and make a slice down the length of the back edge. Start about 1/4" above the folder's spine and slice to about 1/4" below the spine. This allows for the accordion folder to open without pulling on the page protector. Now, gently, work it until you pull the length of the accordion folder out through the sliced opening in the page protector. Now you have the accordion folder on the outside of the page protector, and the layout is inside the page protector.