Tuesday, December 15, 2009
A Letter From Santa Claus - Wow! What a Memory!
I did this last year - paid someone to do it, but this year I asked around and got the "how to" to do it myself! Here is my plan for today! I have not done this this way before, but it doesn't seem to be a problem. It is a common thing for this post office to do, so I am going to give it a try!
YOU write the letter to your child or grand child "from" Santa. Find some nice stationery - google: stationery and see what free things you can find. Just make sure you use stationery that the child DOESN'T know you have! Or just go to Michael's or Joanne's and choose some 8x10 Christmas themed sheets to print on.
Create the letter from Santa's point of view. Inlcude things specific to the child that "Santa" would know. Mention family, friends, their pet, school, anything that is important to the child and would be something that "Santa" would know. Of course, include things the traditional things Santa would say like, "I know you have been good this year" or "It was very nice of you to have helped ___________this year" or "I know you had some sad times this year, but I will bring you some holiday happiness........" Anything that will relate to your child specifically.
Of course, sign it with a beautiful signature by Santa!
Choose an nice festive envelope and address the envelope to the child. Place a stamp on the envelope. Go to the PO and get some holiday or christmas themed stamps. Something the child has not seen!
NOW>>>>>>>>>>
This late in the game you might want to use USPS Priority FLAT RATE Mail - ($4.05 and 2-3 business days)
In the Priority FLAT RATE envelope (free at the Post Office) place your sealed and stamped letter(s). In this case you can write letters to many kids, place in their own envelopes and place ALL of those letters in the same Priority FLAT RATE envelope. It is $4.05 for as many as you can fit in the envelope and the envelope close properly. Great if you have a group of kids!
Mail it to:
North Pole Christmas Cancellation,
Postmaster,
5400 Mail Trail,
Fairbanks, AK 99709-9999.
The post office there is perfectly accustomed to this, and will take care of opening the Priority Mail envelope you sent the letters in and mailing the individual letters for you to the children.
On that surprise day - the little ones get a letter from Santa! I can already hear the squeals of excitment and wonder! Have your camera ready for that wonderful photo of that adorable face when they open the letter!
THEN........... after Christmas......... a scrapbook layout is created! And all you have to do is make a pocket for the letter so it can be taken out (repeatedly I am sure!) and looked at, matte the photo(s), add a title, and you are done with a most wonderful and precious memory!
10 Free Scrapbook Supply From the Christmas Holidays!
Free scrapbook supplies are all around you this holiday season! There are not hard to find, you just have to be creative and look around! In a way, these are cheap scrapbook supplies! Someone else's trash is a scrap booker's treasure!
Here are 10 things that can be used as scrapbook supply that you might keep your eyes out for. Just think… you'll have some great new supplies ready and waiting to create your Christmas themed scrapbook layouts! And they will have the additional memory of "where" and "how" you found that particular scrapbook supply!
Gift tags - These are cute to use "as is" in a scrapbook layout. If you have any extras, don't throw them away or store them for a year. Use them on your Christmas themed scrapbook pages! They come in all shapes and sizes, so you could even pick up a package on the After Christmas Sales! They are perfect for the title and date. You could add fiber hangers to embellish them a bit better. Or you could just cut off the little end that has the image on it and use it as a sticker! Add a pop-dot and the sticker is now 3-D! Line several of them end to end along an edge of your background paper and create a border! Use them to "name" the photo. Often the tags say "Merry Christmas" or something so just add the person's name and you have your photo description!
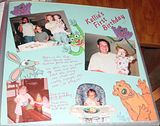
Paper plates and napkins - Just cut out the design or image and use them as a sticker-style embellishment! I cut out these figures off of the napkins and used them sticker-style and they worked out great in this layout if Baby's First Birthday - a character over each photo!

Ribbons - Those thin curly ribbons are great for making tag hangers, confetti or lines pointing to something. You can get several colors and weave them together to make a photo matte or a square embellishment for the scrapbook page. Thicker ribbons are great to make borders or frame a photo, Take a small length of a piece of ribbon and using gel pens, JOURNAL on it and place it under a photo for the photo description. Ribbon is great for tag or envelope pulls. The thick, red, velvet ribbon would be a great enhancement to a Christmas themed scrapbook layout!
Family Recipes - I would probably say that no one is going to give you their recipe card, but jot the recipe down while you are there and then check out some of these great freebie sites that offer free recipe cards. Some you can type the recipe then print it out, but others you print out the card and then use your own handwriting to write out the recipe. Not only will you always have the family recipe for that wonderful dish, but it now becomes a memory to be passed on to generations so it can stay in the family!
Wrapping paper - Cut out the designs and use them as die cuts on your scrapbook layout! You could also make envelopes out of the beautiful wrapping papers. Click here for the pattern.
Depending on the paper, use it as the background paper. (Acid-free issue at your own preference). There are some papers that have a beautiful scene on them - like a snow scene or a fireplace scene. Cut that out (silhouette it) and use it for the embellishment on you scrapbook page. Add glitter or other "add-on's" to dress it up or make it stand out. To make additional safe guards for the acid-free issue, you could laminate the front side and then run it through a Xyron sticker machine, then stick it to cardstock and cut it out, then run it through the Xyron machine again. This covers the front and back of the wrapping paper item and if there was an acid issue, now there is not!
Christmas Cards - What a great place to find images to use as stickers! Silhouette-cut an image to use as a sticker and use pop-dots to raise it up a little bit for a wonderful 3-D effect. Cut the INSIDE of the card out creating a frame and use that frame portion to frame your photo or journaling. If you really want to keep the card for a sentimental reason, don't cut it up; just use it as the embellishment on the scrapbook page. Adhere it to the background page and put a slice in your page protector and it can be opened while admiring the page!
Tissue Paper - Tissue paper adds a bit of delicacy,and frill. Use is similar to as you would vellum. You can crinkle it up and the smooth it out and add it to a tag or other punch art item. Or just keep it crinkled for the 3-D effect. In this layout I used it to make cotton candy!

Window Clings: Odds are they won't hold up till next year, plus, do you really want to bother with all that packing and storage over a few little clingies? Scrapbook them! Depending on what they look like, use glue or double sides tape runner to adhere them to the scrapbook layout page. You might treat them like Vellum as far as the adhesive goes so you don’t see the glue through the clingy.
Tiny Ornaments - Seems to be a common thing now, that stores carry these little, tiny ornaments that are figurines. They come in sets of 6 or more and they are a theme and are about 1 inch tall. A cartoon character and his friends, 6 different styles of snowmen or trees or several styles of reindeer. So many to choose from! These are great embellishments for "hanging" from your scrapbook layout! Use the hanger that came with them and string them across the page. So many ways you can use these little treasures!
Other household decorations - Do you really want to store all that for next year and probably not even use it again? Take your scrap bookers eye and look at it and see what you can cut, silhouette, adjust, take part of, or whatever else you think of to do to use all or part of that decoration in your scrapbook layout.
Just have a look around and see what you can find. Remember, collect it now, and if you can't think of a use, you can always trash it later! But while you have the opportunity to collect some free scrapbook supplies that will help you create some wonderful scrapbook page layouts, why not take advantage of saving some money, while you save your memories!


