Saturday, November 15, 2008

How To Scrapbook Your FAVORITE FOODS!

Scrapbooking is all about memories. Well, favorite foods can have some great memories! Whether the foods are yours or your kids, make a scrapbook layout about them so you'll remember in years to come! You might not think right now that there is much to remember, but in years down the road, they are guaranteed to bring a couple good laughs!
My grand daughter was 2-3 years old and she had her favorite foods and of course I had to document them! Her scrapbook would not be complete without these! This is a case when a scrapbook layout doesn't need any journaling - the memory is there, just not much to say about it but a picture holds a 1,000 memories! This way, you only have to do one scrapbook layout, instead of 1,000 words!!!
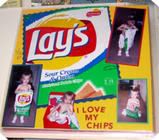
I Love My Chips!
At 2 years old, she loved sour cream and onion potatoe chips! The bag was nearly as tall as she was! I used a couple shots of her with the bag of chips. Then I cut the front portion of a bag of her favorite chips and glued it onto cardstock, then glued that onto the back ground page. I did this for the sake of protection from the acid - I have no idea if the bag is acid free or not, so I just did it this way to help the unknown. Each photo is matted on cardstock so the actual photo never touches the bag. I used 1/4:" letterpunch for the letters.


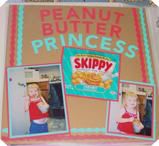
Peanut Butter Princess
She loved PB! So it was hilarous when she got ahold of the near empty jar and took her spoon and chowed-down! I used the same colors, blue and red, as in the jar label. Took the label off the jar and mounted it on cardstock and then on the background page. The letters are 1,1/4" die cut letter punches. Photos are doubled matted. The border is made with strips cut with a Coluzzle Template.

You Make 'Um, I Eat 'Um!

She didn't like the cereal by itself, but she did like the cookie bars you make from the Rice Cripsies. So one day when I was making them with her, I just let her eat off the mixing spoon! Then I cut the front out of the box, and the recipe for the cookie bars from the side. I mounted the front of the box on the layout and added the recipe (matted) by thread. I used eyelets on the recipe card and kind of "hung" it from the box front. That way she will always have that recipe! Photos are matted on cardstock.

All thses scrapbook layouts are quick, easy and inexpensive. Use your own judgement about the acid free issues of the packages you use.

Thursday, October 16, 2008

Our First Pumpkin - Quick, easy and lots of color!

When my son got married, they lived with us for a few months and Halloween was in there. We are not big Halloween fans, but we do like the fall and harvest-y themes of the season. I do like the carving of pumpkins and baking the pumpkin seeds!

So when I do a scrapbook layout on a theme that I am not a fan of, there's always an event or feature that is a memory other than the holiday, so I twist the layout theme to show the memory I do like about the event/holiday.

This scrapbook layout is a 12x12. It is titled " Our First Pumpkin". The kids carved it together with the help of their little 2 year old neice (my grand daughter that is "hosting" the swap of Box Tops 4 Education for Free Scrapbook supplies at Scrapbook For Box Tops

This scrapbook layout is quick, easy and few "supplies", but it still generates the theme of their first pumpking harvest/carving that they did as well as just a family function!


3 photos tell the story of the event. This is a 12x12 layout.

I cut the photos in a circle and matted them on a 1/4" larger circle die cut. The letters were purchased from Missy Made It . I added a pumpkin die cut and there you have it! Quick, easy but shows the "process" they went through from start to finish and a "family shot" at the end. Has basically nothing to do with
Halloween.
That's a fantastic feature of scrapbooking - out of the box, no right/wrong way to do it! It's your memory - you create its designation!

Sunday, July 13, 2008

Get Your FREE Scrapbook Embellishments Here!

At Scrapbook for Box Tops - we are still collecting box tops and swaping them for free scrapbook supplies. Come on over and read about the new products offering box tops, get free printable coupons to use on the participating products and for a limited time as a back to school event...they are offering DOUBLE box tops on many items!

Scrapbook for Box Tops

So...print a coupon, save money on the product, cut the box tops and send them off for free scrapbook embellishments - all the while you are eating healthy! What a great way to scrap!!!!

Tuesday, May 20, 2008

Maps, Phamplets and Tickets of your Vacation!

A picture might say a 1,000 words, but those words are pretty important on their own! What I am trying to say is, pictures are not the only things that hold a memory or tell the story.

On your trips this summer - look out for things that will make you remember WHERE you were and WHY!!!

In my Vacation Album scrapbook

I used "road" sticker strips. Looks just like a road and I put a little stretch on each page. This continues on each page and just offers the ammenity of "continuation" in your album.

I used the map of the area I went. This is especially good for places like National Parks or a specific location. Although I do admit I did a scrapbook layout from California to Texas - and used the map highlighting the trip on Interstate 10 East! That is what I used as the "background" paper! The actual map!! And I made other little markings for things on the way that I want to remember. This way, the map as the "background paper" not only offers the theme of "travel" but also offers memories! Cuts down on cost and thickness of the layout. If you dont have the actual map or it isn't in usable condition - scan it and print it out!

In addition...

you can use admission tickets and phamplets that you might get at a destination. I did a layout for Disneyland - a 2 page spread with5 photos of my 2 kids at different ages when we went to Disneyland- so it shows "Disneyland Through the Years". It also has admission ticket showing the price of admission and the parking ticket to see how much we had to pay to park!!! Admission is about $52 to Disneyland this year - in 1999 it was only $36!!!!


The phamplet that they hand out as you walk in - I just cut out the map of the park and it shows the whole park with all the rides - and we always look to find our favorite!

Look Out For Other Things That Hold Memories

Had I been thinking "scrapbook" when I went, I would have also kept food receipts from when we bought the Mickey Mouse pretzels and the frozen chocolate covered bananas. Or the label from the popcorn box or even a pebble from a walkway!!

There is so much that you can find that will offer you memories. Don't just rely on photos. They are great and do their part, but other momentoes are just as great.


Monday, May 12, 2008

Free Scrapbook Supplies - Make your summer work for you!

School is nearly out but that doesn't mean Free Scrapbook Supplies will be gone!

Check out Scrapbook For Box Tops for some tips on how to make box tops work for you this summer!

Scrapbook for Box Tops is still "open". Collect box tops all summer long! Send them to us any time you have a bunch collected! June, July, August...we are still here. Get Free Scrapbook supplies all summer long and help Kellie with her school fund raiser as she starts 3rd grade in September!

Hurry! Don't forget!

Monday, April 28, 2008

Velcro - for Scrapping? You Bet!

We all know that velcro is a wonderful invention with tons of uses. But in scrapping? Sure! You have to attached everything in your album with something - and since "interaction" and "activity" pages are kind of the "rage" nowdays, what better way to combine the two!

Buy velcro with the adhesive already on the back. I bought a package with 2 yards at a craft store for 99¢. That will last a long time since you just need a very small square. (99¢ - VERY inexpensive,long lasting and saves you money!) You just then need to cut off the length you want! The adhesive is pretty strong, at least in my experience, so no other addition is needed. Just make sure of your exact positioning as once down, you can't reposition it. Here is a photo of a 2 page layout (5x4 size) using the velcro...


Zebra Envelope Page (Click on photos to see it closer)

I used the frilly fibers and a pull tab from a can of soup (YES a PULL TAB!!)for the closure decoration on the outside of the envelope flap.


Envelope opened. The inside of the flap I decorated with another animal pattern paper.

Although you can use velcro to adhere most anything that you want to be able to be moved, I like using velcro on envelopes. Envelopes are my current favorite thing to put in my albums. They hold all kinds of stuff! At the moment I am just using them for holding additional pictures and a cardstock square for journaling. But give me time - I will think of more!!

Just take an envelope you have laying around or of a particular size you want, tear (gently!) it open at the construction of it and there is your template! How quick and easy is that! For another example......

Cut it out or print it out on the BACK of the paper you want to use for the envelope then cut out. Create the envelope. Now for the closure - VELCRO!! Cut a tiny bit off that 2 yard length (see what I mean about it lasting a LONG time!) take the cover off one side of the velcro. I usually put the fuzzy side on the envelope and the pointy side on the flap. Just seems to be the best "appearence" way to do it.

Now it is a good idea to make that flap a bit stronger. I always line the inside area of the flap with a contrasting paper. If the envelope is solid, i use a print and visa versa. This adds strength to the flap for pulling it open. All you have to do is turn the envelope over with flap open, and trace the flap and down only as far as you need to go into the envelope so that that area is covered. It doesn't have to be totally inside the envelope.

Now make sure you are SURE of where you want it as once down, it sticks really well, Most likely you wont' be able to reposition it. Remove the adhesive covering from the pointy side of the velcor. Adhere the velcor to the UNDERSIDE of the FLAP. Now, take the cover off the other side of the velcor and close the flap. Press on the top of the velcro and you are done! Envelope closed with Velcro.

Now just create a "pull" to open the envelope if you want and just glue the envelope onto your layout! You could also, instead of a "pull", just wrap ribbon or fibers around the envelope. Adhere them to the bad of the envelope but leave them loose to the front, that way you can just tie the ribbons to "close" the envelope.

Here is another 2 page layout of the envelope with velcro...


Flag layout. I just used 3 strands of fiber, adhered them to the back of the envelope and brought them around so they tie in front. This is the envelope open. I decorated the inside of the flap with the same pattern paper. I didn't use velcro on this one, just used the fibers to tie it shut, but you could use the velcro if you wanted to. Possibilities are endless!


Open Flag Envelope


Give it a try. If you have any questions, leave a comment and I will get back to you!

Hope you enjoy this technique. i have found it to be one of my favorites!

Monday, February 11, 2008

Make Wonderful Quick and Easy Scrapbook Layouts

Quick and easy! Sometimes that is just what we need or maybe even want, our scrapbook pages to be! Got "scrappers block"? All it takes is a few quick and easy scrapbook layouts and you're back in business! Got a "backlog" of photographs waiting for their place in your albums? Do some quick and easy layouts and get caught up and still have wonderful layouts in your memory album.

Scrapbook layouts do NOT have to be elaborate, extremely ornate, completely filling the page or use a lot of embellishments. Simple is sometimes the best embellishment you can use!
Wild Safari

In this layout I took my grand daughter to the little petting zoo at a local street festival. It was her first petting zoo experience. But since I was doing it from my point of view for her album, I just used computer journaling and typed out what I saw her do or act. How she liked the bunnies best and wanted to take one home. How she wasn't scared of any of the animals until they came to her first instead of her going to them. I used yellow cardstock for the journaling and a matching hue to matte the photo and then double matted onto a leopard fur theme print paper. I used the same print paper to punch out the letters for the title. Using different hues of the same color is a great (and easy!) way to create quick and easy layouts, that still capture those wonderful memories.

The only other embellishment or decoration was some die cut leaves. I had been to the local scrapbook store and they allowed a customer to use their die cut machines for paper purchased at their store. So I "stocked up" on leaves, thinking it would be a very common design that I'd want to use often. All I did was assemble leaves in different hues of green in a manner to resemble tree branches hanging down like they would in the jungle. The part of this layout that took the longest was typing the journaling! The rest was done in about 15 minutes! But this is one of my grand daughters favorite "memories" even though she doesn't remember it! She loves animals and just loves knowing that she was petting bunnies when she was a "little baby girl". That in itself creates an extra added memory for this scrapbook layout page!

The Zoo

I was not on this trip to the zoo with my granddaughter, but I wanted her to have the memory even though she doesn't remember being there this time. So journaling wasn't something that I could do on this layout. I just titled and dated. I used animal fur theme print paper for the matting of the photos, title card and the punched out letters. I added a few leaf and animal stickers and was done! I spent about 15 minutes on this layout.

One Item on This Layout Generates Additional Memories
Something special I add to this layout was a photo of her mom with her dad at a zoo when mom was a little girl. This creates a wonderful embellishment of a memory for mother and daughter. Daughter sees mom did same things she is doing! Plus, all those photos from the past that I didn't use in a scrapbook layout in another album - uses up the "extras" while adding another memory. Plus, I only had the 2 photographs of my grand daughter's day at the zoo, and needed something for that lower corner. I could have created a sticker scene or some other generally related embellishment, but this photo "from the past", was just the right touch to complete the layout while adding an additional memory to the page!

So, see? Quick and easy doesn't have to be frowned upon! A scrapbook layout can be created in a few minutes, using no more than one or two simple supply items and still hold an enormous amount of memories!