Saturday, October 28, 2006

More FREE Printable stickers

A favorite magazine of mine has an online site too. It is the perfect magazine for moms, kids, teachers, scout leaders, grand parents - anyone that wants to have fun with kids and/or their families. It is the best family related magazine I have ever seen. It is called Family Fun. I have had a subscription for 3 years now and just renewed it for another 2 years! I was just there changing my mailing address and noticed a lot of things offered online that aren't in the magazine! So I did some "shopping". Got some great ideas for my grand daughters crafts, some interesting recipes, but saw this for us scrappers!

Printable stickers!

You downloand them (for free!) and print them out on your printer. Use glossy photo paper for a shiney sticker or regular card stock for that matte look, which is great if you are going for a more traditional/heritage style look. Use chalks to "shade" the sticker edges for a heritage look. Use your markers to outline or give detail within the sticker. You can cut out the exact image instead of just cutting a circle or a square. For instance, if there is a little dog image on a circle background, cut out just the little dog! There is a large variety of themes - pick and choose and then save the site to your favorites so you can go back when you need stickers!

Once printed, you can either use adhseive squares, glue stick or run them through your Xyron machine and
TA-DA!! You have some great stickers and didn't even have to leave the house and spend a ton of money! And give the site a second when you click on the stickers you choose, it uses .pdf and has to pull that up and all, but it does pop up just fine and you just click and print!

And these are also great for just giving to the kids to play with...... while you scrapbook! Even if you don't make the as stickers - just print them out on cardstock and have them create a game or a story board or something! Or help them learn to scrapbook by making their own layouts! And the stickers could be a great way to make gift tags for Christmas gifts! Have the kids work on that!

Check them out here. There is a list of them so click around to see them all!
http://familyfun.go.com/printables/craft-templates/specialfeature/printable-stickers

This magazine is absolutely wonderful in my opinion, so I'd like to mention that if you are interested - You can get this magazine for only $9.95 for 1 year, plus you get a FREE $5 gift certificate for every subscription you buy from
More Magazines, Please! It's a great bargain! I know the owner of this site and I know that you will get great service.

Please Note: I receive NOTHING from this magazine or the web site selling it, for making this "promotion". I just think the magazine is wonderful and wanted to pass it along - and give you a place to get free stickers!

Sunday, October 22, 2006

Using Portraits in Your Scrapbooks

Enter into the world of scrapping your 8x10's!
You can use this method for 8x10's of adults or children, individuals or partners, groups or events - even your pets!
Any 8x10 or 5x7 will do!

Using portraits in your scrapbooks is not the first thing you think of when you scrap. You always think of snap shots. But how many of those 8x10 or 5x7 memories can you frame and put on the wall? I admit, I have a hallway with nothing but 8x10's and 5x7's covering both sides of the walls - a shrine to my kids! Helps me not to miss them so much and I smile every time I walk down that hallway! But even I have to call it quits on framing them!

So I went back and took the ones that I had not framed and was keeping in page protectors in a notebook. Deciding how to scrap them was my next delima. At that point in time, I had not heard of anyone scrapping larger than 4x6 so I didn't have anything to refer to for help.

In looking at the ones I had, it suddenly became clear. I had 2 kids and it only made scrapbooking-memory-sense to scrap them together at the same age, even though they are 4 years apart.

Scrapbook Layout Description
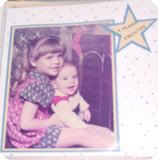
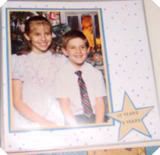
I choose 2 8x10's of them together. I picked out a nice print background paper that matched the colors in the portraits. Then I matted the 8x10's on contrasting cardstock 2 times with 1/4 inch borders. I then cut out a large star die cut and put in their ages using small sticker letters. I placed them facing each other in the scrapbook. I can now see them both together, but with their 4 years age seperation


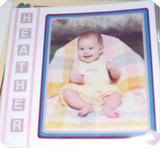
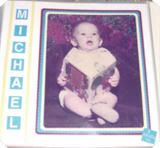
I then took 2, 8x10's of each of them at the same age. I used white cardstock for the background. I matted each 8x10, 3 times with contrasting cardstock leaving a 1/4 inch border on each matte. Then I used 1 inch square die cuts and placed a 3/4" sticker letter to spell their names down the side of the layout. I added a simple 1/4" strip of the same cardstock I used for the squares to seperate the names from the portrait. In the lower right hand corner, I used a 1 inch square and put their age. Again, these are facing each other in my album. It is so great to see them at the same age!


We are talking about literally only minutes to create these wonderful layouts! How easy is that!
And it is a great way to scrap any 8x10 of anyone or anything you might have!
And if you don't have sticker letters, you can use ink stamps, chalks, stencils or just free-hand it!
Quick, easy and oh,so inexpensive!


Scrapbook Techniques Used
No specific technique used. Just basic matting and dating.
Scrapbook Tools Used
Paper Trimmer, square punch, letter stickers, photo square adhesive, star die cut.
Quick, easy and oh, so inexpensive! Doesn't get much better than that!

Thursday, October 19, 2006

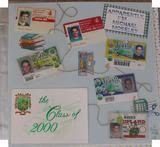
A one page layout for 6 years of High School!

With all that goes on in high school, graduation seems to be the main topic everyone scraps. But there is more to the high school years, than just graduation! Ever thought of making a scrapbook layout to show ALL 6 years in high school? Every high schooler has to get a Student ID card the first of every year. In 7th and 8th grade that is so cool as it is their first form of ID! And kids usually save their Student ID's year after year. But what do you do with them when all is said and done? How can you throw something like your last 6 years of ID away!!

You don't! You make a layout!

Scrapbook Layout Description

This layout is of my son's 6 years of high school - which includes 2 years of Junior High. He was going to throw the ID's away when he moved out, but he knew he'd better check with mom first, so he asked me if I wanted them. Need I tell you whether I said yes or no?!

I wanted to use the cards in chronological order with his graduation announcement the final "step" through his high school years.

Scrapbook Techniques Used

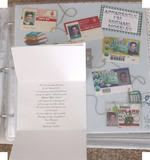
I layed the ID cards out on the page in the year formation I liked. I used jute twine as my form of "continuation" or the path to follow "through the years". I then used a hole punch and punched a hole in a corner of each card in different corners, so that I could loop and twist the jute through each hole and wind it around and down the page, connecting each card and ending at the announcement. I used adhesive photo squares to secure the cards to the background page. The jute is not secured, excepet on the back of each card near the hole to keep the jute in place.

Photobucket - Video and Image Hosting


The announcement is a tri-fold style. I glued the back (middle section) to the layout background page. Then I slide the layout into the page protector. Using a craft knife, I carefully make a slit at the top fold and one at the bottom fold of the announcement so that the top and bottom of the announcement could slide through, thereby being able to be opened once in the album.

Photobucket - Video and Image Hosting


A few "back to school" theme stickers completed the layout.

When I gave the layout to my son, he was amazed and stared at it for the longest time and every time he gets the album out he spends time looking at this layout. I can only imagen the memories going through his head about those years of his life!

Scrapbook Tools Used

Cardstock, hole punch, adhesive photo squares, jute twine, stickers, Student ID cards, Graduation announcement,

Sunday, October 15, 2006

Do You Know How To Smudge? It's FUN!!!

Have you ever "smudged" your ink? Or your chalks? It is fun, easy and a great way to make letters for your scrapbook titles!

Supplies needed: Letter Stencil, ink pad, makeup sponge, writting tip marker

Step 1: Place the stencil down onthe background page (or whatever paper you are using) where you want the letters to go and hold it down firmly and stable - don't let it move while you work or your letters will be crooked. Tape it to the table if you can.

Step 2: Dab the makeup sponge into the ink. Don't saturate the sponge, just get enough to "dab around" the paper. You can always go back and get dab more ink on the sponge.

Step 3: Starting from the edge of the stencil and going "into" the letter area, just "smudge" the ink around the edges of the stencil - partically on the stencil and partically on the paper. You'll have to do some testing first to learn how to get the various effects - heavy smudging makes for a darker color and more specific letter shading. Lighter smudging gives a lighter color and more blending shading.

A good way to start is to make the edge closest to the stencil a bit darker and then the inside of the letter lighter - this gives great dimension to the letter. You can play alot with this technique and create alot of beautiful lettering for your layout.

Step 4: With the stencil STILL IN PLACE, take a writting marker with a medium to thick tip and outline the letter. When the stencil is removed, the letter has 3 dimensions - the specific of the maker outline, the dark outside edge, and the lighter, fluffier inside - all blended together.

NOTES:
- You can use chalk the same way - you just have to "drag" more than "dab"
- You can use the same color or different colors. Outline in black, use red for the darker outside edge of the letter and a yellow for the fluffier inside of the letter. Just mix the colors to match the colors in your layout.
- This looks particularily good when using pastel colors. They seem to blend better than darker colors.
- Chalks will also blend better than inks, at least in my experience. Once ink is set, it is there. But the chalks will merge together more.
- Ink is more specific. Chalk is more "fluffy". Keep in mind for the effect you want.
- Once finished with the stencils, wash them with warm soapy water to get the ink and chalk off (or Windex).

Give it a try and see what creations you can make just a-smudgin'!

Saturday, October 14, 2006

The Most Fantastic (and FREE) Scrapbook Printout Site I've Ever Seen!

Oh My Gosh!! This is the most FANTASTIC site for FREE scrapbook pages I HAVE EVER SEEN!!

TONS of themes and ideas and categories! So much you can do here! Pages, letters, stickers, die cuts, banners, journaling themes, and SO MUCH MORE and probably every theme you can imagen!

A friend shared this site with me and I am thrilled to be able to pass it on!

I'd venture to say "name it and it is here". There is just so much available! AND ITS FREE!!!!! Says so right there on the main page! You download them to .pdf files and print them out on your printer!

If you like digital scrapbooking, then this is also the place for you! I don't do digital, so I can't comment on that part of it, but it says that is what you can use it for so take a look and see what you think!

I am going to be using the themes and pages for a recipe book for my personal favorites recipes to give to my kids - pass on the flavor as they say!

Print Your Own Scrapbook & Cardmaking Supplies

A tip for printing out on printer but still making the die cuts look really nice is to use shiney or matte photo paper - like you use to print out photos. That way when you cut the die cuts out, they are on a thicker paper and a nicer finish to them (besides just regular typing paper) and they will look nicer.

If you have any tips for using thi site for digital scrapping, leave a tip! Lots of us would like to learn about that!

Shared with me by AudreyO. Thanks for this goldmine, Audrey!

Wednesday, October 04, 2006

Using Magic Mesh in your Scrapbook Layouts

Have you ever tried Magic Mesh in your scrapbook layouts? It is a great embellishment and not very expensive. It makes for a wonderful dimensional feature on your scrapbook page.

Magic Mesh is a strip of "netting", although it is fabric. Usually it is about 3 feet by 2" wide. It is sticky on one side, so you just cut your length and stick it down! Quick and easy!! You can lay it on cardstock, over a photo or anywhere you like. It is a speciality scrapbook made item, so it is acid free. It gives dimension to your layouts in a soft, easy kind of way. Magic Mesh is a good embellishment to achieve that "old fashioned" look or "antique look". The darker colors are good to get that effect. Use the brighter colors for a "funky" look.

I used to buy it often (until I got stocked up!) and it is not to expensive, at least the way I bought it. I used to shop the online scrapbook stores - I kept a BUNCH of them in my Favorite Places and usually at the end of the month, I would surfed them all and check out their sales. I never paid full price for anything. When I'd find it on sale, I'd buy a couple colors. I was paying about $1.89 or less for a 3 foot length. It goes quite far - you can use it 2" wide or cut it in half and have 6 feet of 1"! But usually because of the short lengths you use, you will still get several layouts out of it.

Scrapbook Layout Description - 12 x 12 layout
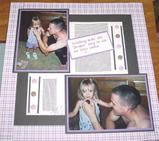
In this first layout, "The Proper Way To Eat an Oreo Cookie", I used 2 different sizes of Magic Mesh. The large "square" at the top of the layout is 2" by about 4 inches. The other smaller piece is 1" x3". This just shows that you can use any size you like. It was when my son taught his little neice how to twist the cookie apart, eat off the white icing and then throw away the cookie!! We had a talk about that!


I used purple as that was the color my grand daughter was wearing so I pulled that color from the photos and used it as the main color. The background page is a patten print in purple. I added a larger piece of black cardstock - about 10"x10" to the middle of the page. I then added a piece of white cardstock, about 9"x9" to the center of the black cardstock. I double matted the photos on purple and black. The Magic Mesh is placed as shown and then I added tiny buttons and a thin strip of the black and purple cardstocks for embellishment.

The title is typed on computer onto white cardstock and matted. Notice that it is placed crooked instead of straight. That is something that is good to do, to keep the layout from getting monotonous since I used so many squares. This layout is a case where the Title holds the memory. There wasn't really anything to journal about. They ate cookies. What's to say about that? But I look at it now and remember how funny they were together. It's just a funny memory.

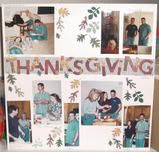
This second layout - THANKSGIVING, I used the Magic Mesh as a title strip across the middle of the page and then with my letter punch, punched out 1,1/4" letters using a pattern paper of fall leaves. The colors just added to the "fall, thanksgiving" theme. I used several leaf punches that I have and punched a variety of leaves in the fall colors and just "sprinkled" them around the layout. The background paper is just white 12x12 cardstock.


I cropped the photos so just the people show up, not all the background. I got alot of family members in this way. I didn't matte the photos. I used a gel pen to write everyones name and the date


Both of these layouts are quick and easy and can be used for children or all adult themes.

Sunday, October 01, 2006

Journaling: How to Make the Best of It

Journaling is an absolute MUST for scrapbooking. It can be a little or alot, but you really need to have it. Journaling often often holds the memory more than the photo does. Sometimes, there are no photos for the memory so journaling makes the memory.

Journaling is all about memories. You will always have memories, but as time marches on, many of them fade.Sad, but true, you think you will always remember them all, but as life moves on, so do the memories, to make way for the new things to remember. Many times you can remember the event but it often stops there. You don't remember the specifics or the feelings or the moment.

Scrapbooks are memory holders - journaling is memory makers.

What is Journaling?

Journaling is the title, the story, the caption or description, the theme, the senario, the point of the layout - what you want to remember! It can be done by hand or computer. Some say by hand is best as your handwritting is another memory you are creating. Others say because their handwritting is not very neat, they prefer the computer with all its fonts. And then of course, if you have alot to say in the memory, the computer is often the better way to go, simply because of the needed space to get the memory down. It is your decision for your scrapbook layout. Don't stress about "how" to do it, just make sure you do it and your imagination will take it from there.

What Should You Include in the Journaling?

Family histories are so much more than pictures of birthdays or every day, usual events. Strive to capture what makes an event a special memory you want to keep and what makes your family members unique because of this memory. Everyone has birthdays, so don't just say "Happy Birthday!" Journal about why this one is so special. Why was it different from last years? What happened this year, that didn't happen last year? Why are you scrapbooking this event? Are there hopes and dreams for the next year? Who was there? And especially the person's name - this way, future generations will always know who the person is. I say that and many of you will probably say ,"Well, yeah of course the person's name", but sometimes when you are working by yourself, you get wrapped up in the production of the layout and you own personal memory of the event or person, that you tend to write based on your own time right here and now, not thinking that future generations will be looking at this scrapbook layout and might need to know a little more about the subject.

Solution: Be detailed and specific. Don't assume others will know the memory so they won't need the details surrounding it.

Journal Using Your Own Handwritting

If you want to use your own handwritting to journal in your scrapbooks, and have a problem with writting "straight" on the page, journal "around" something! That way it won't matter if you are straight or not! Use a ruler and pencil to draw faint lines where you want to journal. When your writting ink has dried, you can erase the lines. Make your journaling in "pieces". Write a few lines here and a few lines over there and a few more own there. If you keep the length of the lines you are writting short, they won't tend to get crooked. Use acid-free, archival gel pens or markers. They come in all colors and tip styles (straight, thin, thick, caligraphy,etc). On dark backgrounds, those metallic silver, white and gold pens are absolutely wonderful for the journaling!

Journal Using the Computer

With all the fonts out there today, you can pick and choose till the cows come home! You can find whimsical, funny, structured, bold, themed, script, standard, weird and the list goes on! Pick one that matches the feel or theme of your layout. If you are journaling about a wedding, a script style would be nice. If it is a child's layout, choose a silly looking one or one that resembles a child's handwritting. The possibilities are endless! You can also change the font color. Bold, underline,italic, size - so many ways to add to the flavor of the journaling to match your theme. Print it out on cardstock, and cut it to your desired size or shape. You can print on solid cardstock or pattern paper. Printing journaling on vellum is a really wonderful way to add your journaling, but also add a special embellishment to your scrapbook layouts.

Where Do You Journal on a Scrapbook Layout?

Since the journaling is about as important as the photo - journal anywhere you want!

Journal on a die cut that is the theme of your layout. If you are doing a layout for a pet, use a die cut relating to the pet and journal on the die cut! For a dog, get a bone die cut. For a cat, use a mouse die cut. If you are doing a boy layout, get a wagon or a truck die cut and journal on it. For a birthday - a birthday cake die cut or for a picnic, use a picnic table die cut and journal on the "table top". The limit is only in your imagination! Back to school - grab an apple die cut or a school bus!

Trace a child's hand or foot print on the background paper and journal inside the imprint!

Use a tag die cut and journal on one side, and place a photo on the other! With a fiber tassel, its a great embellishment!

Use stencils - Use a pencil and lightly trace the shape onto the background paper. Then just write inside the stenciled shape! When the ink dries, erase the outline. This is a great way to get journaling in a circle which can very much add to the design of the layout!

Use Line stencils: These are stencils and they are just "lines" to actually write in, like squiggly lines, or spiral lines. There are stencils that is in the shape of something - like a balloon, or an animal or a tree. These serve 2 purposes. You can use them to journal in and trace them, cut them out and you have a die cut!


Make a book embellishment and journal inside the "book" StoryBook Time

Date Your Journaling

Another important thing to include in jouranling is the time and date of the layout. If you are reading a journal item and the date is there, it will be more memorable. "In June 2003, we went to our most favorite camping place". You have set the date, the event and the memory all of which will be important in years/generations to come.

When Do You Do the Journaling?

That is kind of up to you. You find when you can do it best so that you include all the details you want to be remembered. I usually do my journaling (on the computer) first, as I almost always do it on cardstock and make a matted block of my journaling and have that ready to include when I am setting my layout. Or you could do the layout and then just journal around the items on the layout. It doesn't have to be a "set in stone" action and no matter what you decide to do, you will most likely change it many times in your scrapping ventures so don't make a big deal of the "when", just make sure you do it and don't forget anything! You can always work around things.