Sunday, August 27, 2006

Scrapbook Your Age at Your Child's Age!

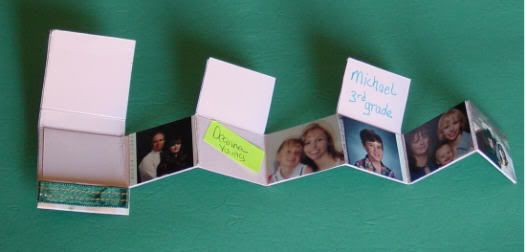
A great idea for a scrapbook layout overflowing with memories, is to show what you did as a child and what your child is doing now - at the same age! It is really amazing the same and differences between the generation ages. This is great for the back to school going right now - start some layouts and have them ready to add those wonderful papers that will be coming home!
Scrapbook Layout Description
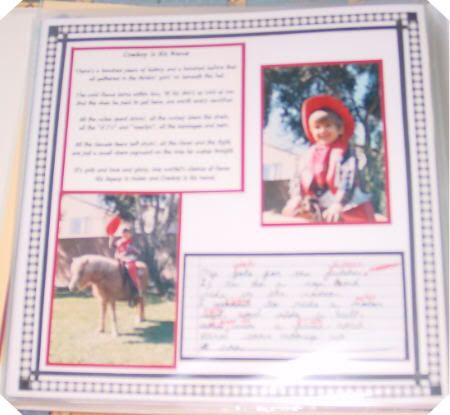
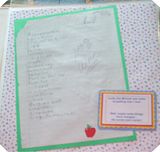
The first layout is a spelling test I took when I was in the 6th grade - 1968. I got a B!!! Later, in 1994 when my son was in the 6th grade, he took a spelling test and got a 100%! I had to scrapbook our tests! Our handwritting is similar, the words are similar - and you can't see it very well, but the tests were taken about 26 years apart, NEARLY TO THE DAY!!

Now granted, you might not have tests or papers from your school days, but scrapbook the kids papers anyway. You'll have that memory plus you'll be preparing for the memory you can give your grandkids when they bring home a paper to match the one mommy or daddy did when they were "their age" back in the olden days!!

Scrapbooking Techniques Used

I used the same background paper (12x12) and I matted the tests on acid free cardstock and used die cut letters on one to show it was the 6th grade for both of us. Then I added a bit of journaling on the PC and matted 3 times for that school/primary color theme and used the decorative scissors to cut some deckle edges to the mattes.

Quick, easy, inexpensive, yet oh, so full of memories!

Thursday, August 24, 2006

The Hopes Before and Pride After - Remember it!

While growing up, kids have goals, dreams and hopes for their life in the future. Scrapbook pages are a great way to not only remember those hopes and dreams, but also, once they have been accomplished, they can look back and have pride in themselves for keeping their eye on the prize!

My son, when in the 4th grade, had to write a paragraph what his goals were for his life. He said he wants to be a cowboy, ride bulls and be a police officer on a motocycle. I wanted his young dreams to be remembered in conjunction with his accomplishments in his life and that is the creation behind this layout.

I included a kindergarden photo of him on a pony, the paragraph he wrote and lyrics to a song he loved at the time of making the layout. A little older, he spent a summer on a farm with the hourses, then he started getting into bull riding, but then when he got accepted into the Police Academy, he had to stop that. He is now a Police Officer. Not on a cycle yet, but in his plans!


I took the words to a song by Garth Brooks "Cowboy Was His Name"- my sons favorite song - and did a journal block and then I added the little paragraph he had written in the 4th grade. Past, present, future - - - all in the same layout. I did this layout before he was accepted to the police academy, but it shows his goals and he knows he achieved them.

*******The goal and the dream.....accomplished******

And also look at the layout - simple, quick, easy and inexpensive. A quick strip border and matted photos and journal blocks. That's it, but this is one of my most favorite memory layouts as well as my son's. We remember it so vividly and marvel that he carried through another 10 years to met his goal in life from the 4th grade!

What are your children's goals and dream? Scrap them well - don't forget them. I am a grand mother, so take my word for it - - You will treasure these memories as much as the person they are about. Just saying them is one thing, but seeing them in print/photos - just make them so much more precious and rememorable

Sunday, August 20, 2006

Sillouette Your Photos for a Great Scrapbook Layout!

I learned about silhouetting photos and just love that technique. What's involved? All you do is cut out the object or person you want to use! Just cut it out of the photo and you have a silhouette for your scrapbook layout! Quick, easy and very eye-catching! A scrapbook layout just won't be the same!!!!

You can do so many things with this little silhouette for your scrapbook layout.
1. Place it "behind" something or "holding" something, or something holding it
2. Add it to another photo - just lay it on top!
3. Use it instead of a letter in the title-like if the silhouette is a person just standing straight, make the silhouette the I or L in a title.
4. Have it sticking out of a title letter - like an O - have it come through the middle or BE the middle!
5. Make a "flip book" kind of thing - several of the same silhouettes "walking" across that bottom of the page.
6. Just use it as an embellishment without a reason!
7. Look closely at the layout I show here - see how she is sitting on the "H" and the "E" and standing with her foot "through" the "P"! Lots of little extras you can create!
8. Play around with the styling of it - you can create depth and dimension depending on how and where you put the sillouette figure.
9. Another favorite - add pop-dots to the back of the sillouette figure! makes great dimension and depth. You can even add the pop-dot figure to another photo to make for a special addition.


This one that I did, I look back now and think "why was I wanting to remember her slippers" for heaven sake! I still don't know why I wanted to make that a memory in my grand daughters scrapbook - they were no big deal, but I scrapped EVERYTHING. So her first pair of slippers - here they are - with silhouette photos of a cute little girl!

Thursday, August 17, 2006

Interactive MatchBook "Scrapbook"

Here is photos of the Mini Matchbook scrapbook that I made for on my grand daughters little album. I used this on the front cover and added a magnet to the back of it and a metal embellishment to the album so that is would stay attached.

I used the matchbook as the template and for measurements. I added an interactive photo insert strip that not only pulls out for additional photos (head shots) but also opens up to show more photos!


I used pattern paper on the front embellished with just a tad bit of ribbon. The photo insert is inside here, open it and it pulls out.....


See how this inserted piece pulls out to reveal head shot size photos? This is the baby's family. The mother and father head shots current age, but are on a tab that opens up to show them at a younger age. Click on the photo to see a larger view.


This is a closed view of the matchbook scrapbook. See how it all fits inside there? Totally cute!!!

These aren't hard, just kind of time consuming, but they are certainly worth it. This is my first one and it turned out pretty good, and I didn't have any instructions - just saw a completed one once and figured it out. It is that easy. And the errors I made on this one, won't be on the next ones! Totalaly fixable!

This is one was made with a regular size matchbook as the template, but I have done the same thing, only enlarged the template - adding about 2 inches all around. Worked out great!

Feel free to leave a comment!

Friday, August 11, 2006

Scrapbook Your "Cotton Candy" Days!

I LOVE Cotton Candy!! So of course that was the first candy I introduced to my grand daughter. Of course, it is now also her favorite!! But I needed an embellishment to compliment the photos and the theme.

So I MADE cotton candy for the layout!! I took pink tissue paper and crinkled it "just right", not to crinkled and as poofy as possible and made a "circle" of the crinkled tissue paper and made a stick of COTTON CANDY!! The cone handle is just a long triangle cut from cardstock. I made another one and cut a circle out of the photo, matted it on acid free pattern paper and then again on solid cardstock and put it in the middle of the 2nd poofy candy.
This is a 12x12 layout
Photobucket - Video and Image Hosting

To finish the layout: I double-matted each photo with acid free card stock, used stickers for the title and as you can see... no journaling! Basically there is really nothing to say and "my first cotton candy" just sounded corney - even tho that is what it was - but that precious little face covered in cotton candy was just priceless. That is one of the few memories that I KNOW I will NEVER forget. Those come around occassionally and this is one of them. I added the month/year and did my signature stamp of I Love You, N (for Nanny). I do this on ALL layouts I do for my kids.

What is used in this scrapbook layout? Double-matting with prints and solids,3-D embellishments and no journaling.

Expense of the scrapbook layout? Basically nothing as you used your scraps.

What was/is your favorite candy, food or other thing that you want to introduce your grand children or your own child too? Was it corn dogs? Black Jack gum? NECCO wafers? Babe Ruth bars?

Whatever it was/is, you gotta scrapbook that special little something in your lives to share with each other!

Share what you have done to pass on your "cotton candy" days memories - leave a comment!

Friday, August 04, 2006

Free Scrapbook Stickers! Just print them out!

I am currently researching this but thought I'd send it along just in case you'd like to look into it also!

We all use stickers in our scrapbooks and on the layouts so....Printable Stickers for FREE!! How cool is that!

This link is a free link and offers alot of craft things, however, the printable stickers caught my eye. You can apparently print them out on sticker sheets that go in your printer. The seem to be 8"x10" in size.

Free Printable Stickers


My thinking...I don't want to invest in those sticker sheets so am going to print them out on Glossy photo paper like you would use for printing your photos and cut them out! Use the acid free adhesive photo squares, or pop dots and INSTANT SCRAPBOOK STICKERS!

Or if you have a Xyron Sticker Maker machine, (which come in multiple sizes) - you could run the paper through that and there you go - - - STICKERS STICKERS STICKERS for your scrapbook layouts! Or just for the kids to have to play with!

Try it out, see what you like and then leave a comment and let us all know how you liked it!

Wednesday, August 02, 2006

Scrapbook The Past With The Present

I started scrapping 10 years ago. My kids, at that time were 18 and 22. I had TONS of photos of their lives. Now they both have little girls! 6 years old and 5 month old! I had 4 scrapbooks going at once!

After the first grand daughter got here, and I started taking TONS of photos of her, I noticed something.....I was taking the same photo shot of my grand daughter that I suddenly remembered taking of my daughter (her mommy) at that same age! Yes, I guess I am a creature of habit! I noticed that I had taken the same shot/posse of my grand daughter that I did of my daughter - and not at all on purpose!

Scrapbook The Past with the Present

So of course, I have to link the past with the present. I wanted my daughter to see how she looked at the same age as her daughter. I wanted my grand daughter to be able to see herself and her mommy at the same age, and as an extra added bonus- they are doing the same thing! A Scrapbook holds more memories than you think!

Free Image Hosting at www.picturetrail.com
This scrapbook layout is of my daughter (right photo) and her daddy in 1978 and my grand daughter (left photo)and her Grandpa in 2000! Both sitting on the counter, mesmerized by the shaving ritual! The girls look alot alike and notice the change in the razor being used in 20 years, and of course, Daddy's gain weight too! Lot of memories in one layout - and notice NO JOURNALING!! Just a title! Scrapbook layouts offer you so many options!
The Generation Non-Gap...
But I didn't stop there. I also found some photos of me when I was young and made sure the if I ever took my kids or grand daughter to that same place, I'd take a photo of them at the same posse as I was! Talk about generation to generation! In this scrapbook layout, the top photo is of me and my 2 brothers and 1 sister back in the 60's at Knott's Berry Farm playing on the old train that we absolutely LOVED!(top left) So when I was able to take my grand daughter to Knott's, I made sure that I took a photo of her on that very same train - (right top). Plus, we played on the covered wagons (lower left) but since they dont' have that activity any longer at Knott's, me and grand baby just crawled into one that was on display (lower right) And to keep in the "family" theme, i added a photo of my 2 kids and the baby. This scrapbook layout shows the generations wonderfully! And notice, not to much embellishment! Just a block for journaling, photos (not even matted!) and a couple stickers

Free Image Hosting at www.picturetrail.com

The Fashion Gap? No way!

I also kept 2 dresses of my daughter's. When the grand baby was a girl, I waited till she was the same age as her mom in the picture and took one of her in "mommy's dress". Again, a scrapbook layout with just a little bit of journaling. That title says it all!


Free Image Hosting at www.picturetrail.com


Now if you dont' have kids right now, make a list of places you were when you were little that you will probably be able to take your kids and make a folder of the pictures. For instance, if you went to Disneyland and have a photo of you on your favorite ride, or eating your favorite food item, date the photo and just drop it in an envelope. In the future, if you are able to take your child to Disneyland, make sure you take a photo of the little one on the same ride as you or eating the same food item! Match them up on a layout and you have a winner of a memory!