Friday, December 14, 2007

Make Your Own Envelope


1. Find any envelope you want to use for the size. Small, long, square, whatever. Even little package name tags size are fun to work with and have on the page

2. Turn it over to the back. Look to see "how" it is constructed. Usually there is one large flap "glued" over the top of 2 side flaps

3. Starting at the top, gently start "tearing" or peeling the large front flap away from the smaller flaps on the sides. Tear slowly and gently but if it isn't perfectly torn or there are gaps, it won't matter - that is fixable. Just try as slowly and gently as possible to pull the flaps apart to make it easier on yourself!

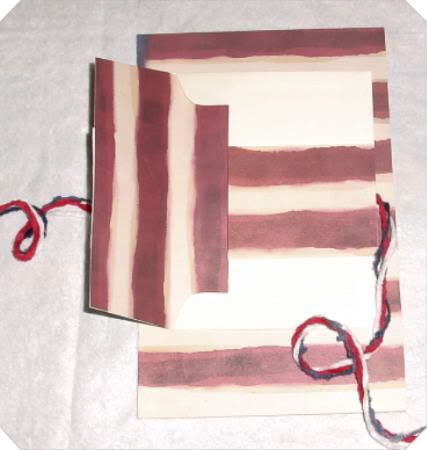
4. Once apart open it up and now you have your pattern!

5. Open the envelope pattern you just created. flatten it out. Place it on the paper you want to make into an envelope. Sometimes a tiny bit of glue stick in the middle is a good thing to do so that it stays in place. Just make sure you put the glue where the glue residue WON'T show once the envelope is done. Trace around the pattern. Remove the pattern from the paper.

6. Now to make the fold lines: Using the "real" envelope for a guide, take your ruler and line up from side to side, where the folds should be. You will only have 4 fold lines, 2 vertically and 2 horizonaly. Draw a line for each fold. At this point you just make the fold on each line you have drawn.

7. Fold the 2 side flaps in and then fold the lower portion UP, then fold you top flap DOWN. Use your ruler or bone folder to flatten the creases. Now your envelope is created! Apply adhesive ( I use glue sticks) on the side flaps. Fold the bottom flap up and press for the glue to stick. The top flap just folds down.

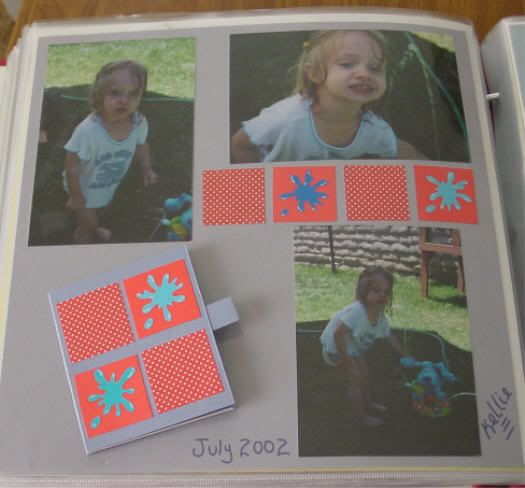
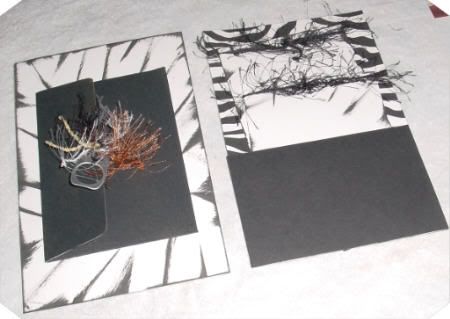
To add extra embellishment: I always cover the inside of the envelope that is visable, like this


Take the envy you just made and lay it on a contrasting piece of paper. Place it open side up so you can see where to end it. Make the contrasting paper go just below the bottom flap's edge, just to make sure there is no gap showing and when you open the envy all you see is the contrasting paper.

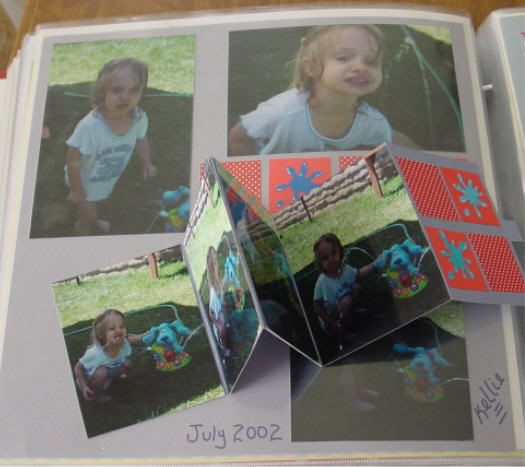
Trace the outline of the envy - basically just the top half of the envy is what you will be tracing. Cut this piece out, and do a bit of wigglying and a small trim of the edges that go inside the envy so that it matches the closing flap. Hard to explain, but as you do this, you will see what I am talking about. Then just glue it down!

Make sure you have glue where the fold line are, and make sure you flatten this very well - use your ruler or a bone folder to smooth it out. This makes sure that there is no "bubble" of the paper in that area.
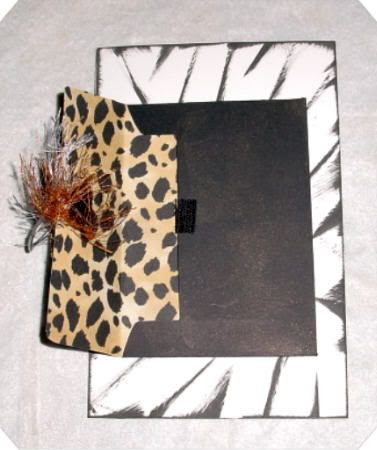
And you are done!!


Thursday, December 06, 2007

Like To Chat? My Lot is the place for yoU!

Do you enjoy chatting? Well, now a days it is called Social Networking and it is stil so much fun to chat with others about literally anything you can think of or like to talk about! Come join My Lot and be a part of the gang!

http://www.mylot.com/?ref=coffeebreak

Nice chatting with you!


myLot User Profile

Saturday, October 27, 2007

Baby Memory Scrapbook

Here is something I thought I'd share. It is a great way to get started scrapbooking, a great baby shower gift, a great way to go back in time and try to get caught up! A baby memory scrapbook - amazing and I can just feel those wonderful memories of your little ones emerging within your heart - start one todaY!

Sunday, October 14, 2007

Unusual SCRAPBOOK Embellishments from Around the House

Look around! Scrapbook embellishments and creations are often seen but not used! Find them! Use them! Embellishments for your scrapbook layouts and pages are a fun way to scrap and add alot of dimension to the layout. But you dont' have to spend alot of money for something unusual. Look in your junk drawer!

Just because it was not purchased in the scrapbook department, doesn't mean it can't end up on your scrapbook layout!! Pull out your imagination and see what one of a kind scrapping creations you can create to make your scrapbook layout and page spreads the most unique and talked about layouts in town - - - or at least in the generations to come! Just seeing what you used as in your scrapbooks and albums will create a new memory of you for those looking at your albums.

Look around the house! The craft room, sewing room, kitchen orthe work bench in the garage are all great places for finding things to use. We've all used the usual, ribbons, trims, buttons, snaps, and other "sewing" related items. Beads and jewlery makings and the like. Even clay!

BUT.......WAIT......DON'T STOP THERE!!!!

Here is a list of items I have recently heard of being used. I have not used all of them all, but some I have and it is pretty cool to create with these things.

But I would also like to hear from you guys about unusual things that you have used as emellishments in your scrapbook layouts. Especially the items that didn't cost anything, that are found around the house and such. Share your ideas as a comment here so we can all get that "Oh, cool! I never thought of that before" feeling that will throw us into scrapping mode immediately!!

Rings from soda cans (we used to call them "pop tops" as back in the old days, the ring used to pull all the way off. Now, they just fold up inside!) Anyway, these little gems make great embellishments. i have used them for a clasp on an envelope. Use them for an embellishment on a tag. As the "loop" part of a tie effect.

The square, plastic bread clips - the ones that keep the bread bag closed - these come in a variety of colors. Just add a sticker, add some glitter. Add a 3-D flower embellishment. Then you just clip it on the edge of something, or if you have a tag, clip it on to the hanging strings. Hang it from a ribbon

Party favors or cake decorations. Depending on the thickness of the item, often these items can be used in a scrapbook layout. At my daughter's baby shower, there were little ring kind of things on the cake, I used those in the layout. My DIL's baby shower there was plastic confetti decorations - little horses, bottles, pacifier, I grabbed a couple handfulls at clean up time, and added those to a shaker box in a layout. Also, they can just be glued on! I used the napkins and party hats - cut out the theme of the party and used them as die cuts.

Aluminum foil - heavy duty kind. Just crinkle it up as you want and rub ink over the crinkles to add dimension and color! Makes a great frame for a masculine scrapbook layout!

Old credit cards - yes OLD ones!! Ones that are no longer valid! Put them on a shopping theme layout. A great embellishment for a "money learning" theme for teenagers. How about an expired AAA card for a "first driving" theme or a "just got my drivers license" theme? These are all layouts that are common in scrapbooks so an expired card is a great embellishment

Washers, thin nuts, small chains, old keys, paper clips, and other "hardware" items are great embellishments! And you didn't have to go to the scrapbook store to get them!

Look around and see what you can find and then share with the rest of us! I am anxious to hear and learn some new ideas!

Thursday, October 11, 2007

Halloween Paper Piecing Patterns and Stickers!

Kid Printables.com is a fantastic place to play around in! Everything is free and there are so many things to do and use...the sky is the limit!

Need some Halloween paper piecing patterns?

Print these out on cardstock and cut them out, add your own detailing and presto! Paper piecing!

Cat, Hat and Bat
Arched Cat
Witch
Ghost trick or treating
Witch's face
Monster faces
Haunted House
Need some stickers?

Print these out on cardstock, run them through a Xyron and presto! Stickers!

If you don't have a Xyron, just use your glue stick!

Or...Print them out on photo paper - this will give them the glossy finish on the front and add a little extra character!

Stickers

Saturday, October 06, 2007

Make Your Recipe Bookfor FREE - Digital Scrapbooking

Back when WordPerfect was the "only" word processing tool out there, I typed up all my family recipes, including personal comments about the recipe or a story the recipe created. I just used colored typing paper cut in half and a regular font and then used Italic font for the story behind the recipe and put that at the bottom. Only other thing I did was make "chapter" dividers out of the cards the kids had given me over the years..which was really nice. I still love looking at those! And then I used the colored papers for the different chapters. That's it...done and has been used for years. Nice that at least all the recipes are in my book, but not very pretty, fun or amazing.

As a scrapbooker, I have been wanting to make a scrapbook recipe book of these same recipes. Why haven't I? LACK OF TIME!!! That major pain in the neck that we all get! Just not enough to go around!

HOWEVER... I have just been saved. I stumbled across this program and am working on my pages! I am new to Digital Scrapbooking, but this is quick, easy and amazing! Part of my problem is the unlimited options scrapbooking offers. I don't know how to "tone it down". Well, Smilebox has shown me how and I am a beliver!

Smilebox

This program is free to use and recipe books are not the only option. Digital scrapbooking is apparently the up and coming thing in this computer age, so maybe I can learn something new! Well, probably not. I LOVE my hand made pages and so do my kids and I love making and creating them so I think I'll just do my recipe book digitally and the scrapbook by hand. I taught my 7 year old grand daughter how to scrap and she has gotten a life-long membership!

So I start my recipe book and this is great too as I can make multiple copies - one for me, one for each of my grand daughters and one for my daughter - who doesn't cook or bake, but I'd like for her to have it anyway!

Give it a try and see what you think! Memories are in more than photos. You kids will love making Mom's best potatoe salad or "those cookies Mom used to bake" in years to come!

Tuesday, September 11, 2007

Need FREE Scrapbook embellishments?

Scrapbook For Box Tops is a site I started to help my grand daughter (now second grade) collect Box Tops 4 Education labels as her school fund raiser. We have had a GREAT response from so many fellow scrappers. We are glad to help you as you help us! I hope that we can keep it going!
You collect and send us BOX TOPS 4 EDUCATION labels from participating products (that you buy anyway!) and we swap for free scrapbook embellishments!

Check it out at Scrapbook For Box Tops and see what it's all about. FREE SCRAPBOOK supplies - can't get much better than that!

And remember with all the holiday baking and cooking and lots of kids lunch products you will be needing, make sure you save that Box Top label and swap them for free scrapbook supplies!

Saturday, June 09, 2007

Get Some FREE Scrapbook Embellishments!

I' d just like to remind everyone about the program I am working with my 7 year old grand daughter on. Scrapbook For Box Tops. The fund raiser at her school is for the kids to collect Box Tops 4 Education labels from participating brand/products.

37 NEW BRANDS JUST JOINED BOX TOPS 4 EDUCATION!

Kimberly Clark has joined the Box Tops 4 Education family! Diapers and other baby related products from Huggies and also Kotex and Depend have joined! Gotta have this stuff anyway, so check for a coupon and then watch for the box tops!

(Also, watch these particular advertisers as they often have free samples of their items that you can request.)

Plus, I now have (on the web site) the option for you to print out coupons on your own printer for products you want to buy. Print them out, take them to the store and save money! THEN..... cut off the Box Tops 4 Education squares (pink/blue and white) and go "shopping" on Scrapbook For Box Tops and choose the items you'd like and email me your "order". Send us the box tops, and I will send you the items you choose and a few extras!

I have ALOT available, not all is shown on the site. Stickers, fibers, die cuts, stickers, brads, eyelets, stickers, punch art, paper piecing and more - all acid free, and speciality made for scrapbooks.

If you don't see a theme or item you are looking for, ask me! I have lots of stuff, just have not been able to keep up the flow of posting. YTD we have collected 628! We are still collecting during the summer so Kellie can take them in when she starts 2nd grade.

Hope you'll all continue to help us out and enjoy your FREE Scrapbook embellishments!

Saturday, April 21, 2007

ABC Scrapbook Album - Not the Ordinary ABC's!

Whether you child is a toddler, pre-schooler, or kindergardener,an SBC album is a great educational tool (as well as alot of fun!) for them to have a book about the ABC's that they will enjoy and WANT to look at often, thereby helping them LEARN THE FUN WAY!!!

I made a scrapbook ABC album for my grand daughter and gave it to her when she was 2. Now, in 2st grade, she STILL picks out that book when she is at my house and totally enjoys looking through it, even tho she knows her ABC's. These layouts are not complicated, however you can make your ABC scrapbook as structured as you like. I used the "I Spy" collage theme.

But this isn't just a regular A is for apple, B is for boy ABC scrapbook album. I used ACTUAL things that she knows for the letters, not just the ordinary things. I also tried to incorporate a few things from her mother's life - D is for Dynamo which was the duck her mommy had when she was little. R is for Rainy Day, the rabbit we had when she was young and has now died. D is for Daddy, M is for Mommy and included a photo of each! These are memories that she will have for years, and can even hand down to HER children! Who knew the alphabet could have so many memories!

Q is for quarter and I glued a quarter on the page. N is of Nanny and I put a photo of me. M is for Mommy and Me and I put a photo of her and her mommy. U is for Uncle Michael and I put a photo of her uncle. Y is for yarn and I took a length of actual yarn and squiggled it up and glued it down! G is for goat and I used a photo of her mommy and uncle when they were little playing with a goat. Every letter a memory! What wonderful ideas can you come up with for your childs ABC album!

Educationally speaking: If you are making the scrapbook for a toddler or pre-schooler, it helps alot if they KNOW the picture they are looking at and can then relate the letter to the picture instead of learning the letter and trying to find something that relates to the letter.

In addition to some of the usual items or "normal" kind of items, I used items that meant something to her and only her. I used white cardstock for each page and those letters that have a color (p is pink, purple) i used that color to embellish - like strips across the page and then wrote "pink" or "purple" under the color. I also wrote the name next to each item in colored gel pens.

C is for California (she lives in California, die cut) cotton Candy (die cut and her and her favorite candy!) C is for Christmas (a photo of her mommy at christmas when she was 2) C is for Cinderella (stickers of Cinderella, although she now tells me that the pink dress is not Cinderella, it was Sleeping Beauty or whoever, I am bad at the names of all the princesses!) C is for coins (sticker of coins in this ATM card world)

D is for Daddy (photo of Daddy) D is for Dolphin (photo of dolphin when we took her to Sea World and she is now mezmerized wtih dolphins!) D is for Dynamo ( photo of her mommys pet)D is for Dragon fly (an unusual bug)

M is for Mommy and Me (photo of her and her mommy) M is for magician (die cut) M is for Mermaid (sticker) M is for money (stickers of dollar bills)

S is for sleeping bag (sticker, what she loves to sleep in when she spends the night at my house) S is for Strawberry Shortcake (sticker and she and her mom love this character) S is for Sylvester (sticker, she liked the cartoon cat) S is for saxaphone (die cut, she liked tooting horns!)
P is for Papa (photo of her Papa) P is for paw (die cut, from the Blue's Clue's days!) P is for Powerpuff Girls (stickers and she liked them back then!) P is for pumpkin (die cut, she loves carving pumpkins) P is for Panda (sticker, she loves animals)

So you get the idea. Create an album uniquely to your child and his/her likes, interests and family. They will enjoy them for years! Make memories in your ABC albums - education and memories - what a great combination!

Tuesday, April 17, 2007

What Scrapbook Supplies Do You Need?

Don't forget - Scrapbook for Box Tops means free scrapbook supplies! Take a look over at my blog I am doing with my 7 year old grand daughter to help her with her school fund raiser.

Need some free scrapbook embellishments? Come on over and take a look! Just save those little pink/blue/white Box Tops 4 Education labels from participating brands and go "shopping". I have lots on the site to see, but I have so much, i just can't get it all on, so tell me what you want, like, need, theme you prefer or category and I can pretty much accomodate any theme.

Stickers, die cuts, punch art, paper piecing, stickers, fibers, 3-D embellishments and more! I always give you a little more than you "order" so click on over to Scrapbook for Box Tops and take a look and start collecting for a free shopping spree for scrapbook items you can use!

Scrapbook For Box Tops

Small Envelope Pattern

I found this pattern in all my inventory of scrapbooking supplies and embellishments. It is really a good pattern to use for adding an embellishment to work with journaling. Write your journaling on a piece of cardstock and slide it into the envelope. Decorate the front of the envelope.

Or, my favorite way to use this pattern is with vellum - make the envelope out of vellum and use a sticker on the front, or cut a photo the exact size of the front of the envelope and slide that in the envelope. Then you have a muted photo front to the envelope.


Click on the pattern and it will take you to a larger size to print out. You can reduce the patter to make is smaller if you like!

Thursday, March 29, 2007

Scrapbook Your House to House to House....

As a youngster, my family moved alot. I don't remember the specific years, but I remember the moves by the schools that I went to and what house I lived in. I wanted to preserve the memories I have of each house, but again, so much time has past. This scrapbook layout is in my album called "My Life". It is just about my life, so there are other references to the houses I lived in, but I wanted memories of each house to go along with the photos. Most of the memories listed are literally about the house itself - that cool stair case or the favorite places we played or that closet that we turned into our own "library" so we could play library!


SCRAPBOOK LAYOUT DESCRIPTION
I took the specific memories of each house and journaled about them, and then included a photo of each house. The first 3 are in California, the fourth one is in Ohio and the fifth one is back in California - a 20 year span of time on a 2 page 8x10 spread! I even remembered the address and most of the phone numbers!

SCRAPBOOK TECHNIQUES USED
This scrapbook layout is called a "double page spread" as it is 2 pages for the same layout. This one is 8x10 in size and in page protectors. It is quick and easy (quick, once the memories are journaled!) I just typed the journaling on cardstock, seperated into a paragraph per house, used a corner rounder punch for the photos and the mattes and matted each photo onto cardstock. I didn't want the layout to get to "buzy" so I just added some handmade punch art flowers in the corners. I put the address and phone numbers below each photo


Another way I have done this (in my siblings albums I made them) was to create a "post card" of each photo. I put the photo on the right side of the card (in the place where you would normally write a note) and then on the address side, I put the address of the house. Turned out really cute!


SCRAPBOOK TOOLS USED
Paper trimmer, cardstock, photo adhesive, computer typing for journaling, corner rounded punch, gel pen, handmade punch art, glue stick. Quick, easy and inexpensive!


Sunday, March 18, 2007

Preserve Your Memories OUTSIDE the Scrapbook Album

Preserve Your Memories OUTSIDE the Scrapbook Album Box!
I have been wanting to learn about digital scrapbooking so in surfing the web, I found this site. I thought it was about digital scrapbooking as far as scanning photos and savings designs and such, organizing it all in a photo editing program and then just printing out a completed scrapbook layout page.

Boy, did I find something outside of the scrapbooking box!

*
Online Crafting at DigiKeepsakes.com using photos and scrapbook pages is another way of preserving your memories "outside the box" of traditional scrapbooking! This is the most amazing thing I've seen in relation to scrapbooking in a long time!

From your scrapbook layout (or any photo) to home decor, fashion apparel, blankets, flags, tapestries, banners, pillows, table cloths, towels, even dorm room decor and more! What a way to display your memories! You can decorate a blanket with your babies face! Talk about sweet slumber! Or how about making a banner for your college student's dorm room of them with their friends from back home? Or even a beautiful scarf around your neck with your child or grand child smiling out at you!

And Online Crafting at DigiKeepsakes.com using photos and scrapbook pages does it for you! You send them your special photo and they will create your memory on your choice of display!

I myself, am searching for the perfect photo to use for a blanket. I am thinking of Christmas gifts here. I know my daughter would love to have a blanket with her and her little girl on it! And what a way to say "I Love You"! The blankets or pillows would a make great wedding gift! Give a Gift Certificate to Online Crafting at DigiKeepsakes.com as a baby shower gift! Wow, the options are amazing...as is the product.

So I just thought I'd share my new discovery and let you all in on what I think, is one of the most wonderful ways of preserving your memories to come along since the scrapbook memory album! Take a look and see what you think!

Saturday, March 10, 2007

Scrapbook 11 Photos- One Page - The Accordion Way!

I was one of those scrappers that took photos upon photos upon photos of my first grand daughter. No matter what she did or where she did it, Nanny was there with that camera! Probably the most photographed kid in the country! Okay, I know I share that with every other grand mother, but the next problem was how to display all those photos! Throw away a photo? Yeah, like that's going to happen! I wanted every second to be remembered.

But again, that age old question of how many photos per scrapbook page? I use 12x12 instead of 8x10 for the main purpose of being able to have more space for memories and photos, but even a 12x12 can only take so many! So I had to figure out a way to put more photos on the 12x12 pages!

An accordion album can mean alot of things and can be created alot of ways. I was concerned about the thickness this embellishment would cause. But, where there's a will, there' s usually a way! So intead of making an "all by itself", "book in a book" kind of thing, I just did a simple technique with a couple folds and made the perfect accordion fold booklet for my scrapbook layout.

This layout was just of my grand daughter playing outside in the sprinkler. Since this layout was #2 in the sprinkler "photo layout", I didn't do any journaling on this layout as that was already on the first scrapbook layout. However, all you'd have to do if you did want journaling would be to use sections of the accordion book and journal on it instead of putting a photo on it.

In addition, this layout was not particularily to remember the event or what she was doing, but it was more to remember that FACE!! That precious little cherib, darling, princess, cute, adorable, face with its priceless and beautiful smile!!! Totally unrehearsed, just plain, pure sweetness! A picture that is saying about 5,000 words!

The only other embellishment is four, 1 inch square punchies with a water splat sticker .

To Make the Accordion Folder

To make the folder, just choose the size of photos you want to use. I cropped these to the size of just the main picture and very little background. I wanted to see the baby, not the background. This folder is about 4x4 in size. I used 12x12 size cardstock and cut 2, 4 inch by 12 inch lengths. I scored them every 4 inches, and then made the folds. Then I glued the 2 lengths together and folded the total length into 4" pages. One 4" section is glued to the background cardstock. To add the photos, there are 4 photos and one "cover" on the one side of the folder, and then 4 photos on the other side. A little tab pull made from a piece of folded cardstock and adhered as the "pull" of the book. I decorated the cover with matching squares as I used on the page embellishment.

So quick and easy and you have 11 photos on one scrapbook layout page!

To Put In a Page Protector...

To put this scrapbook layout in a page protector, just slide the layout into the page protector with the accordion folder closed. On the right side edge of the accordion folder, take your craft knife and make a slice down the length of the back edge. Start about 1/4" above the folder's spine and slice to about 1/4" below the spine. This allows for the accordion folder to open without pulling on the page protector. Now, gently, work it until you pull the length of the accordion folder out through the sliced opening in the page protector. Now you have the accordion folder on the outside of the page protector, and the layout is inside the page protector.

Tuesday, February 27, 2007

MILITARY THEME SCRAPBOOK SUPPLIES

I found a site that is all about military themed scrapbooking! I took a look at it has a good selection of all themed papers and embellishments. Looks like a great site if you need military themed cardstock and scrapbook supplies. This site has some freebies you might be interested in too.

Creating Military Memories

This site has free Military printables to help Military whether their Military Love Ones are stationed here or away. For example many of the free military cards are in jpg image format which can be opened in any in any image editor and personalized before printing. Featured free military printables offers are Military Guardian Angel for printable stationery and cards, Yellow Ribbon Candy Wrappers.

Military free printables

Both sites are also great for passing on to those that have military friends and family but don't scrapbook! Cards, stationery and other things that have nothing to do with scrapping, but will be a welcomed by loved ones.

God Bless Our Troops

Thursday, February 22, 2007

Before and After, Ears and Years and Time Travel!

One of my favorite themes to scrapbook is a "then and now" theme. I have lots of "extra" photos of when my kids were little and can't bear to throw them away. I have found that this style of scrapbooking a layout is just perfect. Uses up the extra photos, but more importantly, creates even more memories and wonderful feelings for everyone!

Also, are you behind? Well, that is a common place to be in scrapbooking, so don't be hard on yourself! This style of scrapbooking is absolutely fantastic way to get caught up while you create and preserve memories for all involved!

In this layout I used shiney, gold paper and my letter punch and punched out the letters for the title. My intention was to have "Disney Years" because the layout is of my grand daughter's first trip to Disneyland when she was about 3 years old. I also had extra photos of when her mother (my daughter) was at Disneyland when she was little. I wanted to incorporate both girls at the same place, at similar ages, but in different times! Move over time travel! Then and now, before and after! Oh, the memories!

The Perfect Title

I didn't notice it until I layed the letters out, that I was short a Y. But, there before my eyes, was the perfect title! Disneyears! Why? What is the first thing you think of when you think Disneyland? Mickey Mouse and of course, his EARS! And what is the point I am trying to convey? YEARS of time span between mother and daughter doing the same thing! Ears and years, take away a Y and you have it - Disneyears! It was perfect!


Do You See Mickey Mouse and Minnie Mouse? Look Closely!

Well, you won't find them in the photos, but since you just can't have a Disneyland scrapbook layout without these two entities, I included them......
in theory!

The background paper I used was a red with white dots... which is what? Minnie Mouse's dress pattern! I double matted the photos with red and black cardstock which is .... Mickey Mouse's colors! I used a black die cut of a Mickey Mouse head and used white gel pen for the journaling. I also found Mickey's white-gloved "hands" die cuts and used those to kind of "hold" one of the photos as often Mickey Mouse is holding his hands out to welcome you to his kingdom.

This layout started with a mistake. Had I not made a simple mistake, it probably would have just been your usual "Trip to Disneyland" layout. But thanks to that mistake, the memories are of Disneyland with my daughter - about 20 years ago, Disneyland with my grand daughter about 3 years ago and once that far, I can't help but remember my amazing trips to Disneyland when I was a kid - 30 years ago! Wow! Talk about time travel!!

Sunday, February 11, 2007

Look "Outside the Box" for Scrapbook Memories

There is so much available in the scrapbooking world these days, that it seems there is no limit. There is something for every event, theme, happening, time, era, person, place, thing and then some. Scrapbooking is all about using different items to preserve a memory. And you have those items! You don't always have to get your embellishments at a store!

Some memories are so personal and deeply felt, that a purchased embellishment and a photo, just don't convey the memory. So what do you do? All you have to do is look "outside of the box". You have things you could use, you just don't know it as you don't think "scrapbooking" when you look at them.

The Baby T-Shirt
This is a scrapbook layout that is very dear to me. It is the t-shirt my son got in the hospital when he was born. Because it is the actual shirt he wore is a memory in itself - "my little boy, who is now 24, wore that shirt!" This is a memory a photo couldn't give. It also reminds me of how small he was and how I loved to hold him and rock him to sleep. The T-shirt is a tiny little thing, fits perfectly on a 12x12 scrapbook layout page! A black background page, the shirt, a title and a few stickers. Quick and easy, but holds the most precious memories for me. (the glare is from the camera flash)
Now, back in the "old-days", baby formula stained. Hard as I tried, I couldn't get that stain out. However, now that I am day-caring HIS baby girl, I notice how far things have come - baby formula no longer stains! A new memory created - cheesey, but a memory nevertheless! I adhered the t-shirt to the back ground cardstock with the photo adhesive squares. Some on the back of the shirt and some on the inside to hold the two layers together. Once in a page protector, there is no sliding. Everything is secure and protected.
The Title is a Memory Too!
The title is also quite a memory. "Baby of Mine" is the name of a song in the Disney movie, "Dumbo" - the song that Mrs. Jumbo sang to her baby, Dumbo. This movie was my son's most favorite movie when he was in pre-school and kindergarten. MANY mornings I couldn't get him out of bed unless I turned this movie on. Once he heard the movie, he was up and ready to go! I use metallic silver scrapbooking paper and a letter punch to make the letters. You could use any alphabet template if you don't have a punch system.
Other Embellishments
This layout is quick and easy. The only other embellishments I used were some color matching, floral stickers and some thin strips of the silver metallic paper, which I cut using a paper trimmer. It just needed a little "something" extra to compliment the layout since the t-shirt was so large and filled the layout page.
So take a look around at what you have. Memories are everywhere. There is more to scrapping than what's in the stores! Just think "Scrapbook" as you look around and see what memories you can find!

Sunday, February 04, 2007

How To Basket Weave Your Scrapbook Layout!

Basket weaving is not just for baskets! What a fantastic and unusual embellishment for your scrapbook layout! It adds color, depth and dimension and just brings the page layout all together. And if you want to use it for the upcoming Easter theme layouts - how perfect is that going to be!!!
"Catching Balloons"
I was making the layout for my grand daughter's memory album. She was at a wedding shower and she was amazed at the balloons and enjoyed reaching up to grab the strings and then hand them out to the guests. That is what I wanted her to remember. This is a 12x12 layout page
To Make The Basket Weave Embellishment
This is not has hard as it might seem. All you need is a paper cutter and some glue. Choose your colors for the entire layout. Choose which 2 colors you want for the basket weave. I choose purple and yellow. I cut strips from12x12 cardstock at about 1/4" in thick, making 12x1/4" strips. I started with the yellow strips and layed them across the top, with equal spacing between them for the purple ones to slide through. I glued them down to the cardstock back ground paper only as far over until I wanted the weaving to start. This makes for easy weaving. The ends are glued down so they don't move while you weave. Photos on top of the strips break up the weaving a bit so it doesn't get overwhelming.

Next, I weaved the purple strips in through the yellow ones. My weave area size guide was the photo at the bottom. Notice I made the purple strips portion of the weave only as wide as that photo at the bottom. The weave area of the yellow strips was just slightly less that the height of the pictures. It looked "over done" to have them the same "size" as the height of the photos. This is something you have to do and consider for your self. Since you aren't glueing anything yet, you can easily play around and find that perfect fit for your layout. The photos kind of hide the ends of the strips and tie the weave all together.

Once you have the weave the way you like, just add glue in a few places inside the weaved area and then glue down all the ends of the strips. Sounds more complicated and time consuming but it really is quick and easy. Hardest part is probably deciding how much area you want to cover with the weave.

In addition, I cut 3 photos of just the toddler catching or holding the balloons and cut them into thinner sizes - these are about 2 inches wide, 4 inches long. I matted them on contrasting cardstock and layed them over the yellow basket weave strips. The last photo, I cropped it to match the purple strip area size.

To Compliment the Basket Weave Area

Now you have an open space in the lower left corner of the scrapbook page. This is where I wanted my title to go. I didn't want to use more basket weaving as that would have been to much. So I just took small pieces of the cardstock I had used and with a 2 inch square punch, I punched out squares, and just layed them out into a nice catchy sploch of color. I used vellum and printed the title "Catching Balloons" via computer. Then I tore the vellum into a nice odd shape and laid it over the colored squares. I used yellow eyelets to hold the vellum in place. Again, quick and easy.

No Journaling, But the Story Is Still Told
This scrapbook layout has no journaling. It "shows" that my grand daughter liked catching the balloons and other than that, there was nothing else to say. The title tells the action and the photos tell the story. I always "signed" my scrapbook layouts with a stamp that said "I Love You" and my initial (N for Nanny to my GD or M for mom for my kids) I always used gold ink for the stamping of my signature. Just that extra added feature that holds on to a wonderful memory!

Sunday, January 28, 2007

Enhance Your Scrapbook Layout with Photo Stamping!

Just because a photograph is not "good" to use as a main point of interest on a scrapbook page, doesn't mean it is unusable! Just the opposite! Take another look at that photograph... the face of the person may be blurred, the main point of interest might be to dark, but there are images there that you can see and use!

Look at the background. Maybe there is something in the background of the photo behind the main point of interest, that is good quality and tells a story. The signage of a store, an animal, an object that can "say" where the photo was taken or offer you a memory of that place. Look at the background...there is a memory there! But what can you do with it?

What about when you have a photo of alot of people. If the image of the person you are focusing on is not good, and sometimes even it if is, you also want to remember the others in the shot. But how?

I call this technique Photo Stamping (directions below) simply because I used a punch that has
serrated edges that look like the edges of a real postage stamp. I punched out some squares and they looked like postage stamps, so I named it that.

With this technique, you can create a variety of wonderful creations using these small "photo stamps" and they will tell the story in themselves as well as adding that memory to your layout and offering a great decorative feature! In this 12x12 layout page, not only have I included a bunch of specific things, but lined the photo stamps down the middle of the page as a seperation feature so the layout wasn't just a common 4 photos on a page structure. Took very little space, created a seperation, added a focal point and includes numerous memories - all that with one little photo stamp!


Enhance Landscape Views

In addition to faces, I used this technique to create an ambiance effect with the landscape. Using the stamp punch, I punched the landscape in the photo evenly across. Then just lay the little photo stamps side by side with just a bit of space between them. The background page color shows through just enough to give the scene a bit of that "stand out" effect, but because the photo stamps were all punched exactly in conjunction, the actual view is not much effected.

On this layout, I just wanted the view of the trolley car. I didn't want the rest of the busy background that was in that photo. Putting the trolley car photo as is, just didn't "do it". So I took another photo that had sky in it, used my photo stamping technique and created a full scene. The seperation makes it look as though this was one picture. The trolly car view is just a long rectangle, while the sky is the photo stamping technique.

People, Places and Things

In these sets of photo stampings, I just wanted the face of the person or a specific item and not all the background or rest of the scenery that was in the photo. I photo stamped each specific item or face and then just layed all the stamps out on the layout and did some juggling until I got the scrapbook layout organized as I liked! This is also a great way to fill in the small spaces that are to small for a photo, but if the space is left blank, it looks unfinished. In addition, you can use this technique as a space filler but still in sync with the layout. Some of these "stamps" I used were not particularly of anything, just an object or design. I used them as space fillers, but was still able to keep in theme of the layout while adding a fancy embellishment to the layout.

Check out your photos - do you really want all that busy background? Do you want the expressions and personalities that a face close-up offers! Take a look - see what you can find in your photographs that can offer you more memories while adding a wonderful feature to your scrapbook layout.

How To Photo Stamp:

Take the stamp punch, or you can really use any similar punch - circle, square, heart - just so it has a large center area to accomodate the close-up you are wanting.

Turn the punch UPSIDE DOWN. Slide your photo, facing up, into the punch. Because the punch is upside down, you can see the photo through the opening that will be punched out. Place the photo over the area you want to punch. Then just punch! It's that easy! If you are doing a landscape, just start from one side and make sure you line up the additional punch areas very near to the previous punched area so that the landscape horizon stays in order. Don't punch one with half the tree, and then the next punch shows no tree at all. Don't cut one that has mountain in it and the next one has a tree. Just line it up as near to the edge of the previous punch and make the next punch. Do this across the photograph or for how ever many photo stamps you want.

Sunday, January 21, 2007

FREE Paper Dolls - Great Scrapbook Embellishments

When I was a kid I LOVED paper dolls! We traveled alot for vacations and my sister and I always got a new "book" of paper dolls for eac trip. We loved them!

Now, as a scrapbooker, I can not only keep my memory of paper dolls alive, but use them as embellishments to my scrapbook layout pages! I stumbled on this site and although many are not my "style", it is still great to use the ones that are (I Love Lucy to mention my favorite!) and use them on a scrapbook page! Just print them out on white cardstock!

Free Paper Dolls


Print them out for your little girls to play with and no one will say a word if you want to print some out for yourself to play with! Reliving memories is what scrapbooking is all about!!

There is an option to purchase a set of paper dolls using YOUR OWN photo of the person's face. Apparently you send her a photo of your person and she makes the face of that person on a paper doll. Might be something interesting for a gift idea!

Have fun!

Tuesday, January 16, 2007

Interactive Scrapbook Page - Moving Tags

I just love making my scrapbook layout pages interactive. Not only does it give a wonderful, playful substance to the layout, but it also offers inquisitive lookers a fun way to remember. A memory doesn't stop at the subject person. There are lots of other things that contributed to making that memory and I wanted to capture it all!

What Is A Moving Tag?

I created Moving Tags to accommodate smaller photos. These "smaller photos" I am talking about are "photos" that are cut from a regular size photograph, but just a smaller part of the main photo that I wanted to capture, not any background. Multiple tags are punched and stacked together to spin individually

When my son graduated from the police academy, it was a time in his life that he had been dreaming of since he was in the 4th grade. He even wrote an essay in the 4th grade about what he wanted to be when he grew up and he wrote "be a cop". And he was able to make his dream come true. Of course I put that essay on his layout! But back to the tags. He was so proud of what he had accomplished. And what mother wouldn't want to remember her son on the most wonderful day of his life....at least to that point in his life! And that is what I wanted to capture on this scrapbook layout for myself.

Since I was in "tag" mode, I used my tag punches to punch out the his face-only. Tag punches come in all sizes - small to gargantuan! Take your pick! You can do this technique with as many photos you want. Of course you could also use a circle, square or heart punch. You can use any style of punch as long as it has a large middle area for the face or other image you are working with.

This is a 12x12 layout. I used a police man die cut and blue, print background paper. I used red, white and blue cardstock to matte the photos and create the tag bases. One tag had the title and is secured with a star brad. The other tag is a red base and secured with a star brad. A photo cut with the next smaller tag punch size is on the red tag base, appearing to be framed with the red tag, but take a closer look.................


How To Create Moving Tags

I took 4 close-up photos of my son's face, showing his pride and commitment and used a tag punch to punch out just his face. I put a hole at the top of each tag with a hole punch and stacked them together, securing them with a round brad so that they can be turned/rotated individually. From his point-blank face while being sworn in, to his huge smile once he realized it was for real - it's all there!

How To Accommodate a Page Protector

To make the stack of tags accommodate a page protector, just slide the layout into the page protector BEFORE securing the rotating tag photos to the red tag base. Once the layout is in the page protector, mark on the plastic where the hole needs to be to for the tags to be centered on top of the red tag base. Using the brad itself, I wiggled a hole into the plastic. Then put the brad through the stack of photo tags and then through the hole in the plastic page protector and through the background paper. Pull the prongs apart on the back of the background page and there you have it! A wonderful, interactive addition to your scrapbook layout page preserving some most amazing memories!

Thursday, January 11, 2007

How to Put More Photos on a Scrapbook Layout

A very common question asked in scrapbooking is..."How do I get more photos on a single page layout?". The answer....Book it! This is very easy to do, and you can put as many photographs as you like in the book! Look at this 12x12 scrapbook layout...see the book?

Let's start at the beginning. Notice there is no title on this scrapbook layout page. Well, there is, it is just not an "added" feature. It is on the photograph at the top of the layout - Pier 39 and with the Golden Gate Bridge in the background of another photo, no other title is needed. San Francisco is a given. This photo has the title in it as well as the "who" of the layout. But take a closer look.... this photograph is also the cover of the book of extra photos and journaling! This one embellishment covers 3 scrapbook layout features... the title, extra photographs and journaling. How cool is that! Let's open the book......

Open the book and there are the extra photos - mounted on white cardstock and a caption for each. I was not on this trip, but made this layout for my daughter so I left 2 blank "pages" in the back of book for her journal her own memorys on.
The First Page

The first page is another photograph of the whole group of people she was with. However, check out that beautiful candy bar wrapper on the facing page. One of her favorite places she visited was the Ghirardelli chocolate factory/store. What better memory inducer than a beautiful, shiney, colorful, chocolate bar wrapper! I just folded it back up like it was with the bar in it, and adhered it to the inside cover page!

Turn the Next Page

Look closely, you can see how I mounted the 4x6 photos to white cardstock with photo adhesieve squares and then using a red gel pen, wrote the captions on the upper or lower edges of the white cardstock page. No cutting, cropping or sizing! I have these two "pages" and 2 more in this book. It is not to thick, but just enough to hold the extra photos and not be to bulky.

Want to Make This Book?

Book was made by just matting photos to cardstock. How easy is that! First, I used 4x6 inch as my main measurement and then took white cardstock and cut "pages" with an additional border of 1/4" on the sides and 1/2" on the top and bottom (of the white cardstock). The extra 1/2 added to the top will be what is put in the "binding" and the bottom will be space for the captions. The writing space will alternate as you turn the "pages".

Next, take a piece of matching background cardstock (in this layout case it was red) and cut a piece the same size as the white cardstock pages. This will be the front cover of the book. Add the photo and it now looks like any other photo on a scrapbook page because the border area is the same color as the background.

Next, take another piece of the matching (red) background cardstock and cut it the size of the pages PLUS another 1/2 inch to the top edge. This 1/2 inch is then folded down OVER all of the white photo pages to create a "spine". I then used 3 gold brads to secure all pages, pressing them through the "spine", including all pages and to the back of the book and folding the prongs outward. The back of the book is then glued to the background page.

And the "book" is done! Pretty easy! Even a beginner can do this book. Just measure and cut. If you don't want to secure the book to the background page, make a pocket for it to slip into!

Give it a try! If you have any questions, leave me a comment and I will help you out.

Tuesday, January 09, 2007

Scrapbook for Box Tops - new items to choose from!

New Items at Scrapbook for Box Tops - free SB supplies for Box Tops swap!

I have some new items posted in the 10 Box Tops and 15 Box Tops categories if you'd care to take a look! Some handmade punch art kids and some metal button stickers. More on the way!

Scrapbook For Box Tops

We have had a really great response for this swap for free scrapbooking supplies and Kellie and I are very thankful to all those that have swapped box tops with us to help her school. She enjoys including a thank you note with every swap and is anxious to see where you "are" on the United States map!

The "Surprise Me!" category is a popular request. You tell me what you like or want and that is what I will send you!

Hope your layouts are coming along great and keep collecting box tops! There are more items are on the way!

Thanks to everyone!

Saturday, January 06, 2007

How to Expand a Photo - Horizontally or Veritcally

We are always talking about "cropping" a photo to fit a scrapbook layout, but sometimes we need to expand a photo - whether it is to accommodate more space on the layout page or to add an interesting aesthetic feature to the layout. Expanding a photo is quick and easy to do and it is one of my favorite ways to accentuate a scrapbook layout.

All you have to do is take your photo and cut it into even sized pieces! Sounds a bit shaky, but take a look at this scrapbook layout and the close up of the expanded photos.

The Layout
This is a layout I did for my daughter when she went to San Francisco, CA for the first time. The photo itself was a 4x6 size photo. It is of the coast line with fishing boats. Just the photo alone, was too plain. I wanted to add something to it.

Cut and Seperate (cringing at this point is acceptable, but stick with it!)
After measuring, I cut the photograph into sections. They are all equal sections except for the last one, slightly smaller because I ran out of background space! Each section is 1 inch wide. I didn't matte the photo, just layed it out on the background page. Make even spaces between each photo piece and voila! An expanded photo, fills the required space on the layout and adds quite the charm to the theme of the layout.

The Aesthetic Issues

This method of scrapbooking accomplishes 2 aesthetic issues. First, the photo takes up a lot of space, while keeping the theme and streamline of the layout, without making it look cluttered. Secondly, it makes the photo "appear" to be matted, when it is not. Both of these additions make for a very interesting, eye-catching scrapbook layout page!

Do It Vertically, too!

You can also do this method using vertical photographs! This photo, I cut into 1/2 inch strips and placed them evenly spaced on a contrasting color cardstock matte and then placed that whole ensemble onto the layout. Again, quite an aesthetic eye catcher! Now as for the color of cardstock you use, that is your decision. I didn't use a color from the photo as I thought that would just blend to much and you wouldn't be able to see the continuity of the photo. I chose the blue as that was main color in the other photos - the blue sky - so I stayed with that shade and just used a different hue. The blue I used is soft, suttle and blends very well with the images and colors of the photo. You can still plainly see the full photo but it has the little bit of expression in there. So just pick and choose, trial and error which color cardstock that would look best on your layout.

I would venture to say that expanding photos would be best if kept to scenery or objects, but if you have extras or can make copies, give it a try on any subject. You never know what you might come up with!