Friday, September 29, 2006

Paper Tearing Technique for your scrapbook layouts

This is a wonderful scrapbook technique to use and it is so simple and easy, yet it yields dimension and shadow to your scrapbook layout.

Layout Description
This 12x12 layout, was of my grand daughters first visit to the beach! She didn't like it too much! I used pale blue cardstock for the back ground page to make the sky. Then a "sandy brown" color for the sand, white for the caps on the waves and dark blue for the water/waves. Mickey Mouse stickers of Mickey and friends "at the beach" doing beachy things. A lazer die cut of "A Day at the Beach" and just 3 photos - one I sillouetted.

Photobucket - Video and Image Hosting
Scrapboking Technique Used:

One tear of cardstock and it give you 2 edge-styles to work with. Take a piece of solid cardstock. Holding it in your left hand, take a portion (however much you need) and tear downwards. You'll see that the piece in your left hand has an edge that is solid color of (the paper) but then evolves to a lighter shade. The piece in your right hand, has just that solid color edge. You can choose which edge you want to use.
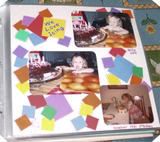
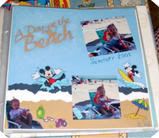
I have seen alot of this technique and it looks nice as a heritage embellishment, but the only way I have used it is as WATER WAVES. I then layered several colors of the torn paper to show the different colors of waves and the sandy beach!
Layout Assembly
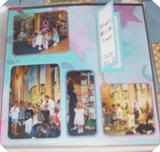
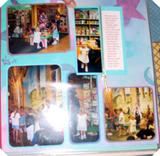
I started with the light blue for the sky cardstock - my back ground paper. Typically, you would think to start "building" the bottom, but since you want those "torn paper" edges to be visable for all shades, you have to start building the beach from the top instead of the bottom. I layed out where I wanted the photos to get an idea of how "high" to make the darkest waves. Then I tore a piece of dark blue cardstock and layed it in the middle of the page. Then I tore a white cardstock, and placed the torn edge overlapping the dark blue. At this point, you could add another shade of blue if you like. The rest would be the "sand" of the beach, so I tore the sandy brown cardstock, but made it longer to add the beach to the layout. Now the colors are all there, in "order" and the beach is on top with the waves in the background! When you are tearing the paper, tear it with some motion to get "valleys and mountiains" so that the torn edge is not straight across. This adds to the dimension of the waves.
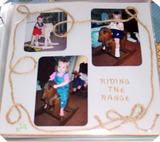
I then just layed the photos around, added the stickers showing the characters playing in the water, but put the photos of my grand daughter on the beach for the memory, that she didn't like the beach! Then in the sky, I placed the title die cut. Name and date and the layout is done and ready for your scrapbook!
Quick, easy and inexpensive - except for the lazer diecut, your only expense is cardstock and a few stickers! If you dont have the lazer die cut, use any die cut letters, or stamp the title or chalk it!
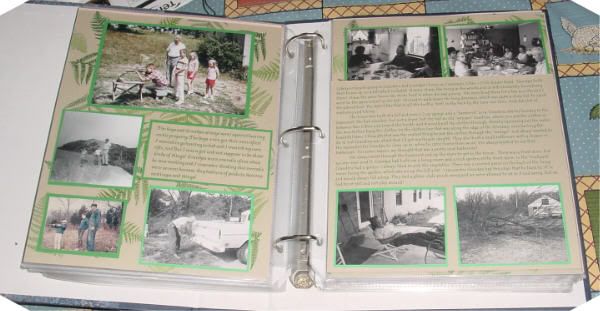
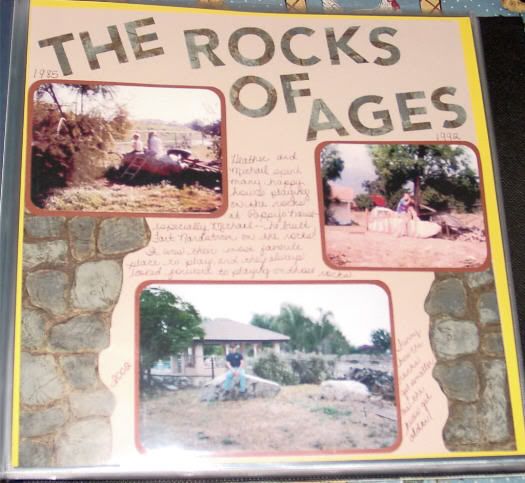
This layout just took a little more time, but no more expense and was still pretty easy. You can do this with any landscape ... browns or greens work great!

Tuesday, September 26, 2006

Compare Your Children! Scrapbook The Results!

In the case of scrapbooking, it is okay to compare your children! To each other, but more important to the memory aspect - compare them to their parents at that same age.. or to their grand parents at that age! Memories and laughter will be the results! They say times change, people change but in some cases, nothing changes - the memory just gets adjusted!

Scrapbook Layout Description - 12x12 layout

While taking photos of my grand daughter, I was amazed at how many photos I ended up taking that were the same situation or posse that I took of her mother 20 years ago! It wasn't on purpose, just cute things she did and when I got to scrapping them, a memory hit and I looked back in my stock of photos and there it was...the same situation, 20 years ago, with another little girl, that could be a twin to my grand daughter! It made for a perfect scrapbook layout. Mother and daughter doing the same thing 20 years apart. Who says times change?!
And there isn't/wasn't any memory to actual journal about. What do you say about washing a truck? But in this case, just looking at the photos creates memories on its own. Remember when she was that little? Remember how cute she was? Look how much they look alike at that age! Those kinds of memories - the ones that can't be written down, but just stay in your memory banks and come forward when you see the layout. It is almost like creating new memories, now that you see them together!

Photobucket - Video and Image Hosting "We Love Icing" - The top 2 photos are of my grand daughter "sneaking" a taste of the icing on a birthday cake. The lower photo is my daughter (her mother) "sneaking" a taste of the icing on a birthday cake 20 years earlier! Mother is a bit older than daughter in these photos, but the "sneaking" was obviously inherited!


Photobucket - Video and Image Hosting "Helping Papa": The top 3 photos in this layout are of my grand daughter helping her Papa wash his truck. The lower photo is her mother - 20 years ago at the same age, helping her Daddy wash his truck. Although some things never change, (you know men and their trucks!), these 2 little girls are definately related! Notice the little sillouette of my grand daughter looking over the one photo at the top!
Photobucket - Video and Image Hosting 'Little Girls Don't Shave"
In this layout, my daughter at age 2(top right) is watching her daddy shave. 20 years later, my grand daughter(lower left) is watching Papa shave! Why kids are so mesmerized by that shaving trick is beyond me, but they seem to like it! And look at the two girls... not much change there - they look alike! However, there are other memories - look at the difference in the razors used and the changes in Dadd/Papa!

Scrapbook Techniques Used

These layouts are quick, easy and inexpensive. This helps for getting layouts done and staying current!
For "We Love Icing", I used a corner round on the photo's corners and didn't matte them, just adhered them to the background paper. Then using different sizes of square die cuts , I scattered them around the page - for a confetti effect since the picture was at a birthday party. On the one biggest square die cut, I used tiny letter stickers for the title "We Love Icing" and then added names and dates.

In the "Helping Papa" scrapbook page, I cut a sillouette of my grand daughter and proped it up on top of the one photo like she is looking over the photo to the layout. It was just a litte extra thing I added. I had just learned about sillouetting, and just had to use it! I also used a corner rounder on the photos, no mattes and just wrote names and dates below the photos. The only extra feature was die cut letters - I bought them for 5¢ each and used them for the title. But what I did that you can't see in the picture is, once I had the letters adhered to the page, I took a scrapbook marker and did a "dash" line around each letter - just to help them stand out a bit better.
For the "Little Girls Don't Shave" I used mulberry paper and cut it into the shapes needed to matte the photos and the title letters. Title letters are die cuts - 1,1/2" in size. To cut mulberry paper and have that frayed edge, use a Q-tip and trace the shape. Then tear where it is wet. When dried, it makes a wonderful dimensional effect. The embellishment at the top - just another square of mulbery paper and a piece of Twistel shaped to a bow and a button on top.

Scrapbook Tools Used
Corner rounder punch, die cut letters and squares, scrapbook marker, scissors, mulberry paper, button, Twistel, adhesive squares, glue stick, tiny letter stickers, white cardstock for the background paper.

Friday, September 22, 2006

Interactive Way to Scrapbook Multiple Photos on One Page

Here is a way to add many photos to your scrapbook layout using only one page. In addition, it is interactive PLUS quick, easy and inexpensive!

A few photos on the layout and then a book that holds the rest of the photos! This is a great way to get alot of photos on one layout, instead of making a layout for each photo or having to choose between several really good photos! Scrapbooking has all the answers!!!
Scrapbook Layout Description
This layout is a 12x12. In this layout I sillouetted several shots of my grand daughter holding ladybugs and rolie-polie bugs that she likes to "collect" and play with. (those are all that are allowed to be collected!) Then I created a book with additional photos. The journaling is on the front cover!

Photobucket - Video and Image Hosting This is the layout with the book closed and the journaling showing
Photobucket - Video and Image Hosting Open the book and there are more photos!

Scrapbook Techniques Used
I sillouetted several close-up shots of the child doing differnet things, holding the bug cage, etc. That was my main layout design.
To make the book: Take a sheet of cardstock and cut it to twice the size you want the book to be and fold it in half. This book is about 4x6 - that way I only had to trim 1/4" off the photos to have them fit on the pages. On contrasting cardstock, I used the computer to type the journaling and then just glued it to the front of the "book". I decorated the front cover with left over stickers. I took 2 more photos - these were my favorites - and cut them the size to fit in the "book" . If you'd like to make more "pages" in the book, just cut additional pieces of cardstock the same size and put them together - use a stapler to hold them together at the fold, or needle and thread and sew them together at the fold.
If you use page protectors, just slide the finished layout in the page protector with the book closed. Using a craft knife, gently slice the page protector along where the "spine" of the book is.Make the slit just about 1/8 inch longer than the spine on both ends - just a little extra space so it doesn't tear when you open the cover. Make sure you don't slice into the paper. Now, pull the page protector open and slide the book cover through the slit.
Scrapbook Tools Used
Sicissors, adhesive photo squares, cardstock, computer, left over stickers, 1 sheet of pattern paper.

Wednesday, September 20, 2006

Storybook Time - On Your Scrapbook Layout!

Some things that you do, you can use that same idea in your layout. I used to take my grand daughter to "Storybook Time" at the book store on Tuesday nights. She loved it! So, when I made the layout for that special time, I made a "story book" to go on the layout and put the journaling inside the story book! Turned out really cute and now - 4 years later - she looks at that layout and loves opening that little story book! And she even remembers going to "Storybook Time"! It is a favorite memory of hers!

Scrapbook Layout Description
This is a 12x12 layout. I have created a "storybook" flip-open kind of "book" for the journaling. The outside of the "storybook" has the title of the layout "Story Book Time" and the date. On the inside cover of the "book" I have added another photo and the journaling (on the computer in color) is on the other side of the book. I made a "tassel" bookmark out of embroidery floss to hang in the middle of the "book" for decoration as well as being the "book mark" feature. Other photos are cut in different sizes and shapes and I did not matte them.

Photobucket - Video and Image Hosting
This shows the book closed.


Photobucket - Video and Image Hosting
This shows the book open

Scrapbook Techniques Used

This layout is on a pattern paper - big pastel stars - kind of like having the "You're a Star" theme. I did not matte the photos, just cut them all different sizes.

To make the "book", I just cut a piece of card stock to the size I wanted and then folded it in half. With white cardstock, I cut it just smaller than the cover of the "book" and glued it to the front cover. I used colorful letter stickers to create the title "Story Book Time" and the date. I cut a photo the same size as the inside cover and adhered it with adhesive squares.

For the journaling side, I typed out my journaling on the computer, did it in a red and whimsey font. I did some measuring so that it would only print a few words per line so that it would be long and narrow like the book, then glued it to the back of the "book".

For the "bookmark" tassel: I took a few strands of embroidery floss, braided them and made tassels at the ends. The unfinished end, I folded over and glued it to the back of the book then glued the whole book to the background paper.

Tip: make the fold of the book kind of wide, so that it lays flat once the bookmark is in there - using a embossing stylis tool, use the wide ball end instead of the small ball end.


Scrapbook Tools Used

Computer, embroidery floss, embossing stylis to make folding line, glue stick, adhesive squares,corner rounder, card stock

So again, except for a bit of computer time, this layout is quick, easy and inexpensive!

Sunday, September 17, 2006

"Rope" In Your Scrapbook Layout!

In looking around your house for embellishments to use in your scrapbook layouts, did you find a short piece of thin rope in your junk drawer? Hopefully, you didn't throw it away!! I found a piece and here's what I did with it.

My grand daughter learned to love horses at an early age, thanks to some rocking horses that I had. This is a memory that I like, but using just one photo - there isn't much to say and how many layouts do you do about this one memory! She is cute in each of the photos. but a different age in each photo. Don't waste your time and supplies making a scrapbook layout for each photo. Use them all in one layout.

There wasn't much to journal about the memory - just that she looked so cute. This is a case where the title says it all. Wheather whimsey or specific, the title is often the only journaling a layout needs. "Riding The Range" - the perfect title for the layout and since we are misplaced Texans, it just hit home to me!


I just took the rope and wound it around to a nice design on the background paper. Then using a glue stick, just traced the winding line that the rope laid on and pressed it down! The ends I tied into a bow. Your eye just follows the rope around the photos. Notice that I overlapped a short length of the rope onto one of the photos. It didn't "hide" anything, just added a bit of dimension to the layout. (The photo shows that the rope goes over her face. It isn't like that. It just pulled off by mistake when I slide the layout into the page protector! I have fixed that and will be more careful next time!)

Quick, easy and SO inexpensive!!!

Friday, September 15, 2006

Make Your Own Scrapbook Layout Background Papers!

This is possible! And it doesn't take much of anything. In Scrapbooking, there are so many avenues you can take to create the perfect scrapbook layout for your albums.

I never quite got into stamping - another expense that I just couldn't afford so I only minorly dabbled. I saw a fern leaf stamp that was so cool and I had a 40% off coupon at the local craft store, so I got the stamp. Then next week, when I had another 40% of coupon I got a green ink pad.

Put two and two together and what have you got? A great scrapbook layout background! Change color of inks and you can have more backgrounds! Use glitters and embossing and you have even more. And it all started with 1 stamp.

I never really knew my grand father. They lived in Ohio, we lived in California. But we did visit a few times and I remember those times dearly. So I did a scrapbook layout about Grandpa. Had a only few photos but alot of memories about the man himself and things he did or said. And I loved the house he built and lived in all his life. I lived in the same house he built for a few months! So I did a 4 page spread to use all that I had and make sure I got everything I remembered all in one place.


I have used the fern leaf stamp on the cardstock to make a "outdoor-zy" kind of background. Just stamp the leaf all over, in different ways. Then matted the photos with green cardstock. Click the image to get a larger view of the page.

That middle page is a 8x10 cut down about 1/3 of the way and in a page protector. This way I can see the photo on the 4th page, while having the journaling about those photos. Turn the page and there are more photos and journaling.

I did alot with 4 page spreads and cutting the middle page in half. I will have some more about that procedure in articles to come.

Saturday, September 09, 2006

Document Time Memories in Your Scrapbook Layouts

How do you document time spans in your scrapbook layouts? You'd be surprised at how many memories you get when you combine time, people and the same setting! This is also a great way to use those "extra" photos. In this case, you are not necessarily documenting a specific memory, but more a period or time that holds the memory. In this scrapbook layout, I show my son's age's, his growing up, the memory he carried throughout the years, a place that meant alot to him and was special. You and yours often have those same kinds of places - and wonderful memories. Scrapbook them!

We spent alot of time at my parents house. Both living and visiting. The backyard had these huge boulders for decoration. My kids loved playing on those boulders. They were my son's most favorite place in the world. Those huge rocks were forts from the bad guys, huge ships afloat and secret hide-outs!

As the years went by, my son grew up and the rocks got smaller (at least they seemed to!) but the memories abounded!

Scrapbook Layout Description

Scrapbooking wasn't around then, but I still was taking pictures! I put these together and a "through the Rocks of Ages" was born. 3 picures of my son at different ages, on those same rocks. Each picture is the same rock, same kid, just years apart - just look at the memories!!


The first is both my kids sitting on the rocks reading together. My son was 3.

The second is my son's creation of "Fort Nordstrom" and his keeping the prairie safe! (the flag was a red shopping bag from Nordstroms!". My son was 10

The third is his last visit to his beloved rocks before the house was sold. He was 21. (He also had his wedding photos taken by the rocks but I had made this layout before then!)

The jouranling is my own handwritting. I wanted the theme to be a little on the rustic side. I used a pattern paper of rocks and just cut a strip out, cutting around the rocks and used them to enhance the rustic rock theme. The letters are also die cut out of this same rock paper and I just single matted the photos. A date beside each photo. Talk about a walk through the years!

Scrapbook Techniques Used : Matting, die cut letters, handwritting journaling, paper cut-outs.
Scrapbook Tools Used: Paper trimmer, corner rounder punch, scissors, glue stick, letter punches.

Scrapbook Skill Level: Beginner, easy, quick and inexpensive.

Wednesday, September 06, 2006

Scrapbook Photo Mattes in Minutes!

If you need to move a bit faster in your scrapbook layouts, or want something quick and easy, or just want simple and stylish scrapbook layouts, use this matting technique!

This is also great to have these mattes available for taking to crops or scrapbooking parties!

This puts a colorful border around each photo, then you just place the matted photos on the background paper, add journaling and you are done - in minutes!

Your only decision is what color to make the mattes - which is so easy! Use the color you like, the color that matches the photo, the color that brings out something in the photo, a color that brings out the theme you are working on ....

Here's how to cut cardstock into mattes - the quick and easy way! Basically you are cutting cardstock to fit a 4"x6" photo.

Making Mattes from 8,1/2"x 11" Cardstock

Step 1: Cut an 8.5x11 sheet of cardstock into four equal pieces. This will give you four pieces measuring 5,1/2" x 4,1/4" each.

Step 2: Using photos that measure 4"x6", cut 3/4" from the 6" side of the photo and
your photos now measure 5,1/4" x 4".

Step 3: Now place your photos on the mattes and each photo will have 1/8" border
around it!
Making Mattes from 12" x 12" Cardstock

Step 1: Cut a 12" x 12" piece of cardstock exactly in half. You now have 2 sheets of 6"x12".

Step 2: Cut each 6" x "12 sheet into three equal pieces, each to measure 4" x 6". You now have 6 pieces measuring 4"x6" each.

Step 3: Using 4"x6" photos, cut 1/4" from EACH side of the photo. Your photos will now measure 3, 3/4" x 5, 3/4".

Step 4: Now place your photos on the mattes and each photo will have a 1/8" border around it!

Give it a try and see how fast your scrapbook layouts get moving! These are also great for doing scrapbooks for a single situation or person. For instance, if you are doing a grandparent scrapbook - one matted photo on one page and journaling on the opposite page. Or an "About Me" scrapbook - again, one photo on one page and journaling on the opposite page. This way your color theme is continued throughout the scrapbook.

(These are directions from a craft show I saw awhile ago. I don't remember which one, but I wrote down the instructions while I was watching it and have used them many times! Hope they help you, too!)