Here is a way to add many photos to your scrapbook layout using only one page. In addition, it is interactive PLUS quick, easy and inexpensive!
A few photos on the layout and then a book that holds the rest of the photos! This is a great way to get alot of photos on one layout, instead of making a layout for each photo or having to choose between several really good photos! Scrapbooking has all the answers!!!
A few photos on the layout and then a book that holds the rest of the photos! This is a great way to get alot of photos on one layout, instead of making a layout for each photo or having to choose between several really good photos! Scrapbooking has all the answers!!!
Scrapbook Layout Description
This layout is a 12x12. In this layout I sillouetted several shots of my grand daughter holding ladybugs and rolie-polie bugs that she likes to "collect" and play with. (those are all that are allowed to be collected!) Then I created a book with additional photos. The journaling is on the front cover!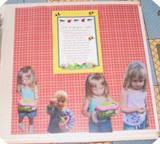 This is the layout with the book closed and the journaling showing
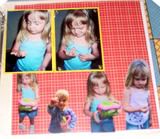 Open the book and there are more photos!
Scrapbook Techniques Used
I sillouetted several close-up shots of the child doing differnet things, holding the bug cage, etc. That was my main layout design.
To make the book: Take a sheet of cardstock and cut it to twice the size you want the book to be and fold it in half. This book is about 4x6 - that way I only had to trim 1/4" off the photos to have them fit on the pages. On contrasting cardstock, I used the computer to type the journaling and then just glued it to the front of the "book". I decorated the front cover with left over stickers. I took 2 more photos - these were my favorites - and cut them the size to fit in the "book" . If you'd like to make more "pages" in the book, just cut additional pieces of cardstock the same size and put them together - use a stapler to hold them together at the fold, or needle and thread and sew them together at the fold.
If you use page protectors, just slide the finished layout in the page protector with the book closed. Using a craft knife, gently slice the page protector along where the "spine" of the book is.Make the slit just about 1/8 inch longer than the spine on both ends - just a little extra space so it doesn't tear when you open the cover. Make sure you don't slice into the paper. Now, pull the page protector open and slide the book cover through the slit.
Scrapbook Tools Used
Sicissors, adhesive photo squares, cardstock, computer, left over stickers, 1 sheet of pattern paper.


No comments:
Post a Comment