Showing posts with label Die Cuts. Show all posts

Saturday, May 01, 2010

How To Personalize your Scrapbooks Title Page

We all enjoy making scrapbook layouts and albums for ourselves, but often we like to make them for others. We work hard to make the scrapbook pages and layouts tell the story of the person, to capture the memory for that person. Sometimes easy, sometimes hard, but why not just start at the beginning.... WHO is that person?

Capture the personality of the person on the very first "title page".
If you have that very first layout about what makes that person "tick", "who" they are, the memories are sure to flow for you as the creator of the album and for the person as they enjoy perusing their lifetime and reveling in the memories of "their time" and often capturing memories they have forgotten. Sometimes you can even make a new memory of an old time for them. Something you remember about them, or things you did together, or the way you saw that person and what they meant to you. Alot to include, but pretty easy to do!

Sing us a song, you're the piano man.....remember that song?
I associate that song with my brother. He was/is the piano man. He took clarinet lessons in the 5th and 6th grades at school. He then stopped and never had another music lesson in his life. Mom gave us all piano lessons once, and the teacher turned him away saying he knew more than she did! My brother can play any instrument there is - all self taught and proficiently. But the guitar was his favorite. Had he had the opportunity, he could have been right up there with some of the great guitar players. He was that good. He couldn't dance a step, but the music was in his soul.

Since he is music, I used that as his title page to his scrapbook. I used die cuts of music notes, and cut strips of black cardstock to create the music staff lines. This is a 12x12 layout. I chose photos of my brother at different stages in life, mainly just pulling the best facial shots so that you could see him the best, since these little cirlces are a bit small. But I made sure I started with a photo near birth, and ended with a current day photo.
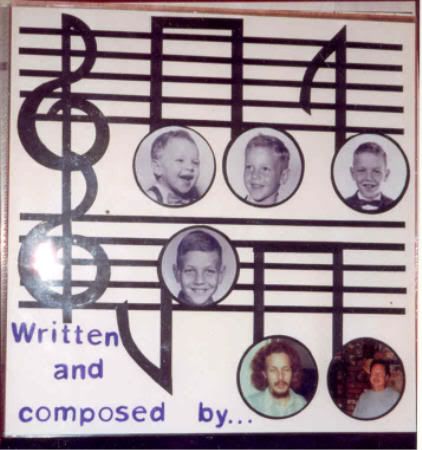
I used a circle cutter and cut the face of each photo just slightly smaller than the music note ball so there would be a black border around the face picture, then adhered the photo to the die cut. Quick, easy and so simple, but boy the memories it captures!!

As the "title" of the album, of course, music related. Instead of just writting his name and birth date (which I did on the next page) I titled his scrapbook album "Written and composed by...." A typical, musically known phrase. And so appropriate, it just completed the layout to perfection.

And there you have it. My brother, his music and his life. The exact reason for a scrapbook. The perfect collection and tribute to his life ... and all on one page! How cool is that!!

Tools used: Although one of the most powerful scrapbook layouts of memories, this is one of the easiest and quickest layouts to create. I used a paper trimmer to cut the strips for the staff lines. I used a circle cutter to cut the photos into circles. Both of these you could do without tools, just free hand! A glue stick, a scrapbook marker pen and a letter stencil - again, you could do free hand.

Monday, May 25, 2009

How To Find Scrapbook Supplies at a Yard Sale

Scrapbooking is a huge and quickly growing cottage industry craft. I have been involved with scrapbooking for 10 years. It is amazing how it has changed. From simple to ornate, from flat to bulky. "Anything goes" in scrapbooking it seems. Acid free is a concern, but even with that issue, the embellishments and supplies currently on market are addressing that so you don't have to! New supplies come out every month, if not every week. I go to craft stores in my area and just browse the scrapbook isles and every time I go, there are new features, new items, new embellishments. Seems it is never ending. And that is great.

Scrapbooking is a fantastic craft, and in my opinion, the best way to preserve memories for generations. As usual though, expense is always an issue. Although I do admit scrapbook supplies have gotten a lot more reasonable in price today than they were 5-10 years ago, sometimes they are still to expensive and if you don't have the income to accomodate, well, the scrapper you are makes you look elsewhere so that you can still preserve your memories for generations to come and satisfy your craft bug!
So where can you find affordable scrapbooking supplies? Well, you can always shop store sales and use coupons. I have found that to be a great way to get the more expensive stuff. Coupons can also work for the less expensive items too, but sometimes they just don't have what you want. So since scrapbooking is a craft, use your crafty mind and think about how else you can conquer expense to save your memories.
Where can you find really good things at a really low price? Yard sales! Yes, that's right, yard sales...or garage sale, estate sales or rummage sales. These ales are a treasure trove for craft supplies! "One man's junk is another man's teasure" - really speaks loudly for the crafter.
What to Look for To Find Scrapbook Supplies
Clothing: One of the most popular items at any yard sale is out-grown clothing. Especially baby clothes. Those little tikes out grow the clothes faster than they wear them out which means the clothing is still in great condition. Look at the buttons. Cute little, whimsical, pastel buttons. Buttons are a great scrapbook
embellishment. Cut them off the clothing item and glue them on with glue or pop-dots - great for the "bulky" look. Also look at the pattern in the fabric and cut that pattern out - if there are little trains or ducks in the fabric pattern, cut them out and run them through a Xyron machine to put adhesive on the back and they secure neatly to the background paper! Makes the perfect fabric die cut! You can do this with any fabric pattern.
Older childrens clothing also has some finds. Jeans have those copper, western looking buttons - great for a masculine, outdoor-zy or western theme layout. Or even cut the pocket off a pair of denim jeans and use the pocket as a pocket on your layout! Look at clothes that have name brands displayed on the front - great if you have a favorite brand you want to remember. Just cut the brand name off the article of clothing and use it as a die cut. Sometimes it is a saying like "I Love Roxy". Although a clothes brand, my grand daughters dog is named Roxy so I can cut that out of the shirt, run it through my Xyron and have a fantastic title for a layout about her and her dog! Look at collars - cute fringes or lacey collars- would make a great "border" to a photo. Appliques are also a fantastic addition to a scrapbook layout.

Other craft supplies: When I started scrapbooking 10 years ago, I had no help from anyone. My spending money was literally next to nothing. I started with photo square adhesives, a circle template and a scrapbook spiral album. But since I have been a crafter all my life, I had others supplies. Ribbons, threads, embroidery floss, fibers, buttons, appliques, yarns, beads, gems stones, rhinestones, jewelery pieces and charms were just some of the items I had. Granted, as I was just starting, I didn't realize I could use all these kinds of things, but now - boy, did I have a treasure trove in my craft closet! Look at any craft supply at a yard sale through the eyes of a scrapbooker - you'll be amazed at what you will find!

Books and magazines: Books are also a standard at most yard sales. I don't approve of destroying books, but at the same time, if the book holds a wonderful memory, I see no problem in preserving it for generations to come. Plus, you don't know that it won't get thrown away if it doesn't sell. Look at the books and see the pictures. Anything remind you of a favorite memory from your life? How about your child's life right now? For 10¢ you buy the book and cut out the item related to the memory. Instant die cut! Cut several images and organize them on the layout page to create a "scene" relating to the memory. Magazines are also great for this but you have to watch for acid in the pages. You can buy an acid-free spray and spray the magazine page. What I did was just insert the magazine page into a page protector and the page protector onto the scrapbook layout page.

Post cards and stationery: Not often as common, but out there just the same. Whether you use the post card as is or cut images from it, you have instant stickers! Cut theimage out, run it through a Xyron machine use acid free glue sticks or photo adhesive squares and you have a sticker!Add pop-dots for a 3-D effect! You can do the journaling on the stationery as it is or cut the designs from the stationery to use as you need.
Board Games: Scrabble has those wonderful small wooden tiles of letters. Each letter can spell out the title or a person's name! Monopoly money is a great embellishment for layouts themed for shopping, travel and other money related scrapbook themes. Even the board could be a great addition - if it is to thick to cut, just scan parts of it to make your back ground paper or to cut parts out for die cuts!
Holiday decorations: Tinsel, christmas cards, wrapping paper, gift tags, paper wall decorations, candy wrappers, window clings, glitter, silk flowers - just take look with a scrapbookers frame of mind and the possibilities will jump out at you!
Other things you might look for: Labels from jars - just soak them off. I'd love to have a label from Knott's Berry Farm jelly jar as Knott's was my families favorite place to spend Sunday afternoons as a kid - way back before it was an amuzement park and cost admission! Nick-naks that can be disassembled to get to the brand name or the image you want. Hand made things like embroidered towels, doillies or lace pieces. Use as is or cut off the part you need. And those School work books- a great "back to school" background paper is a page of math problems from a work book; you just add the photos and journaling!
So next time you see a sign that says "Yard Sale", put your scrapbookers thinking cap on and stop and go shopping!

Thursday, February 22, 2007

Before and After, Ears and Years and Time Travel!

One of my favorite themes to scrapbook is a "then and now" theme. I have lots of "extra" photos of when my kids were little and can't bear to throw them away. I have found that this style of scrapbooking a layout is just perfect. Uses up the extra photos, but more importantly, creates even more memories and wonderful feelings for everyone!

Also, are you behind? Well, that is a common place to be in scrapbooking, so don't be hard on yourself! This style of scrapbooking is absolutely fantastic way to get caught up while you create and preserve memories for all involved!

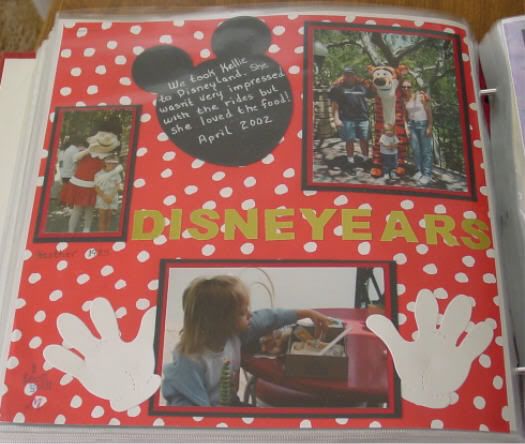
In this layout I used shiney, gold paper and my letter punch and punched out the letters for the title. My intention was to have "Disney Years" because the layout is of my grand daughter's first trip to Disneyland when she was about 3 years old. I also had extra photos of when her mother (my daughter) was at Disneyland when she was little. I wanted to incorporate both girls at the same place, at similar ages, but in different times! Move over time travel! Then and now, before and after! Oh, the memories!

The Perfect Title

I didn't notice it until I layed the letters out, that I was short a Y. But, there before my eyes, was the perfect title! Disneyears! Why? What is the first thing you think of when you think Disneyland? Mickey Mouse and of course, his EARS! And what is the point I am trying to convey? YEARS of time span between mother and daughter doing the same thing! Ears and years, take away a Y and you have it - Disneyears! It was perfect!


Do You See Mickey Mouse and Minnie Mouse? Look Closely!

Well, you won't find them in the photos, but since you just can't have a Disneyland scrapbook layout without these two entities, I included them......
in theory!

The background paper I used was a red with white dots... which is what? Minnie Mouse's dress pattern! I double matted the photos with red and black cardstock which is .... Mickey Mouse's colors! I used a black die cut of a Mickey Mouse head and used white gel pen for the journaling. I also found Mickey's white-gloved "hands" die cuts and used those to kind of "hold" one of the photos as often Mickey Mouse is holding his hands out to welcome you to his kingdom.

This layout started with a mistake. Had I not made a simple mistake, it probably would have just been your usual "Trip to Disneyland" layout. But thanks to that mistake, the memories are of Disneyland with my daughter - about 20 years ago, Disneyland with my grand daughter about 3 years ago and once that far, I can't help but remember my amazing trips to Disneyland when I was a kid - 30 years ago! Wow! Talk about time travel!!