Look at the background. Maybe there is something in the background of the photo behind the main point of interest, that is good quality and tells a story. The signage of a store, an animal, an object that can "say" where the photo was taken or offer you a memory of that place. Look at the background...there is a memory there! But what can you do with it?
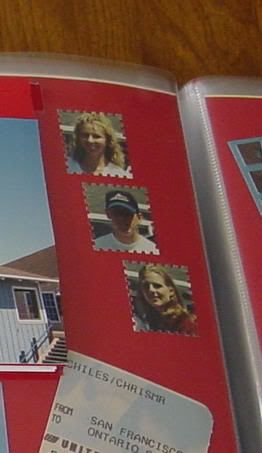
What about when you have a photo of alot of people. If the image of the person you are focusing on is not good, and sometimes even it if is, you also want to remember the others in the shot. But how?
I call this technique Photo Stamping (directions below) simply because I used a punch that has
serrated edges that look like the edges of a real postage stamp. I punched out some squares and they looked like postage stamps, so I named it that.
With this technique, you can create a variety of wonderful creations using these small "photo stamps" and they will tell the story in themselves as well as adding that memory to your layout and offering a great decorative feature! In this 12x12 layout page, not only have I included a bunch of specific things, but lined the photo stamps down the middle of the page as a seperation feature so the layout wasn't just a common 4 photos on a page structure. Took very little space, created a seperation, added a focal point and includes numerous memories - all that with one little photo stamp!

Enhance Landscape Views
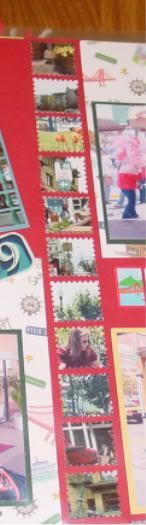
In addition to faces, I used this technique to create an ambiance effect with the landscape. Using the stamp punch, I punched the landscape in the photo evenly across. Then just lay the little photo stamps side by side with just a bit of space between them. The background page color shows through just enough to give the scene a bit of that "stand out" effect, but because the photo stamps were all punched exactly in conjunction, the actual view is not much effected.
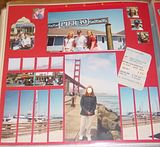

On this layout, I just wanted the view of the trolley car. I didn't want the rest of the busy background that was in that photo. Putting the trolley car photo as is, just didn't "do it". So I took another photo that had sky in it, used my photo stamping technique and created a full scene. The seperation makes it look as though this was one picture. The trolly car view is just a long rectangle, while the sky is the photo stamping technique.
People, Places and Things
In these sets of photo stampings, I just wanted the face of the person or a specific item and not all the background or rest of the scenery that was in the photo. I photo stamped each specific item or face and then just layed all the stamps out on the layout and did some juggling until I got the scrapbook layout organized as I liked! This is also a great way to fill in the small spaces that are to small for a photo, but if the space is left blank, it looks unfinished. In addition, you can use this technique as a space filler but still in sync with the layout. Some of these "stamps" I used were not particularly of anything, just an object or design. I used them as space fillers, but was still able to keep in theme of the layout while adding a fancy embellishment to the layout.
Check out your photos - do you really want all that busy background? Do you want the expressions and personalities that a face close-up offers! Take a look - see what you can find in your photographs that can offer you more memories while adding a wonderful feature to your scrapbook layout.
How To Photo Stamp:
Take the stamp punch, or you can really use any similar punch - circle, square, heart - just so it has a large center area to accomodate the close-up you are wanting.
Turn the punch UPSIDE DOWN. Slide your photo, facing up, into the punch. Because the punch is upside down, you can see the photo through the opening that will be punched out. Place the photo over the area you want to punch. Then just punch! It's that easy! If you are doing a landscape, just start from one side and make sure you line up the additional punch areas very near to the previous punched area so that the landscape horizon stays in order. Don't punch one with half the tree, and then the next punch shows no tree at all. Don't cut one that has mountain in it and the next one has a tree. Just line it up as near to the edge of the previous punch and make the next punch. Do this across the photograph or for how ever many photo stamps you want.


No comments:
Post a Comment