Sunday, January 28, 2007

Enhance Your Scrapbook Layout with Photo Stamping!

Just because a photograph is not "good" to use as a main point of interest on a scrapbook page, doesn't mean it is unusable! Just the opposite! Take another look at that photograph... the face of the person may be blurred, the main point of interest might be to dark, but there are images there that you can see and use!

Look at the background. Maybe there is something in the background of the photo behind the main point of interest, that is good quality and tells a story. The signage of a store, an animal, an object that can "say" where the photo was taken or offer you a memory of that place. Look at the background...there is a memory there! But what can you do with it?

What about when you have a photo of alot of people. If the image of the person you are focusing on is not good, and sometimes even it if is, you also want to remember the others in the shot. But how?

I call this technique Photo Stamping (directions below) simply because I used a punch that has
serrated edges that look like the edges of a real postage stamp. I punched out some squares and they looked like postage stamps, so I named it that.

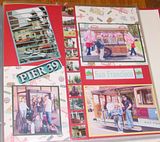
With this technique, you can create a variety of wonderful creations using these small "photo stamps" and they will tell the story in themselves as well as adding that memory to your layout and offering a great decorative feature! In this 12x12 layout page, not only have I included a bunch of specific things, but lined the photo stamps down the middle of the page as a seperation feature so the layout wasn't just a common 4 photos on a page structure. Took very little space, created a seperation, added a focal point and includes numerous memories - all that with one little photo stamp!

Enhance Landscape Views

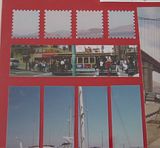
In addition to faces, I used this technique to create an ambiance effect with the landscape. Using the stamp punch, I punched the landscape in the photo evenly across. Then just lay the little photo stamps side by side with just a bit of space between them. The background page color shows through just enough to give the scene a bit of that "stand out" effect, but because the photo stamps were all punched exactly in conjunction, the actual view is not much effected.

On this layout, I just wanted the view of the trolley car. I didn't want the rest of the busy background that was in that photo. Putting the trolley car photo as is, just didn't "do it". So I took another photo that had sky in it, used my photo stamping technique and created a full scene. The seperation makes it look as though this was one picture. The trolly car view is just a long rectangle, while the sky is the photo stamping technique.

People, Places and Things

In these sets of photo stampings, I just wanted the face of the person or a specific item and not all the background or rest of the scenery that was in the photo. I photo stamped each specific item or face and then just layed all the stamps out on the layout and did some juggling until I got the scrapbook layout organized as I liked! This is also a great way to fill in the small spaces that are to small for a photo, but if the space is left blank, it looks unfinished. In addition, you can use this technique as a space filler but still in sync with the layout. Some of these "stamps" I used were not particularly of anything, just an object or design. I used them as space fillers, but was still able to keep in theme of the layout while adding a fancy embellishment to the layout.

Check out your photos - do you really want all that busy background? Do you want the expressions and personalities that a face close-up offers! Take a look - see what you can find in your photographs that can offer you more memories while adding a wonderful feature to your scrapbook layout.

How To Photo Stamp:

Take the stamp punch, or you can really use any similar punch - circle, square, heart - just so it has a large center area to accomodate the close-up you are wanting.

Turn the punch UPSIDE DOWN. Slide your photo, facing up, into the punch. Because the punch is upside down, you can see the photo through the opening that will be punched out. Place the photo over the area you want to punch. Then just punch! It's that easy! If you are doing a landscape, just start from one side and make sure you line up the additional punch areas very near to the previous punched area so that the landscape horizon stays in order. Don't punch one with half the tree, and then the next punch shows no tree at all. Don't cut one that has mountain in it and the next one has a tree. Just line it up as near to the edge of the previous punch and make the next punch. Do this across the photograph or for how ever many photo stamps you want.
Sunday, January 21, 2007

FREE Paper Dolls - Great Scrapbook Embellishments

When I was a kid I LOVED paper dolls! We traveled alot for vacations and my sister and I always got a new "book" of paper dolls for eac trip. We loved them!

Now, as a scrapbooker, I can not only keep my memory of paper dolls alive, but use them as embellishments to my scrapbook layout pages! I stumbled on this site and although many are not my "style", it is still great to use the ones that are (I Love Lucy to mention my favorite!) and use them on a scrapbook page! Just print them out on white cardstock!

Free Paper Dolls


Print them out for your little girls to play with and no one will say a word if you want to print some out for yourself to play with! Reliving memories is what scrapbooking is all about!!

There is an option to purchase a set of paper dolls using YOUR OWN photo of the person's face. Apparently you send her a photo of your person and she makes the face of that person on a paper doll. Might be something interesting for a gift idea!

Have fun!

Tuesday, January 16, 2007

Interactive Scrapbook Page - Moving Tags

I just love making my scrapbook layout pages interactive. Not only does it give a wonderful, playful substance to the layout, but it also offers inquisitive lookers a fun way to remember. A memory doesn't stop at the subject person. There are lots of other things that contributed to making that memory and I wanted to capture it all!

What Is A Moving Tag?

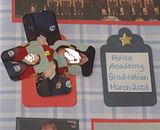
I created Moving Tags to accommodate smaller photos. These "smaller photos" I am talking about are "photos" that are cut from a regular size photograph, but just a smaller part of the main photo that I wanted to capture, not any background. Multiple tags are punched and stacked together to spin individually

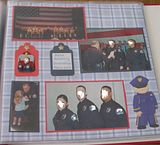
When my son graduated from the police academy, it was a time in his life that he had been dreaming of since he was in the 4th grade. He even wrote an essay in the 4th grade about what he wanted to be when he grew up and he wrote "be a cop". And he was able to make his dream come true. Of course I put that essay on his layout! But back to the tags. He was so proud of what he had accomplished. And what mother wouldn't want to remember her son on the most wonderful day of his life....at least to that point in his life! And that is what I wanted to capture on this scrapbook layout for myself.

Since I was in "tag" mode, I used my tag punches to punch out the his face-only. Tag punches come in all sizes - small to gargantuan! Take your pick! You can do this technique with as many photos you want. Of course you could also use a circle, square or heart punch. You can use any style of punch as long as it has a large middle area for the face or other image you are working with.

This is a 12x12 layout. I used a police man die cut and blue, print background paper. I used red, white and blue cardstock to matte the photos and create the tag bases. One tag had the title and is secured with a star brad. The other tag is a red base and secured with a star brad. A photo cut with the next smaller tag punch size is on the red tag base, appearing to be framed with the red tag, but take a closer look.................


How To Create Moving Tags

I took 4 close-up photos of my son's face, showing his pride and commitment and used a tag punch to punch out just his face. I put a hole at the top of each tag with a hole punch and stacked them together, securing them with a round brad so that they can be turned/rotated individually. From his point-blank face while being sworn in, to his huge smile once he realized it was for real - it's all there!

How To Accommodate a Page Protector

To make the stack of tags accommodate a page protector, just slide the layout into the page protector BEFORE securing the rotating tag photos to the red tag base. Once the layout is in the page protector, mark on the plastic where the hole needs to be to for the tags to be centered on top of the red tag base. Using the brad itself, I wiggled a hole into the plastic. Then put the brad through the stack of photo tags and then through the hole in the plastic page protector and through the background paper. Pull the prongs apart on the back of the background page and there you have it! A wonderful, interactive addition to your scrapbook layout page preserving some most amazing memories!

Thursday, January 11, 2007

How to Put More Photos on a Scrapbook Layout

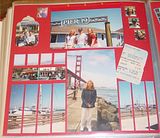
A very common question asked in scrapbooking is..."How do I get more photos on a single page layout?". The answer....Book it! This is very easy to do, and you can put as many photographs as you like in the book! Look at this 12x12 scrapbook layout...see the book?

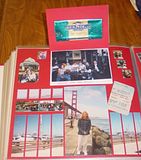
Let's start at the beginning. Notice there is no title on this scrapbook layout page. Well, there is, it is just not an "added" feature. It is on the photograph at the top of the layout - Pier 39 and with the Golden Gate Bridge in the background of another photo, no other title is needed. San Francisco is a given. This photo has the title in it as well as the "who" of the layout. But take a closer look.... this photograph is also the cover of the book of extra photos and journaling! This one embellishment covers 3 scrapbook layout features... the title, extra photographs and journaling. How cool is that! Let's open the book......

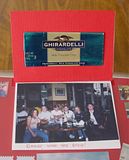
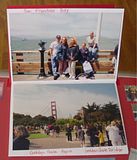
Open the book and there are the extra photos - mounted on white cardstock and a caption for each. I was not on this trip, but made this layout for my daughter so I left 2 blank "pages" in the back of book for her journal her own memorys on.
The First Page

The first page is another photograph of the whole group of people she was with. However, check out that beautiful candy bar wrapper on the facing page. One of her favorite places she visited was the Ghirardelli chocolate factory/store. What better memory inducer than a beautiful, shiney, colorful, chocolate bar wrapper! I just folded it back up like it was with the bar in it, and adhered it to the inside cover page!

Turn the Next Page

Look closely, you can see how I mounted the 4x6 photos to white cardstock with photo adhesieve squares and then using a red gel pen, wrote the captions on the upper or lower edges of the white cardstock page. No cutting, cropping or sizing! I have these two "pages" and 2 more in this book. It is not to thick, but just enough to hold the extra photos and not be to bulky.

Want to Make This Book?

Book was made by just matting photos to cardstock. How easy is that! First, I used 4x6 inch as my main measurement and then took white cardstock and cut "pages" with an additional border of 1/4" on the sides and 1/2" on the top and bottom (of the white cardstock). The extra 1/2 added to the top will be what is put in the "binding" and the bottom will be space for the captions. The writing space will alternate as you turn the "pages".

Next, take a piece of matching background cardstock (in this layout case it was red) and cut a piece the same size as the white cardstock pages. This will be the front cover of the book. Add the photo and it now looks like any other photo on a scrapbook page because the border area is the same color as the background.

Next, take another piece of the matching (red) background cardstock and cut it the size of the pages PLUS another 1/2 inch to the top edge. This 1/2 inch is then folded down OVER all of the white photo pages to create a "spine". I then used 3 gold brads to secure all pages, pressing them through the "spine", including all pages and to the back of the book and folding the prongs outward. The back of the book is then glued to the background page.

And the "book" is done! Pretty easy! Even a beginner can do this book. Just measure and cut. If you don't want to secure the book to the background page, make a pocket for it to slip into!

Give it a try! If you have any questions, leave me a comment and I will help you out.

Tuesday, January 09, 2007

Scrapbook for Box Tops - new items to choose from!

New Items at Scrapbook for Box Tops - free SB supplies for Box Tops swap!

I have some new items posted in the 10 Box Tops and 15 Box Tops categories if you'd care to take a look! Some handmade punch art kids and some metal button stickers. More on the way!

Scrapbook For Box Tops

We have had a really great response for this swap for free scrapbooking supplies and Kellie and I are very thankful to all those that have swapped box tops with us to help her school. She enjoys including a thank you note with every swap and is anxious to see where you "are" on the United States map!

The "Surprise Me!" category is a popular request. You tell me what you like or want and that is what I will send you!

Hope your layouts are coming along great and keep collecting box tops! There are more items are on the way!

Thanks to everyone!

Saturday, January 06, 2007

How to Expand a Photo - Horizontally or Veritcally

We are always talking about "cropping" a photo to fit a scrapbook layout, but sometimes we need to expand a photo - whether it is to accommodate more space on the layout page or to add an interesting aesthetic feature to the layout. Expanding a photo is quick and easy to do and it is one of my favorite ways to accentuate a scrapbook layout.

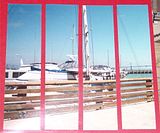
All you have to do is take your photo and cut it into even sized pieces! Sounds a bit shaky, but take a look at this scrapbook layout and the close up of the expanded photos.

The Layout
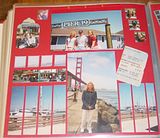
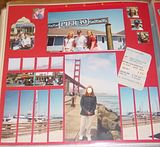
This is a layout I did for my daughter when she went to San Francisco, CA for the first time. The photo itself was a 4x6 size photo. It is of the coast line with fishing boats. Just the photo alone, was too plain. I wanted to add something to it.

Cut and Seperate (cringing at this point is acceptable, but stick with it!)
After measuring, I cut the photograph into sections. They are all equal sections except for the last one, slightly smaller because I ran out of background space! Each section is 1 inch wide. I didn't matte the photo, just layed it out on the background page. Make even spaces between each photo piece and voila! An expanded photo, fills the required space on the layout and adds quite the charm to the theme of the layout.

The Aesthetic Issues

This method of scrapbooking accomplishes 2 aesthetic issues. First, the photo takes up a lot of space, while keeping the theme and streamline of the layout, without making it look cluttered. Secondly, it makes the photo "appear" to be matted, when it is not. Both of these additions make for a very interesting, eye-catching scrapbook layout page!

Do It Vertically, too!

You can also do this method using vertical photographs! This photo, I cut into 1/2 inch strips and placed them evenly spaced on a contrasting color cardstock matte and then placed that whole ensemble onto the layout. Again, quite an aesthetic eye catcher! Now as for the color of cardstock you use, that is your decision. I didn't use a color from the photo as I thought that would just blend to much and you wouldn't be able to see the continuity of the photo. I chose the blue as that was main color in the other photos - the blue sky - so I stayed with that shade and just used a different hue. The blue I used is soft, suttle and blends very well with the images and colors of the photo. You can still plainly see the full photo but it has the little bit of expression in there. So just pick and choose, trial and error which color cardstock that would look best on your layout.

I would venture to say that expanding photos would be best if kept to scenery or objects, but if you have extras or can make copies, give it a try on any subject. You never know what you might come up with!