Saturday, May 01, 2010

Free Envelope Pattern 2"x3"

I love envelopes! They are the best way to be able to add MANY photos to a single layout! And there is so much you can do with a single envelope! You can make envelopes any size you want. Adhere them on the background page any way you want. Make so many beautiful and amazing closures for the envelopes. And the list goes on.

Sometimes you have a lot of photos you'd like on a layout but can't possibly put them on on mattes and on the background page - Envelopes make it possible to put many photos on a single layout. Just make the size of envy you want and cut your photos that same size and BINGO! Slide the photos in the envelope and you got a fantastic layout with LOTS of photos!

Cut multiple sheets of cardstock the same size as the envelope and use them for journaling. You can say alot in one envelope!

Have some memorabilia or other little items you want on the layout but no way to adhere them to the background page? Slide them into an envelope!

Envelopes make for a fun, interactive feature to a scrapbook layout - it is fun and intriguing to "untie" the closure to see what's inside the envelope!

Use vellum, or cardstock, solid or pattern. Anything works! The possiblities are endless! And envelopes are so easy to make and you can make them to match any theme or style of scrapbook layout.

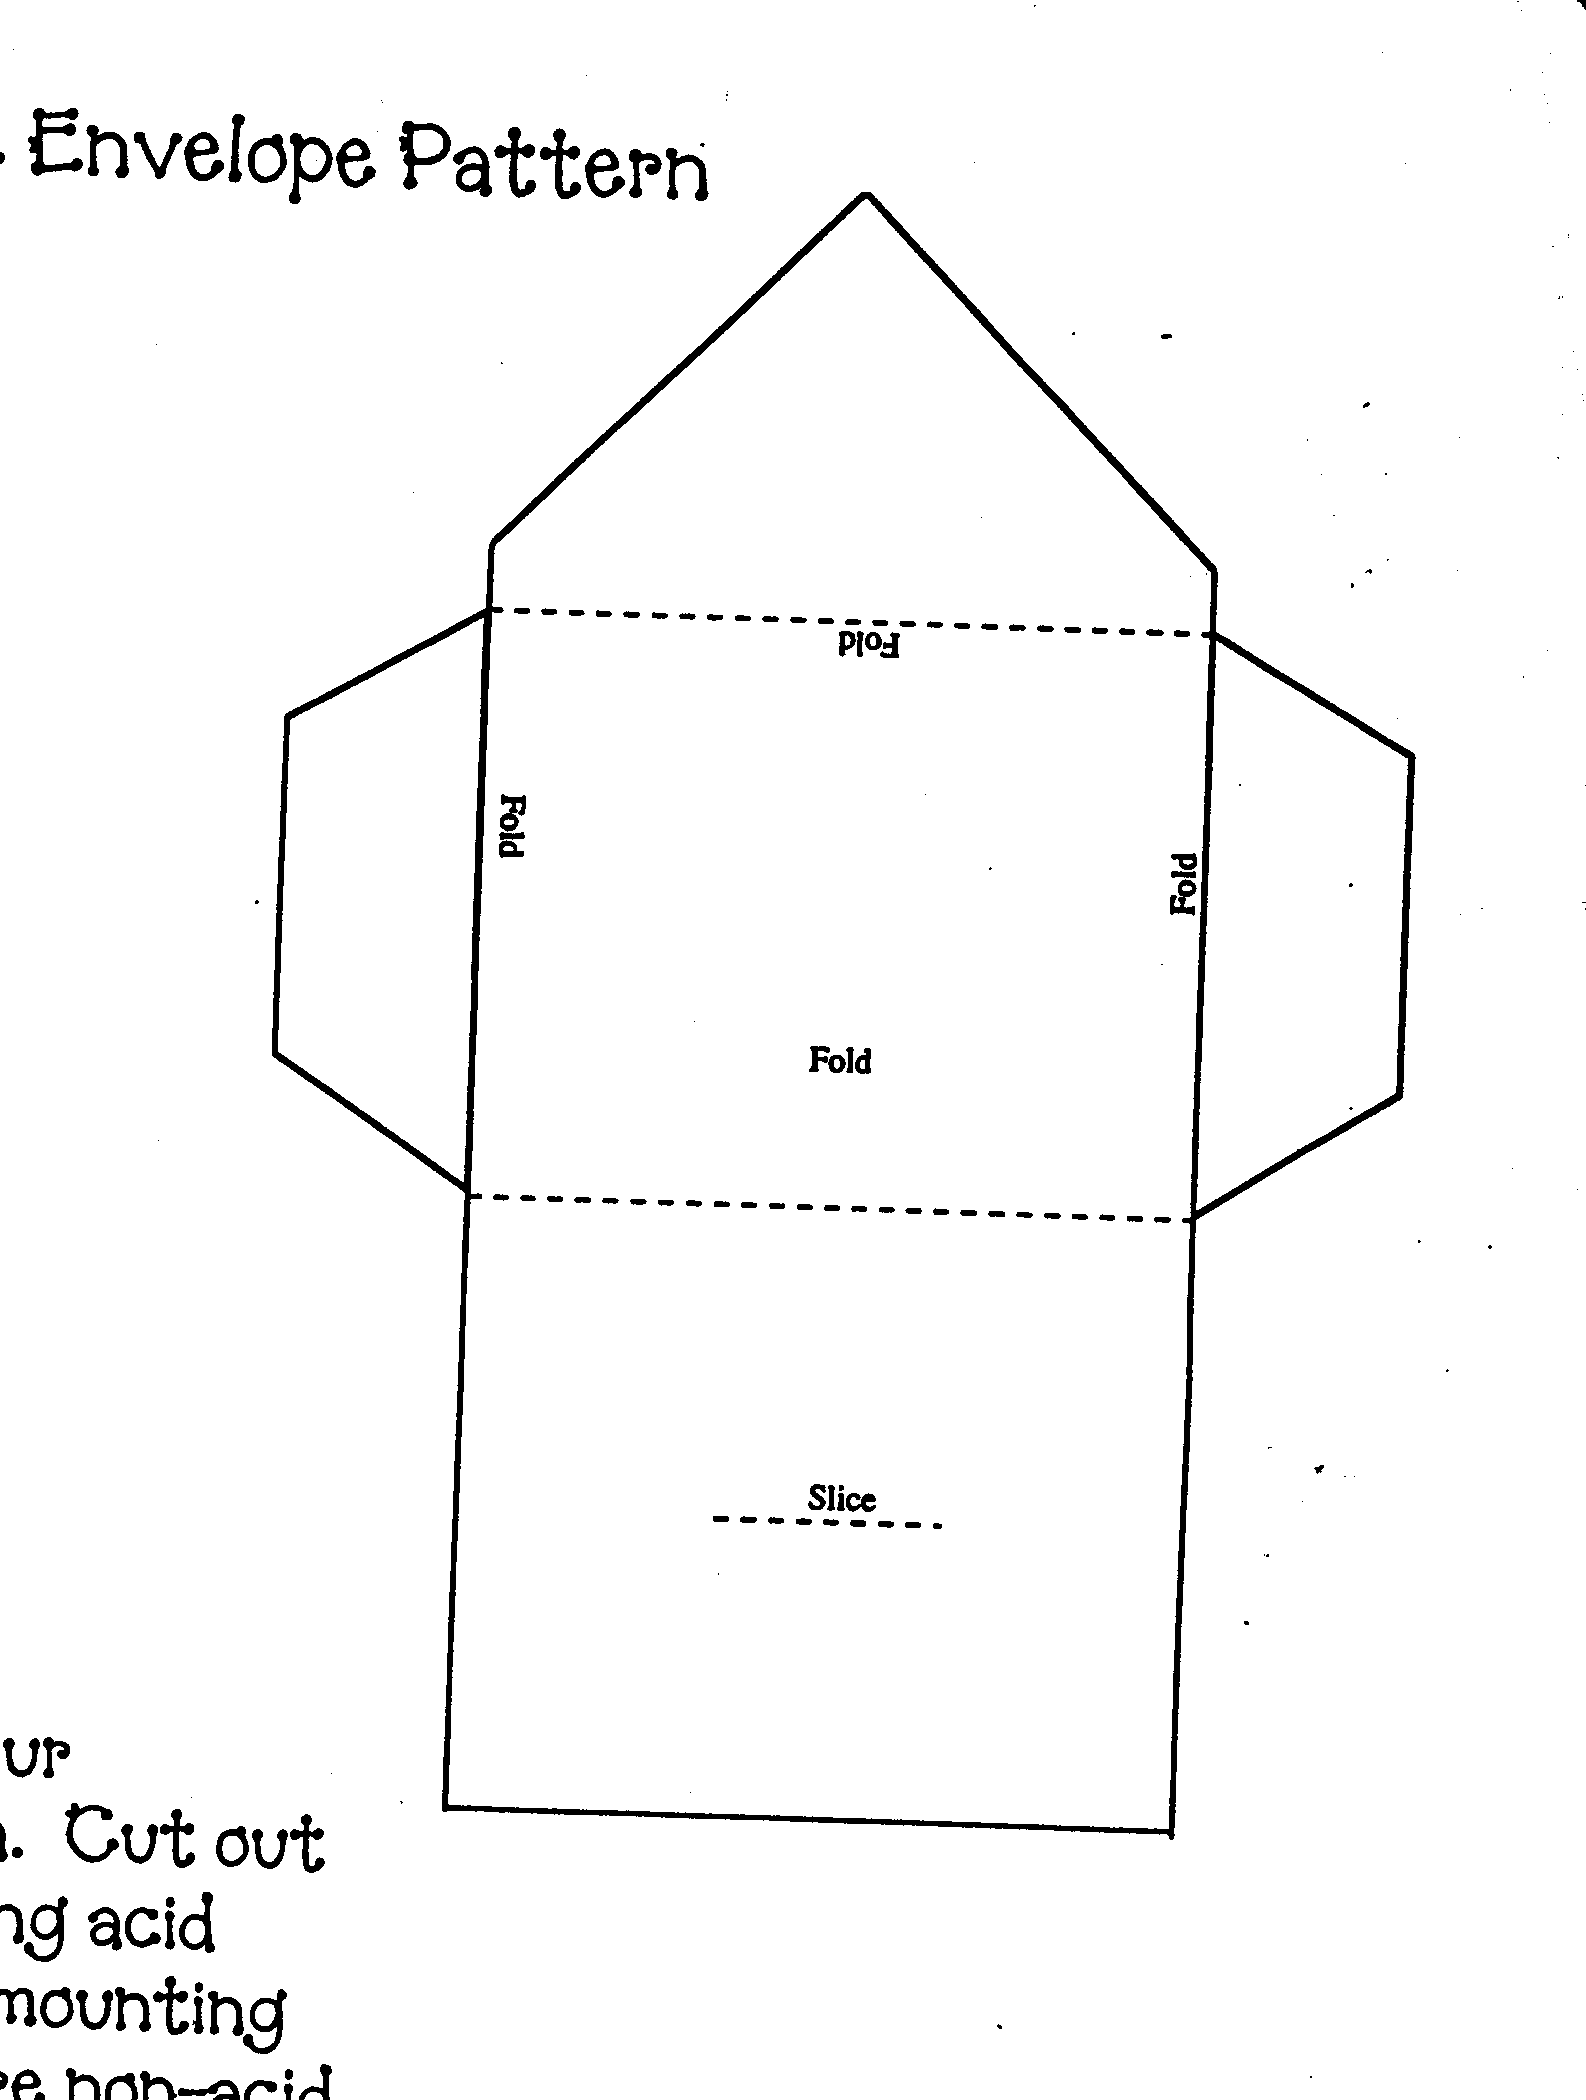
I found this pattern for a 2x3" envelope in my huge stock of scrapbooking supplies and things and thought I'd share it.


Also, if you look at this article, it has other options for creating and using envelopes. I have created all these myself. I love creating the closure - there is just so much you can do and so many ways to make the flap close to accomodate the layout! How To Make An Envelope

Click on the image above and it will take you to another page where you can save and print it. I tried to make it the size you could just copy onto an 8x10 sheet of paper and get actual 2x3" size of envelope, but couldn't figure out how to do that so you can just print it out as is and then make a copy and use the ENLARGE feature on the machine - or if you know how to enlarge it on your computer photo editing program, you could do it that way. This is not my original pattern. I know who is the the creator of the pattern, but I thank whoever did it!

How To Personalize your Scrapbooks Title Page

We all enjoy making scrapbook layouts and albums for ourselves, but often we like to make them for others. We work hard to make the scrapbook pages and layouts tell the story of the person, to capture the memory for that person. Sometimes easy, sometimes hard, but why not just start at the beginning.... WHO is that person?

Capture the personality of the person on the very first "title page".
If you have that very first layout about what makes that person "tick", "who" they are, the memories are sure to flow for you as the creator of the album and for the person as they enjoy perusing their lifetime and reveling in the memories of "their time" and often capturing memories they have forgotten. Sometimes you can even make a new memory of an old time for them. Something you remember about them, or things you did together, or the way you saw that person and what they meant to you. Alot to include, but pretty easy to do!

Sing us a song, you're the piano man.....remember that song?
I associate that song with my brother. He was/is the piano man. He took clarinet lessons in the 5th and 6th grades at school. He then stopped and never had another music lesson in his life. Mom gave us all piano lessons once, and the teacher turned him away saying he knew more than she did! My brother can play any instrument there is - all self taught and proficiently. But the guitar was his favorite. Had he had the opportunity, he could have been right up there with some of the great guitar players. He was that good. He couldn't dance a step, but the music was in his soul.

Since he is music, I used that as his title page to his scrapbook. I used die cuts of music notes, and cut strips of black cardstock to create the music staff lines. This is a 12x12 layout. I chose photos of my brother at different stages in life, mainly just pulling the best facial shots so that you could see him the best, since these little cirlces are a bit small. But I made sure I started with a photo near birth, and ended with a current day photo.

I used a circle cutter and cut the face of each photo just slightly smaller than the music note ball so there would be a black border around the face picture, then adhered the photo to the die cut. Quick, easy and so simple, but boy the memories it captures!!

As the "title" of the album, of course, music related. Instead of just writting his name and birth date (which I did on the next page) I titled his scrapbook album "Written and composed by...." A typical, musically known phrase. And so appropriate, it just completed the layout to perfection.

And there you have it. My brother, his music and his life. The exact reason for a scrapbook. The perfect collection and tribute to his life ... and all on one page! How cool is that!!

Tools used: Although one of the most powerful scrapbook layouts of memories, this is one of the easiest and quickest layouts to create. I used a paper trimmer to cut the strips for the staff lines. I used a circle cutter to cut the photos into circles. Both of these you could do without tools, just free hand! A glue stick, a scrapbook marker pen and a letter stencil - again, you could do free hand.