What Is A Moving Tag?
I created Moving Tags to accommodate smaller photos. These "smaller photos" I am talking about are "photos" that are cut from a regular size photograph, but just a smaller part of the main photo that I wanted to capture, not any background. Multiple tags are punched and stacked together to spin individually
When my son graduated from the police academy, it was a time in his life that he had been dreaming of since he was in the 4th grade. He even wrote an essay in the 4th grade about what he wanted to be when he grew up and he wrote "be a cop". And he was able to make his dream come true. Of course I put that essay on his layout! But back to the tags. He was so proud of what he had accomplished. And what mother wouldn't want to remember her son on the most wonderful day of his life....at least to that point in his life! And that is what I wanted to capture on this scrapbook layout for myself.
Since I was in "tag" mode, I used my tag punches to punch out the his face-only. Tag punches come in all sizes - small to gargantuan! Take your pick! You can do this technique with as many photos you want. Of course you could also use a circle, square or heart punch. You can use any style of punch as long as it has a large middle area for the face or other image you are working with.
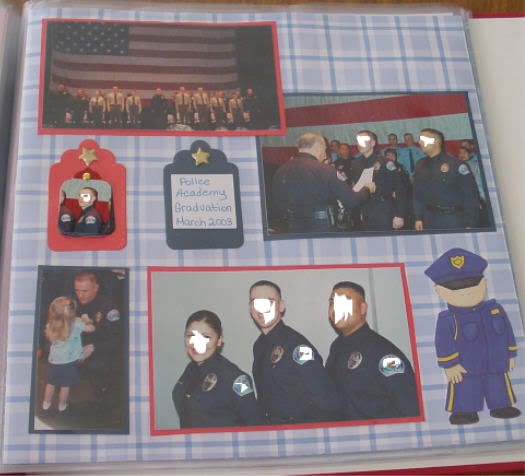

I took 4 close-up photos of my son's face, showing his pride and commitment and used a tag punch to punch out just his face. I put a hole at the top of each tag with a hole punch and stacked them together, securing them with a round brad so that they can be turned/rotated individually. From his point-blank face while being sworn in, to his huge smile once he realized it was for real - it's all there!
To make the stack of tags accommodate a page protector, just slide the layout into the page protector BEFORE securing the rotating tag photos to the red tag base. Once the layout is in the page protector, mark on the plastic where the hole needs to be to for the tags to be centered on top of the red tag base. Using the brad itself, I wiggled a hole into the plastic. Then put the brad through the stack of photo tags and then through the hole in the plastic page protector and through the background paper. Pull the prongs apart on the back of the background page and there you have it! A wonderful, interactive addition to your scrapbook layout page preserving some most amazing memories!


4 comments:
Nice layout! Am I understanding correctly...in the 'moving' tag the 4 photos are OUTSIDE the page protector?
Yes, the 4 "moving tags" are on the outside of the page protector. I'm not to concerned with them not being "protected" as the opposite page is a page protector so they are touching the plastic on both sides so when the album in closed they are protected on both sides.
This is a great idea, and a fantastic site. i've just gone through every one of the archived months and there are heaps of wonderful ideas in here. Well done :)
Amanda
Thankyou! This is one of my favorite ways to use lots of photos on a layout! ANd it is fun!
Post a Comment