I found a site that is all about military themed scrapbooking! I took a look at it has a good selection of all themed papers and embellishments. Looks like a great site if you need military themed cardstock and scrapbook supplies. This site has some freebies you might be interested in too.
Creating Military Memories
This site has free Military printables to help Military whether their Military Love Ones are stationed here or away. For example many of the free military cards are in jpg image format which can be opened in any in any image editor and personalized before printing. Featured free military printables offers are Military Guardian Angel for printable stationery and cards, Yellow Ribbon Candy Wrappers.
Military free printables
Both sites are also great for passing on to those that have military friends and family but don't scrapbook! Cards, stationery and other things that have nothing to do with scrapping, but will be a welcomed by loved ones.
God Bless Our Troops
Tuesday, February 27, 2007
Thursday, February 22, 2007
Before and After, Ears and Years and Time Travel!
One of my favorite themes to scrapbook is a "then and now" theme. I have lots of "extra" photos of when my kids were little and can't bear to throw them away. I have found that this style of scrapbooking a layout is just perfect. Uses up the extra photos, but more importantly, creates even more memories and wonderful feelings for everyone!
Also, are you behind? Well, that is a common place to be in scrapbooking, so don't be hard on yourself! This style of scrapbooking is absolutely fantastic way to get caught up while you create and preserve memories for all involved!
Also, are you behind? Well, that is a common place to be in scrapbooking, so don't be hard on yourself! This style of scrapbooking is absolutely fantastic way to get caught up while you create and preserve memories for all involved!
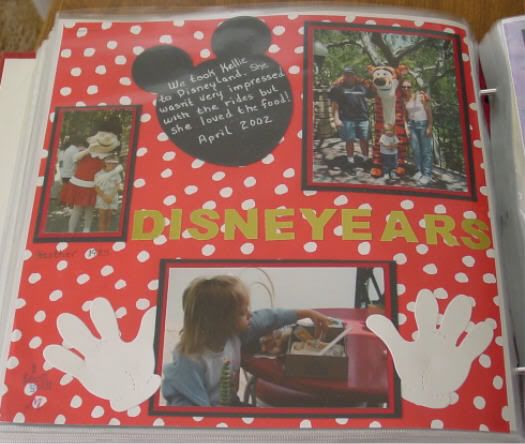
In this layout I used shiney, gold paper and my letter punch and punched out the letters for the title. My intention was to have "Disney Years" because the layout is of my grand daughter's first trip to Disneyland when she was about 3 years old. I also had extra photos of when her mother (my daughter) was at Disneyland when she was little. I wanted to incorporate both girls at the same place, at similar ages, but in different times! Move over time travel! Then and now, before and after! Oh, the memories!
The Perfect Title
I didn't notice it until I layed the letters out, that I was short a Y. But, there before my eyes, was the perfect title! Disneyears! Why? What is the first thing you think of when you think Disneyland? Mickey Mouse and of course, his EARS! And what is the point I am trying to convey? YEARS of time span between mother and daughter doing the same thing! Ears and years, take away a Y and you have it - Disneyears! It was perfect!
Do You See Mickey Mouse and Minnie Mouse? Look Closely!
Well, you won't find them in the photos, but since you just can't have a Disneyland scrapbook layout without these two entities, I included them......
in theory!
The background paper I used was a red with white dots... which is what? Minnie Mouse's dress pattern! I double matted the photos with red and black cardstock which is .... Mickey Mouse's colors! I used a black die cut of a Mickey Mouse head and used white gel pen for the journaling. I also found Mickey's white-gloved "hands" die cuts and used those to kind of "hold" one of the photos as often Mickey Mouse is holding his hands out to welcome you to his kingdom.
This layout started with a mistake. Had I not made a simple mistake, it probably would have just been your usual "Trip to Disneyland" layout. But thanks to that mistake, the memories are of Disneyland with my daughter - about 20 years ago, Disneyland with my grand daughter about 3 years ago and once that far, I can't help but remember my amazing trips to Disneyland when I was a kid - 30 years ago! Wow! Talk about time travel!!
Sunday, February 11, 2007
Look "Outside the Box" for Scrapbook Memories
There is so much available in the scrapbooking world these days, that it seems there is no limit. There is something for every event, theme, happening, time, era, person, place, thing and then some. Scrapbooking is all about using different items to preserve a memory. And you have those items! You don't always have to get your embellishments at a store!
Some memories are so personal and deeply felt, that a purchased embellishment and a photo, just don't convey the memory. So what do you do? All you have to do is look "outside of the box". You have things you could use, you just don't know it as you don't think "scrapbooking" when you look at them.
The Title is a Memory Too!
Some memories are so personal and deeply felt, that a purchased embellishment and a photo, just don't convey the memory. So what do you do? All you have to do is look "outside of the box". You have things you could use, you just don't know it as you don't think "scrapbooking" when you look at them.
The Baby T-Shirt
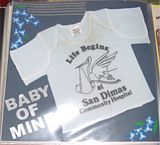
This is a scrapbook layout that is very dear to me. It is the t-shirt my son got in the hospital when he was born. Because it is the actual shirt he wore is a memory in itself - "my little boy, who is now 24, wore that shirt!" This is a memory a photo couldn't give. It also reminds me of how small he was and how I loved to hold him and rock him to sleep. The T-shirt is a tiny little thing, fits perfectly on a 12x12 scrapbook layout page! A black background page, the shirt, a title and a few stickers. Quick and easy, but holds the most precious memories for me. (the glare is from the camera flash)

Now, back in the "old-days", baby formula stained. Hard as I tried, I couldn't get that stain out. However, now that I am day-caring HIS baby girl, I notice how far things have come - baby formula no longer stains! A new memory created - cheesey, but a memory nevertheless! I adhered the t-shirt to the back ground cardstock with the photo adhesive squares. Some on the back of the shirt and some on the inside to hold the two layers together. Once in a page protector, there is no sliding. Everything is secure and protected.
The title is also quite a memory. "Baby of Mine" is the name of a song in the Disney movie, "Dumbo" - the song that Mrs. Jumbo sang to her baby, Dumbo. This movie was my son's most favorite movie when he was in pre-school and kindergarten. MANY mornings I couldn't get him out of bed unless I turned this movie on. Once he heard the movie, he was up and ready to go! I use metallic silver scrapbooking paper and a letter punch to make the letters. You could use any alphabet template if you don't have a punch system.
Other Embellishments
This layout is quick and easy. The only other embellishments I used were some color matching, floral stickers and some thin strips of the silver metallic paper, which I cut using a paper trimmer. It just needed a little "something" extra to compliment the layout since the t-shirt was so large and filled the layout page.
So take a look around at what you have. Memories are everywhere. There is more to scrapping than what's in the stores! Just think "Scrapbook" as you look around and see what memories you can find!
Sunday, February 04, 2007
How To Basket Weave Your Scrapbook Layout!
Basket weaving is not just for baskets! What a fantastic and unusual embellishment for your scrapbook layout! It adds color, depth and dimension and just brings the page layout all together. And if you want to use it for the upcoming Easter theme layouts - how perfect is that going to be!!!
"Catching Balloons"
I was making the layout for my grand daughter's memory album. She was at a wedding shower and she was amazed at the balloons and enjoyed reaching up to grab the strings and then hand them out to the guests. That is what I wanted her to remember. This is a 12x12 layout page
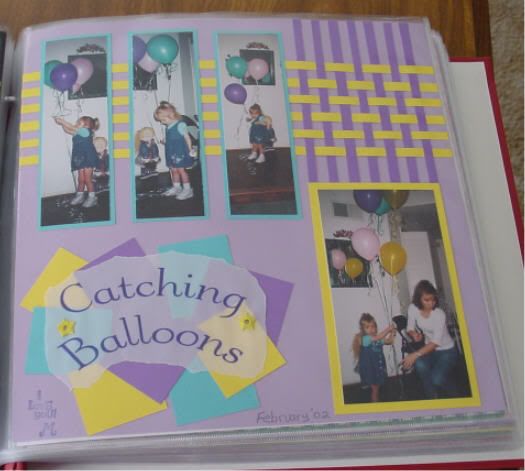
This is not has hard as it might seem. All you need is a paper cutter and some glue. Choose your colors for the entire layout. Choose which 2 colors you want for the basket weave. I choose purple and yellow. I cut strips from12x12 cardstock at about 1/4" in thick, making 12x1/4" strips. I started with the yellow strips and layed them across the top, with equal spacing between them for the purple ones to slide through. I glued them down to the cardstock back ground paper only as far over until I wanted the weaving to start. This makes for easy weaving. The ends are glued down so they don't move while you weave. Photos on top of the strips break up the weaving a bit so it doesn't get overwhelming.
Next, I weaved the purple strips in through the yellow ones. My weave area size guide was the photo at the bottom. Notice I made the purple strips portion of the weave only as wide as that photo at the bottom. The weave area of the yellow strips was just slightly less that the height of the pictures. It looked "over done" to have them the same "size" as the height of the photos. This is something you have to do and consider for your self. Since you aren't glueing anything yet, you can easily play around and find that perfect fit for your layout. The photos kind of hide the ends of the strips and tie the weave all together.
Once you have the weave the way you like, just add glue in a few places inside the weaved area and then glue down all the ends of the strips. Sounds more complicated and time consuming but it really is quick and easy. Hardest part is probably deciding how much area you want to cover with the weave.
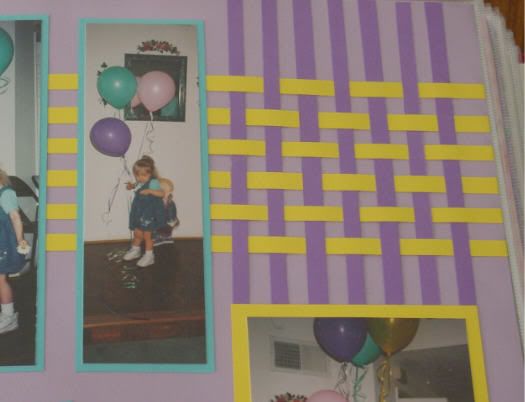
In addition, I cut 3 photos of just the toddler catching or holding the balloons and cut them into thinner sizes - these are about 2 inches wide, 4 inches long. I matted them on contrasting cardstock and layed them over the yellow basket weave strips. The last photo, I cropped it to match the purple strip area size.
To Compliment the Basket Weave Area
Now you have an open space in the lower left corner of the scrapbook page. This is where I wanted my title to go. I didn't want to use more basket weaving as that would have been to much. So I just took small pieces of the cardstock I had used and with a 2 inch square punch, I punched out squares, and just layed them out into a nice catchy sploch of color. I used vellum and printed the title "Catching Balloons" via computer. Then I tore the vellum into a nice odd shape and laid it over the colored squares. I used yellow eyelets to hold the vellum in place. Again, quick and easy.

This scrapbook layout has no journaling. It "shows" that my grand daughter liked catching the balloons and other than that, there was nothing else to say. The title tells the action and the photos tell the story. I always "signed" my scrapbook layouts with a stamp that said "I Love You" and my initial (N for Nanny to my GD or M for mom for my kids) I always used gold ink for the stamping of my signature. Just that extra added feature that holds on to a wonderful memory!
Subscribe to:
Posts (Atom)


