Some things that you do, you can use that same idea in your layout. I used to take my grand daughter to "Storybook Time" at the book store on Tuesday nights. She loved it! So, when I made the layout for that special time, I made a "story book" to go on the layout and put the journaling inside the story book! Turned out really cute and now - 4 years later - she looks at that layout and loves opening that little story book! And she even remembers going to "Storybook Time"! It is a favorite memory of hers!
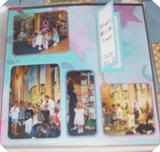
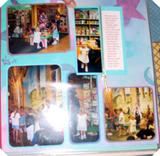
This layout is on a pattern paper - big pastel stars - kind of like having the "You're a Star" theme. I did not matte the photos, just cut them all different sizes.
To make the "book", I just cut a piece of card stock to the size I wanted and then folded it in half. With white cardstock, I cut it just smaller than the cover of the "book" and glued it to the front cover. I used colorful letter stickers to create the title "Story Book Time" and the date. I cut a photo the same size as the inside cover and adhered it with adhesive squares.
For the journaling side, I typed out my journaling on the computer, did it in a red and whimsey font. I did some measuring so that it would only print a few words per line so that it would be long and narrow like the book, then glued it to the back of the "book".
For the "bookmark" tassel: I took a few strands of embroidery floss, braided them and made tassels at the ends. The unfinished end, I folded over and glued it to the back of the book then glued the whole book to the background paper.
Tip: make the fold of the book kind of wide, so that it lays flat once the bookmark is in there - using a embossing stylis tool, use the wide ball end instead of the small ball end.
Computer, embroidery floss, embossing stylis to make folding line, glue stick, adhesive squares,corner rounder, card stock
So again, except for a bit of computer time, this layout is quick, easy and inexpensive!


2 comments:
I am new at scrapbooking and am wondering how you use the embossed paper. I have oodles of it. Do you glue it to card stock?
Also what do you use the embossing stylist to do?
Your idea's are great. Also what kind of paper do you use for the journaling?
Embossed paper: I don't think i have ever used embossed paper, if we are talking about the same thing. Paper with a design raised on the paper? But depending on what style it is - card stock can be embossed, you could use glue. If it is a thinner paper like vellum, you'd want to use something other than glue as you could see the glue through the paper. Use coordinating stickers to adhere it to the background page. You could use it for background page, make die cuts or letters with it. Use it for borders or with punches. Probably most anything you do with cardstock, although I think that using it to matte would not be a good idea as the embossing makes for an uneven backing to the photo and the ridges of the embossing would make imprints on your photos.
I don't do embossing. I only use the stylist tool to make folds in paper.
Paper for journaling: cardstock and vellum. And if using your own handwritting, I use the acid free, archival gel pens and markers. I get them on sale for 88¢ quite often
Post a Comment